02-010-1 Accounts Receivable #1 - Core Processes
Overview
The Accounts Receivable module controls all aspects of the customer’s account whether they have credit privileges or not.
Customer File
Creating a new customer record
1. Select AR from the TransActPOS Main Menu
2. Select Customer File
3. Select F4 or Click in the F4 - New Customer button
4. At the Use the Wizard for new customer prompt, select Yes
5. Within the Customer Information screen, enter the available information, and select Next
-
The system will create the Customer ID from the available information within the Company or First/Last name fields. The Customer ID may be changed at any time.6. Complete the Address Information screen and then select Next7. Complete the Phone, Fax, and Email screen and then select Next
-
At this point, selecting Save instead of Next will immediately complete the remaining screen prompts utilizing the default values established within System > Company Setup > Accounts Receivable 1.
-
Complete the Sales Tax screen and then select Next
-
Complete the Terms Information screen and then select Next
-
Complete the Settings Information screen and then select Next
-
Complete the Comment information screen and then select Next
-
Complete the Customer Notes screen and then select Next
-
Select Save
Main Tab
The main tab of the customer file displays the customer’s name, phone numbers, and mailing address. At the top right of the page there are checkboxes which control how the account may be used.
-
No Account Charge - Purchases can not be charged to an in-house account
-
No Payments - Prevents payments from being taken
-
No Rental - Customer is not permitted to rent
Sales Info Tab
The Sales Info tab displays sales and account balance information, Pay Out Credits to Customers. Note: there are two balances.
Last Statement Balance - this balance will remain the same until statements are generated
Current Balance - this balance includes any purchase on accounts, credits to the account as well as payments on the account
How to Pay Out a Credit to a Customer
This is also the only place where a credit balance can be paid out to a customer. This is done using the Pay Out to Customer Button.
1. Click on the Pay Out to Customer Button.
2. Enter the amount to pay out.
3. Select the payment method that will be used to pay the dollar amount to the customer. (Cash, Company Check, Non-Cash, Gift Card, Etc.)
4. After completion of the transaction a receipt will be printed.
Accounting Tab
Track Authorized Purchasers
If the customer would like to limit the allowed purchasers on the account when an account charge is created, do the following:
Turn on the feature within the customer's file.
1. Select AR > Customer File > Search for, enter the customer information
2. Select the Accounting tab
3. Select the Edit button at the bottom of the screen.
4. Within the Purchaser, select the radio button control for Authorized (Account Charge Authorized Only)
5. Select Save
Enter the allowed purchasers
1. Select Contacts located on the right side of the Customer Information 1 screen
2. Select New to add a new contact or locate an existing contact and select Edit
3. Complete the contact information screen and check the Purchase Authorized option
4. Select OK, select Close
Email to multiple recipients
The Authorized Contact(s) may be selected to receive copies of the invoices and statements in addition to the contact cited within the Customer Information: 1 > Email field. Within the Contact > Properties screen, check the Email Invoice and/or Email Statement to include the current contact within the email activities.
Jobs
The Customer Jobs feature provides an organizational tool for the individual customer account. Upon selecting a customer within point of sale, quotes, sales orders, service tickets or rental contracts, a customer job may be selected or added to the customer account.
-
The Job assignment to an invoice can be corrected within the POS > Manager Screen > Edit Header option.
-
During payments on account, the system will filter to the selected job during the posting process.
-
Within Customer File > Accounting > Jobs, the system can report the profitability and the total of materials by SKU billed to the customer job.
-
Jobs may contain contacts which have the option of emailing invoices and / or statements.
If the customer would like to require jobs to be assigned to invoices or credits, do the following:
Turn on the feature within the customer's file
1. Locate the customer within the Customer File
2. Select the Accounting Tab
3. Select Edit at the bottom of the screen
4. Select the Use Jobs checkbox
5. Select Save
How to Create Jobs in the Customer file
1. Select the Jobs button
2. Select the New button
3. Enter the Job Name
1. Note: The Sales Tax option defaults to the customer's tax status. Change the Sales Tax status, if required, to that of the selected job.
2. The job can be assigned a default Purchase Order Number, a related Tax Number with an expiration date, and a Job Specific Credit Limit.
4. Check the Active check box at the top right to turn on the job availability during transactions.
How to Create Jobs “On the Fly”
Note: This can be done at the point of sale, quote and sales order creation, service tickets, or rental contracts upon selecting the customer’s account.
1. When you are presented with the Job selection window, a New Job can be added to the list by Typing the Name of the new job in the Job Name field on the right side of the screen.
2. Other job information can be added at this time, such as the address, PO number, tax number, and credit limit.
3. After clicking the Select button at the bottom the system will prompt you to Add the New Job to the list and also select it for use.
Note: If the customer is making a purchase for themselves the Cancel button can be pressed to charge directly to the account without an associated job.
Settings Tab
Within the Settings Tab the customer’s pricing scheme and statement type can be set. There are also options to control how payments and credits may be applied, whether invoices will be printed or emailed, and whether the customer’s statement will be printed or emailed. A complete document on TransActPOS pricing can be found in the 04-010-3 Inventory Control Pricing Training #3.
Reports Tab
The Reports Tab provides access to account specific reports. Some of these reports are also available under AR>Reports, but when they are run from the Customer File they will be filtered to the selected customer by default.
Sales Report
The Sale Report allows you to view sales activity for the customer. The report can list sales within a date range in a summarized form, or in great detail.
Invoices Report
With the Invoices report you can list all of a customer’s invoices within a date range. Clicking on the green invoice number allows you to view the invoice in a new report viewer tab, we call this feature a “Drill down”.
Open Invoices
The Open Invoices report will display all the invoices on the account that have not been paid in-full.
Ledger
The Ledger will list all invoices, credits, and payments that have been made on the account since the provided starting date.
AR Processes
Posting a payment on account
1. Select POS or AR
2. Select Payments
3. Select Pay on Account
4. Locate the customer
5. Select Accept to continue with the selected customer
6. Into the Enter Amount to Apply to Account field, provide the total payment amount that is to be collected. This will be the amount of payment received independent of the payment type (s).
7. Select Next
8. Choose the appropriate method of payment. Though the system does support multiple payment methods, typically, a single payment method is likely during payments on account.
9. Enter the Amount Tendered
10. Select Accept
The Payment on Account screen provides three distinct payment posting processes:
Complete
1. Selecting Complete, the payment on account distribution begins at the oldest invoice(s), applies the payment, and then continues down the list of invoices. When the payment is entirely distributed, the system automatically prints the receipt.
2. If Open Credits are present, the system will prompt the user to apply the credits at this time, if desired. Depending upon the individual account, circumstances will determine if the credit should be used at this time.
Automatic
1. Selecting Automatic, the system will automatically post the payments to the oldest invoice(s) and then prompts the user to Post Payments, View Paid, or Cancel Posting. When the user selects Post Payments, the system will then prompt the user to print a receipt or not. Select the appropriate response.
2. If Open Credits are present, the system will prompt the user to apply for the credits at this time, if desired. Depending upon the individual account, circumstances will determine if the credit should be used at this time.
Manual
1. Selecting Manual, the system will position the user's cursor on the Payment column waiting for the user to enter the payment amount to apply to the current invoice. Right-clicking in this field will post the current balance or the remaining payment amount.
2. The Pay Disc column allows the user to enter a payment discount amount to credit the invoice to the indicated account. Note: The Payment Discount Account Field above can direct the payment discount to a different debiting account.
3. Once the payments and discounts have been applied, selecting Post Payments will complete the posting process. The system will then prompt the user to print a receipt or not. Select the appropriate response.
4. If the Payment Balance is not zero, the system will automatically create a payment credit to balance the account.
Notes:
-
When an invoice is partially paid the line will turn yellow to indicate that it is not paid in full. When the invoice is paid in full the line will become green.
-
Invoice list can be filtered to show only invoices for a particular job. Clicking the Select Job button will allow you to do this. If the list is already filtered by a job, clicking the green button containing the job name will allow you to select a different job. To reveal all invoices, click the Cancel button on the Job screen.
Reversing a Payment
The Reserving of a Payment applies to payments posted within the Payment on Account process.
1. Select AR
2. Select Reverse Payment
3. Select Customer
4. Enter the Beginning Payment Date
5. Select Find Payment
6. Select the Payment to Reverse from the listing of payments for the filtered date
7. Select Reverse Payment
Notes:
-
If you are not sure of the Payment Date, go to AR > Customer File > Reports > Payments > Generate > Preview to view a listing of payments in inverse order; the most recent amount will be at the top of the list.
-
The Payment Reversal backs out the payment posting and any payment discount activity made during the original payment.
-
The Payment Reversal requires an open shift.
-
The Payment Reversal makes reversal a Cash reversal. It is assumed that a reposting of the payment will occur to repost the Cash payment for the same amount but this time within a different payment distribution or a different customer. The net cash activity of the reversal and reposting will be zero.
Applying a credit
Credits can be applied using two different processes. To work with a single customer account at a time use AR | Apply Credit. To see the credits for all customers and apply credits across multiple accounts use the AR Aging report.
Apply Credit Using the AR Aging Report
1. Navigate to AR > Reports > Aging Report. Check “Show Credits Only”. To see only credits that were created from account payments check the “Payment Credits Only” box.
2. Click Generate, then click Preview. Running this report will present you with a list of all Open Credits, grouped by customer.
3. Find a credit you’d like to apply and click the green Invoice Number text to open the Invoice Summary in a new report viewer tab.
4. Click the green Apply Credit button at the top right of the report to open the Apply Credit screen.
5. Select between the two available posting types:
1. Automatic
1. Selecting Automatic, the system will automatically post the Credits to the oldest invoice(s) and then prompts the user to Post Credit, View Posted, or Cancel Posting.
2. Manual
1. Selecting Manual, the Apply Credit detail screen requires the user to type in the amount of credit within the Applied column. The Pay Disc (Payment Discount) column allows the applicable payment discount to the invoice.
2. The Credit Discount Account may be redirected by selecting an alternate account for the credit to be posted.
6. Upon selecting Post Credit, the system will complete the posting process and will return to the Invoice Summary.
7. Click back to the Main Report tab in the report viewer to select your next credit to apply.
Apply Credit Using AR | Apply Credit
1. Select AR
2. Select Apply Credit
3. Locate the customer
4. Select Accept to continue with the selected customer
5. Select the credit from the Select Credit screen to be distributed to the existing invoice(s). Click on the desired credit line and then select Post Credit.
1. The Type field indicates either a CR (Invoice Credit) or CP (Payment Credit).
2. The credit is Job aware and will try to apply the credit to an invoice within the related job. The system will allow the user to assign the credit to an unrelated job. A proper notification has been given, so proceed as needed.
6. Select between the two available posting types:
1. Automatic
1. Selecting Automatic, the system will automatically post the Credits to the oldest invoice(s) and then prompts the user to Post Credit, View Posted, or Cancel Posting.
2. Manual
1. Selecting Manual, the Apply Credit detail screen requires the user to type in the amount of credit within the Applied column. The Pay Disc (Payment Discount) column allows the applicable payment discount to the invoice.
2. The Credit Discount Account may be redirected by selecting an alternate account for the credit to be posted.
When the user selects Post Credit, the system will complete the posting process. If additional credit(s) to apply are available, the system will list the credit and allow the user to select the credit and repeat the process.
7. Upon selecting Post Credit, the system returns to the main menu.
Reversing a Credit Posting
The Reverse Credit App, designed much like the above Reverse Payment feature, allows the user to select the historic transaction to reverse.
1. Select AR
2. Select Reverse Credit App
3. Select Customer
4. Enter the date on which the credit was applied to the account
5. Select Find Credit
6. Select the Credit Application to Reverse from the listing of credits for the filtered date
7. Select Reverse Credit
-
The Reverse Credit App un-applies a prior credit application to selected invoices and reverses and Payment Discount adjustments applied.
-
The Reverse Credit App. requires an open shift.
Customer Statements
The individual customer records control the type of statement, whether the invoice details are included, and the document's delivery method. These controls are found in the AR> Customer File > Settings tab. Once completed, a copy of the statement is available within AR > Customer File > Reports > View Statement and AR > Reports > Statements.
The statement process consists of two processes: Finance Charge generation and creating the Customer Statement. Let’s first review the available controls for each of the processes.
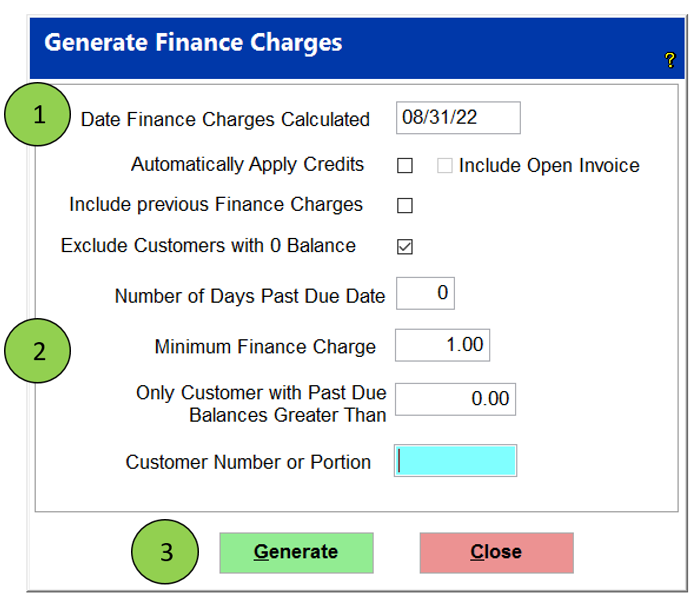
Finance Charge Controls
Definition of available fields within the Finance Charge function.
|
Date Finance Charge Calculated
|
The date that the charges will be calculated for. Can be used to calculate finance charges in previous months or to back up the calculation to take care of holidays or weekends for the current period.
|
|
Automatically Apply Credits
|
Checking this box will automatically apply credits when you generate finance charges. This does not apply to customers flagged with: "No Automatic Apply", "Use Jobs", or "Revolving Account"
|
|
Include previous Finance Charges
|
Check this box if you want to include previous finance charges in the calculation amount.
|
|
Exclude Customers with 0 Balance
|
Checking this option will omit customers with 0 balance from the statement. A customer with a zero balance can still receive a statement if they have invoices and unapplied credits which net to zero.
|
|
Number of Days Past Due Date
|
Enter the number of days past due before a finance charge will be created. This is a grace period.
|
|
Minimum Finance Charge
|
Enter the minimum dollar amount a customer will be charged for a finance charge.
|
|
Only Customers with Past Due Balances Greater Than
|
Entering an amount here will only display customers with a past due balance greater than the amount entered.
|
|
Customer Number or Portion
|
Entering a customer number here will run the process for only that customer. Entering the first portion of a customer number will process all accounts that match those leading digits. Leaving the field blank will evaluate all accounts based upon the previous filters.
|
The Finance Charge rate is established from the default settings found within the System > Company Setup > Accounts Receivable 1 > New Customer Defaults section. Once established, the rate is changed per customer basis within AR > Customer File Accounting > Finance Charge %.
Finance Charge Generation
1. Select AR
2. Select Finance Charge
3. Enter the date upon which the finance charge will be created.
4. Enter the Minimum Finance Charge value. Typically, $1.00
5. Select Generate
1. If the date entered to calculate the finance charge is the same as today, the system wants you to confirm that it is the end of the business day. The point is that creating a finance charge in the middle of the day can be a bit confusing for the customer when reconciling an account.
6. The system will present the Finance Charges Preview screen, which allows the user to uncheck the anticipated charge for the customer, so the charge is not created.
7. Select Continue to create the Finance Charges.
8. Select Yes to confirm the creation of the finance charges.
9. The system does print nor email any of the finance charge invoices.
10. Use the Sales By Class report to view finance charges. They will be listed under the “Finance Charge” class.
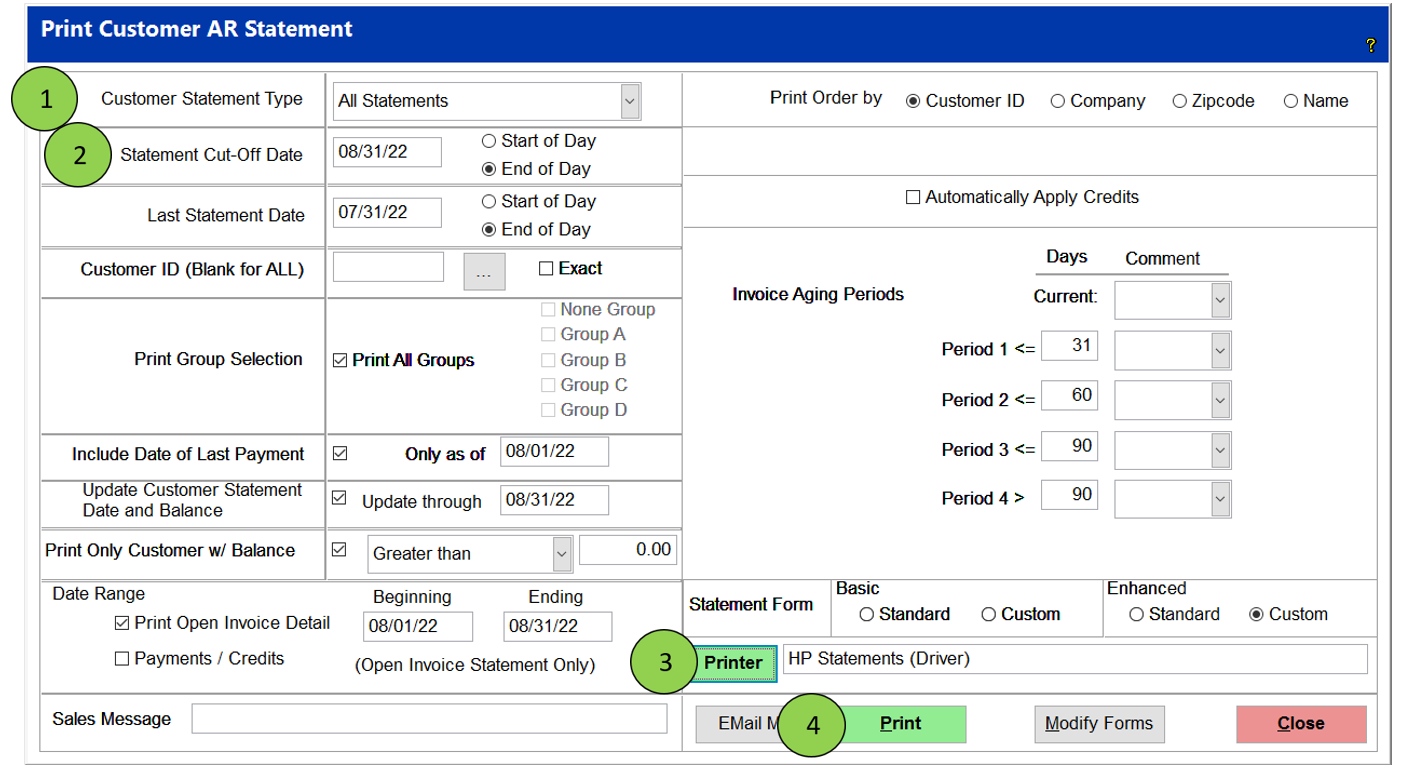
Print Statement Controls
Definition of available fields within the Print Statement function.
|
Customer Statement Types:
|
Typically, the All Statements is the appropriate option to select. This option prints or emails the customer’s selected statement format.
|
|
Statement Cut-Off Date
|
The last date of invoices that will be included in the statement.
|
|
Last Statement Date
|
The date of the last statement run.
|
|
Customer ID
|
The customer ID of the customer whose statement will be generated. Leaving this blank included all customers.
|
|
Print Group Selection
|
Specific customer statement groups can be filtered during the statement run. The Printer Group is assigned within AR > Customer File > Settings > Print Group.
|
|
Include Date of Last Payment
|
Check this box if the date of recording of payments might be different from the date of the statement. This is typically the first date of the date range that you are running the statements.
|
|
Update Customer Statement Date and Balance
|
For all Open Invoice statements and Current Balance Forward statements, check this box to update the customer's record of statements printed. Do not check the box for a reprint of a customer's statement.
|
|
Print only Customer w/ Balance
|
Checking this box will allow the printing of statements with a balance "Greater than" the entered amount. The "Greater/Less than" option will also print statements that may have a positive or negative balance. For example, if you want to print the statement for the customers that have a credit balance, you would use this option.
|
|
Print Open Invoice Detail
|
For Open Invoice statements, the invoice detail may be limited to a specified date range.
|
|
Payments/Credits
|
Includes the payments and credits for the specified date range.
|
|
Sales Message
|
Enter a message to be printed on the selected customer statements.
|
|
Print Order by
|
The order in which statements will be printed.
|
|
Automatically Apply Credits
|
Checking this box will automatically apply credits before generating statements. This does not apply to customers flagged with: "No Automatic Apply", "Use Jobs", or "Revolving Account"
|
Print Statement Process
1. Select AR
2. Select Print Statement
3. Select All Statements within the Customer Statement Type field. The system will select the appropriate statement format and the method of delivery indicated within the AR > Customer File > Settings screen
4. Enter the desired Statement Cut-Off Date. Typically, this is the last day of the month or if you are running statements through the 25th of the month, then it will be the 25th.
5. Select the parameters of the fields as defined above
6. Select the destination Printer to print the statements. The selected printer must have the word "statement" to verify that the appropriate printer with the desired configuration is utilized.
7. Select Print to begin the statement process.
-
TransActPOS installations that have the TransActPOS Email Server configured and installed, the system will automatically print or email the statement in the desired format to the customer.
Combining Customers
1. Select AR
2. Select Utilities
3. Select Combine Customers
4. Select the Find button within the Find Customer to Keep and locate the appropriate customer
5. Select the Find button within the Find Customer to Combine and locate the customer that will be combined into the Keep Customer.
6. Select Combine to invoke the combine process.
The combining process transfers all transactional information into the customer account, including invoice details, quotes, sales orders, rental contracts, and service tickets if the modular data is present within the system.
Common Accounts Receivable Reports
Aging Report
The Aging Report presents the current customer balances with drill-down capabilities into the retail of the transactions. This report can also be used to show and apply all of a customer’s credits and payment credits.
Print Invoice
The Print Invoice allows the user to reprint the customer's invoice upon request. They can reprint based on a particular invoice number or by a range of customer invoices.
Invoice List
The store management commonly reviews the Invoice List to quickly reconcile the historical sales and the current margins on the right side of the report.
Sales Tax
The Sale Tax report may be run for any date range providing a total taxable and non-taxable sales supporting non-tax exemptions. This report provides the necessary details for submitting your Sales and Use tax reports to the representative state. The sales tax structure is maintained within System > Support Files > Sales Tax.
Sales by Class
The Sales by Class report presents the summarized total sales for the indicated date range. Hyperlinks within the report provide access to the item’s current class selection. If the class of the item is changed, rerunning the report will present the historic sales within the current assigned class.
Applied Payments
The applied Payments report allows you to see how account payments have been distributed amongst the customer’s invoices. If a payment was reversed then there will be a letter “R” after the payment amount to indicate the reversal.
Applied Credits
Much like the Applied Payments report, the Applied Credits report will show you how a credit has been distributed amongst the customer’s invoices. If a credit was reversed then there will be a letter “R” after the payment amount to indicate the reversal.