04-010-1 Inventory Control Training #1 - Vendors and Ecatlog Primer

Overview
The TransActPOS Vendor file is the repository for all of the vendors and the information about each vendor.
The TransActPOS Electronic Catalog is the repository for vendor catalogs of available products, automatically referenced to added items to the inventory from various applications depending upon your system's configuration.
The TransActPOS Electronic Catalog is capable of storing over a million records of vendor inventory information. Approximately 50 different vendor catalog formats are built-in and available for no additional cost. In addition, a spreadsheet import utility allows you to map data to the electronic catalog structure, thus allowing you access to unlimited sources of columnar data (CSV and Excel Spreadsheets).
In the Inventory Control module, you can search the catalogs on your system for item information from the vendors. Upon locating the item, selecting the Add button enters the item into your store's inventory.
Additional uses of the electronic catalog include referencing the replacement cost during creating a purchase order and updating your inventory's retail price with the vendor/manufacturer's revised retail price.
Inventory Training - Training #1
There are 2 buttons that we are going to review in Inventory Training Session 1. These buttons are located under the IC (Inventory Control) button on the main menu and are as follows:
-
Vendor File.
-
Electronic Catalog File.
In Training # 1, we are going to focus on the Vendor File and the Electronic Catalog.
Vendor File
In our training of the vendor file we will look at the following:
-
Define what a vendor means.
-
Look at the screens/tabs in the vendor file.
-
Learn how to add a new vendor to the file.
-
Learn how to find a vendor in the vendor file.
Definition of a Vendor
Vendors are the people, businesses, manufacturers and service providers that the store purchases products or services from that they are going to sell in the store.
This can include the local mom and pop business that the store purchases something from, Sam’s Club or Wal-Mart to the big companies (co-ops) such as Do It Best or True Value.
Note: A vendor must be added to the vendor file before you can load an electronic catalog into the system or before you can create any purchase orders.
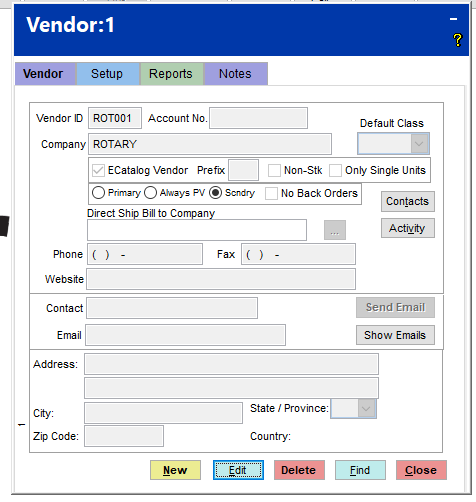
Fields in the Vendor File
-
Vendor ID field. This can be up to 6 characters and one can use either letters or numbers.
-
Account number field. A free-form field that one can enter a number into, but we suggest that one can use the account number that is on their invoice.
-
Name of the company (Vendor) field. This is the name of the Vendor Company
-
Default Class field. If the items from the vendor all fall into 1 class (department), one can select that class. This is useful when the vendor has an electronic catalog. When one adds a new item from the electronic catalog into their inventory file, the system will also add the selected Default Class.
-
ECatalog Vendor option. If the vendor has an electronic catalog that can be imported into the electronic area, the user must check the Ecatalog Vendor box.
-
Prefix Option. When adding an item from the electronic catalog to the inventory file and there is a possibility of duplicate numbers from different vendors being added into the inventory file, one can choose to have a prefix inserted for those items. Example: Hillman items…if the number 123456 is the same for another vendor, once can choose a prefix such as HI or H and then when the number gets added to the inventory file it will show as HI123456.
-
Non-Stk Option. If one wants an item to be added to the electronic catalog as a non-stock item, then they would check the Non-Stock check box. A non-stock item does not have a fixed cost and the store will not track the on hand quantity of the item. Labor is an example of a non-stock item.
-
Only Single Units Option - Items entered from the electronic catalog are added as ONLY single units. The “No Price” box will be automatically checked for stock units where alternate units are present.
-
Primary Option. When this is selected, this will indicate that the vendor will be the Primary Vendor
-
Always PV Option. When this is selected, this will indicate that the vendor will Always be the Primary Vendor
-
Secondary Option. When this is selected, this will indicate that the vendor will be the Secondary Vendor
-
No Back Orders Option. If one is not set up with their vendor to receive backorders from their vendor, then they should check the No Back Orders checkbox. This means that if the vendor does not have the item, then the store will have to reorder it as they will not automatically ship it to the store when they get it in.
-
Direct Ship Bill to Company field. If one orders from say for example Sherwin Williams, but the bill comes through Do It Best, then this is where one would put in Do It Best. In this case, the Vendor Id must be the manufacturer # for that company. You can find this number by going to the ecatalog of for example DIB and finding a product that you can get from Sherwin Williams and Do It Best and on page 1, you will find the manufacturer number.
-
Phone field. One can enter the Vendor Phone number.
-
Fax field. One can enter in the Vendor Fax Phone number.
-
Address field for the vendor. One can enter the Address for the vendor in the Address fields
-
City field. One can enter the City for the vendor in the City field.
-
State field. One can enter the State for the vendor in the State field.
-
Zip Code field. One can enter the Zip Code for the vendor in the Zip Code field.
-
Vendor website field. One can enter the Vendor Website in the Vendor Website field.
-
Contact field. One can enter the Vendor Contact Information in the Contact field.
-
Email information field. One can enter the Vendor Email Address in the Email Information field.
-
Contacts Button. One can enter additional Vendor Contacts under the Contacts Button
-
Activity Button. One can keep track of any Vendor Activity under the Activity Button just like the Activity button in the Customer file
-
New button. YOne can add new vendors by clicking the New button. Instructions on how to add new vendors are displayed below.
-
Edit button. This button allows one to Edit a vendor that has already been added to the vendor file.
-
Delete button. This button allows one to Delete a vendor from the vendor file as long as that an item has not been associated with that vendor.
-
Find button. This button allows one to Find a vendor in the vendor file. Instructions on how to find a vendor in the vendor file are displayed below.
-
Close button. This button will close the screen in the Vendor File and take you back to the Main Menu.
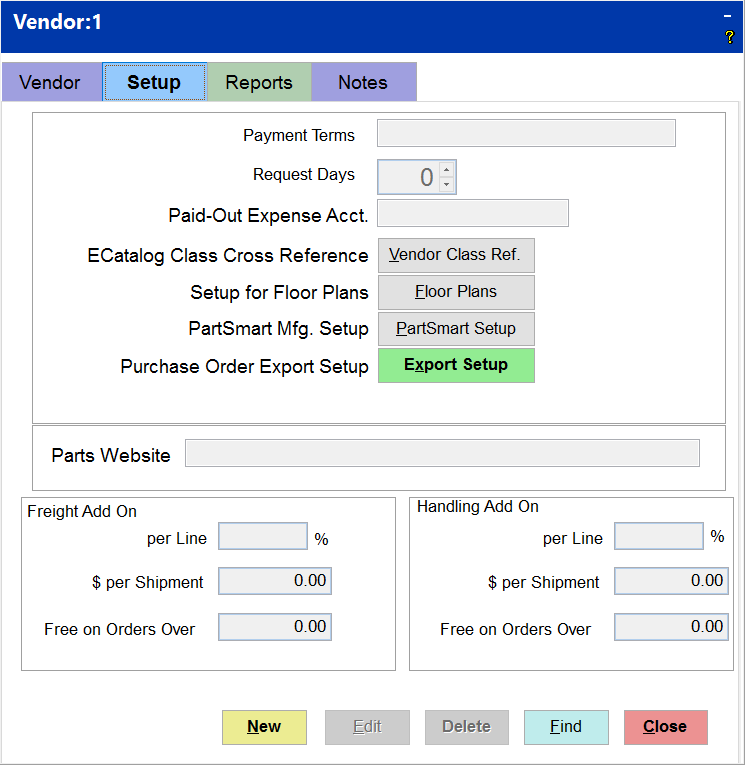
Setup Tab
-
Payment Terms field. This describes the vendor’s payment terms for purchases by the company.
-
Request Days - The Purchase Order’s Requested Ship Date is by default the same as the purchase order date. The Requested Days are added to the current date to create the projected delivery date. The Requested Ship Date is utilized in the Sales Order Action Report to raise concern about the latent arrival of products.
-
Paid-Out Expense Account field. This field stores the default general ledger account used to post paid out expenses when posting within the post payment screen.
-
Ecatalog Class Cross Reference/Vendor Class Cross Reference Button. This allows one to set up or edit cross references for specific vendors. It also allows one to Indicate the department for the vendor, a description and an inventory class for the cross reference to reference to.
-
Setup for Floor Plans/Floor Plans Button. This is a method in which manufacturers of a product will place them within a store for a specified period of time and interest rate. Multiple floor plans may be tracked for a single vendor. Serialized products may be assigned to a floor plan for tracking purposes.
-
PartSmart Mfg. Setup/PartSmart Setup Button. If a store is going to be using PartSmart (a Parts Database of selected Parts Mfg. catalogs, the store will need to get the Trade Partner Identification, the Dealer Account Number and list the Manufacturers for that Vendor as part of the PartSmart setup.
-
Purchase Order Export Setup/Export Setup Button. If one is going to export a purchase order from a vendor to a spreadsheet, one can do the export setup from this location.
-
Parts Website field. This field is used with the PartSmart setup
-
Freight Add On/Handling Add On fields. If one wants to add Freight and/or Handling information for a vendor, you can enter a % per line, a dollar amount per shipment, or Free on orders over a certain amount.
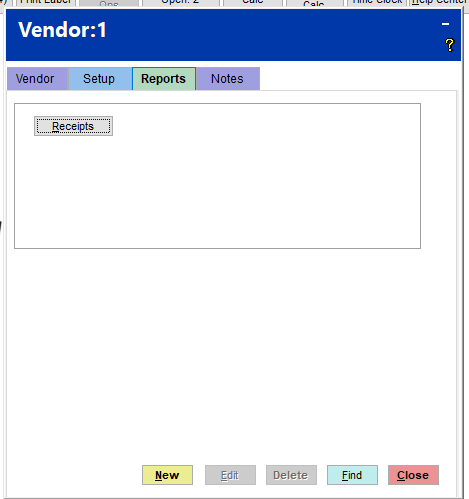
Reports Tab
-
Receipts Button. This will list all of the receipts for the selected vendor.
-
You can click on the Receipts button. The PO Receipts screen will then be displayed.
-
Click on the Generate button to create the Receipt Report.
-
You can then Display or Print the report.
Notes Tab
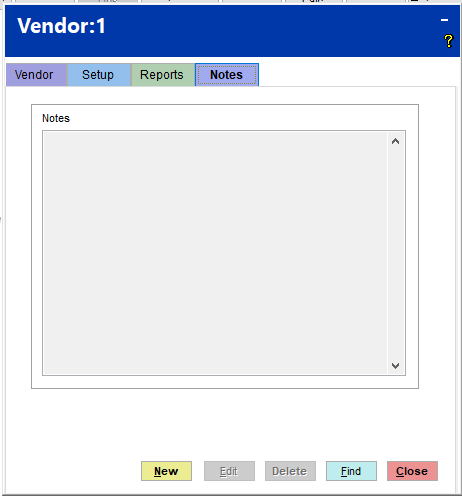
Notes field. Notes for this vendor can be stored for future reference under this tab.
Steps to Adding a New Vendor
To add a new vendor, the fields that must be filled out are the Vendor ID field, the Company field and if you have an Electronic catalog for that vendor, you must check the Ecatalog Vendor box.
1. New button
2. Enter the Vendor ID
3. Enter the Company Name
4. Click the Save button.
5. If you have an Electronic catalog for that vendor, check the Ecatalog Vendor box
NOTE - It is recommended to fill in all of the other fields so that you will have access to that vendor information.
Finding a Vendor
1. Click the Find Button. This will take you to the Find Vendor screen.
2. You can find a vendor by the Vendor ID, the Company Name, the Phone number or a Contact Name.
3. You will then click on the Find Now button and if it finds that vendor, it will be displayed.
4. You can then press either the Select button or the enter key on your keyboard and the record for that vendor will be displayed.
Ecatalog File
Electronic Catalog Definition
We are going to the help file today, because I really like the diagram (the Electronic Catalog Diagram – see note below) there and it helps in the understanding and the whole concept of the electronic catalog.
Electronic Catalog - a catalog of all of the items that a vendor carries requested in an .xlsx or .csv format.
Minimum Fields Requested
Minimum fields that a catalog has to have are as follows:
-
Item ID
-
Description
-
UPC code
-
Cost
-
Retail Price
How to import the Electronic Catalog into TransActPOS
-
Method 1. Electronically through direct communication with the vendors. (Do it Best, House-Hasson, Orgill, True Value, and United Hardware)
-
Method 2. Use the Import Utility -(Link to the training)
Four Methods to Add an Item from the Ecatalog to the Inventory File with Auto-Add Turned On
-
Click the Add Item Button in the ecatalog within the TransActPOS desktop application
-
Enter the item’s UPC within the Enter Item field at the Ring Sale Screen within the TransActPOS desktop application
-
Enter the item’s UPC, Item ID or Vendor Part Number within the Enter Item field within the Purchase Order Detail screen of the TransActPOS desktop application
-
Enter the item’s UPC within the Enter Item field within the TransActPOS Wireless application. Important note: To activate the Auto Add feature, complete the following steps.
Details of the TransActPOS Wireless application and the Auto-Add feature
The Auto Add feature is controlled within the Auto Label option. The following steps invoke this option.

1. Within the TransActPOS Wireless application choose either of the three following options
1. Inventory - this is the direct interface to the inventory management screen
2. Adjustments - Only the Physical Inventory contains the required Auto Label feature
3. Order - This option create a Pre-PO and contains the option Auto Label feature
2. Select Auto Label from the Inventory, Adjustments, or Order screens to invoke the Automatically add items not found from ECatalog. Selecting this option will allow the system to attempt to locate the scanned UPC within the available electronic catalogs. If found, the system will automatically add the item to inventory with all of the supporting vendor relationships present within the electronic catalog.
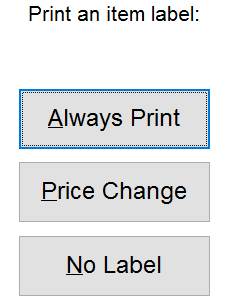
3. Select the desired print label option by selecting one of the following at the Print an Item label prompt:
1. Always Print - this option will print a label upon scanning the item’s UPC or barcode on the BIN label. During this process the system will automatically update the retail price to that found within the catalog.
2. Price Change - choosing this option, the system will only print a label if a price change has been made based upon the catalog’s retail price being different that of the current inventory retail price.
3. No Label - selecting this option does not print a new label upon scanning.
 |
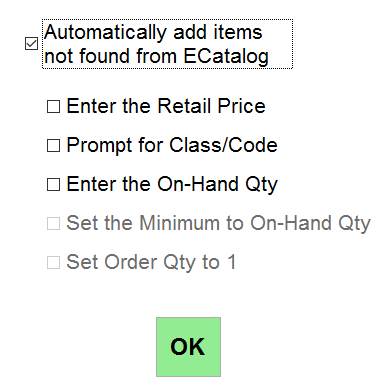 |
4. The next screen presents the Automatically add items not found from ECatalog. Select this option to invoke adding of inventory from the electronic catalog for items that are not located within inventory for the scanned UPC.
1. With the Automatically option selected, other options are then available as described to streamline the management of the inventory. Select the appropriate option(s).