04-010-2 Inventory Control Training #2 - The IC General Tab
Overview
The General Tab of the Inventory Control menu contain a variety of details that determine the nature of the inventory's behavior within the system. Understanding the design and nature of these controls is reviewed in this section.
Inventory Training - Training #2
In Training #2, we are going to focus on the General Tab of the Inventory file.
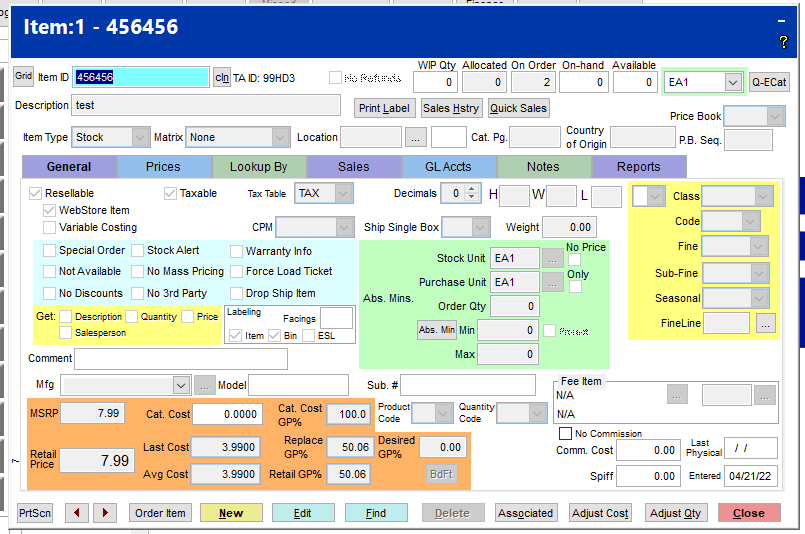
Top portion of the Inventory Screen

Grid button - selecting the Grid button invokes the presentation of the available Picture Grid which is maintained within POS > File Maintenance > Grid Layout (POS).
Item ID - The Item ID has a maximum length of 20 characters and can contain alpha and numeric values. The system automatically capitalizes the apha values.
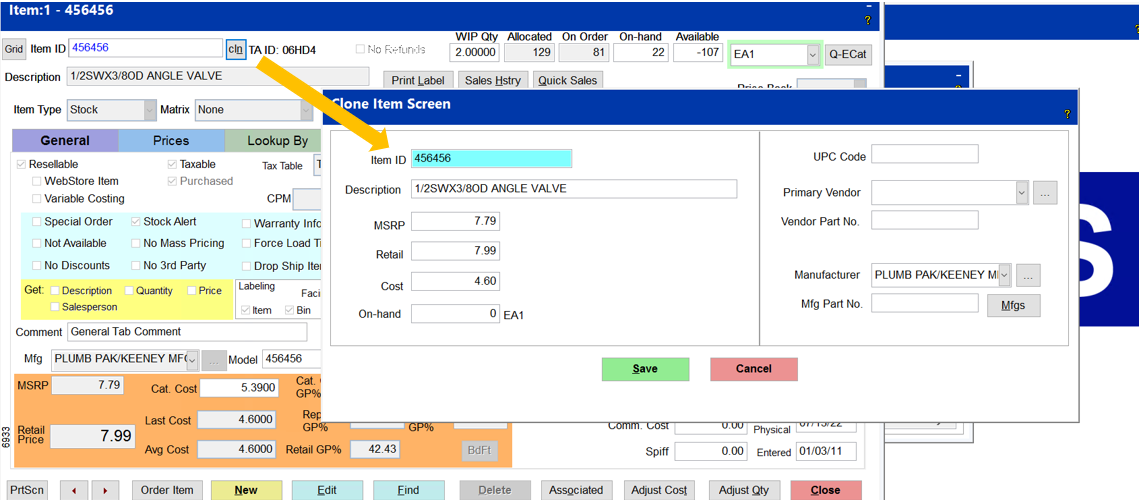
Cln Button - Selecting the “clone” button streamlines the process of creating a like item. The initial fields copied are Item ID, Description, MSRP, Retail, Cost and On-hand.
Editing the Item ID to a unique value allows the system to continue with the creation of this Clone item. Depending upon the circumstance, edits of the description, MSRP, Retail, and Cost would be appropriate at this time.
Item Description - This 70 character field should accurately describe the product.
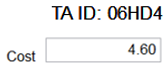
TA ID: The TA ID: represents the cost of the item in a format that may nor be apparent at first sight. This allows the sales clerk to freely review the inventory screen with a customer without showing any cost information.
No Refunds - If returns are not allowed for a particular item, then check this box.
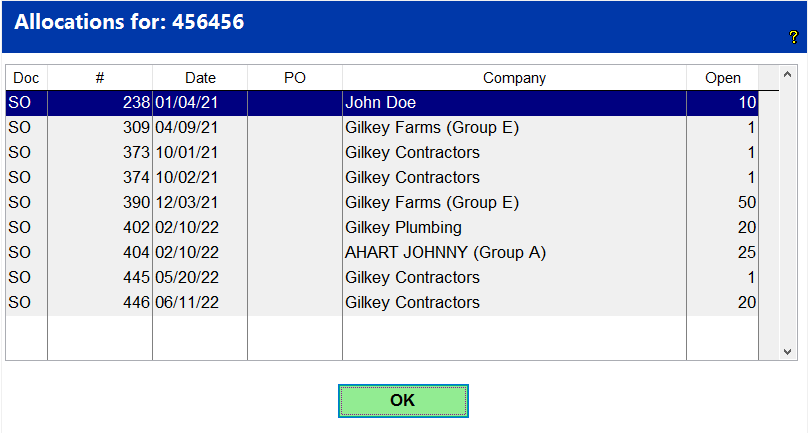
Allocated - Contains the total quantity of the item found within open Sales Orders. Left-click on Allocated to view the listing of Sales Orders that account for the Allocated quantity.
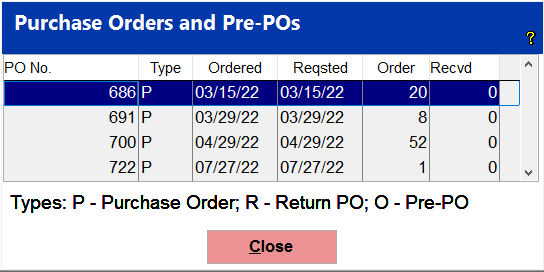
On Order - Contains the total stocking unit quantity for the current item within Open Purchase Orders. Left-click the On Order field. Left-click on On Order to view the listing of Purchase Orders that account for the On Order quantity.
On Hand - Represents the total quantity of an item physically present within the store.
Available - the Available is the current On-hand quantity less the Allocated quantities.
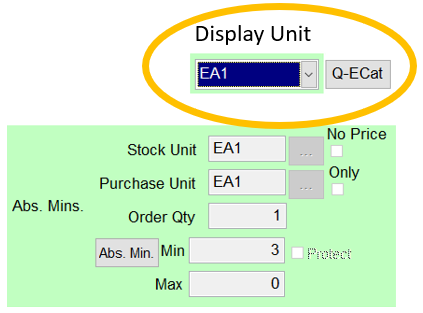
Display Unit of Measure. This field allows the selection unit of measure from the item’s units of measure setup for the item. For example, the default stocking unit of measure for the item may be EA1 but the system does have a PK24 (24 EA1s). The Display unit could be set to PK24 to show the number of PK24s in inventory. The On-hand quantity will change upon selecting a different Display Unit of Measure. Typically, the Display Unit of Measure matches that of the Stock Unit.
Inventory File - General Tab - Item Types
The following explains the different types of items that can be configured within the system. The next section Matrix goes even further to invade other characteristics of the select Item Types.
Stock - items allow the system to track the on-hand qty and the average-weighted cost of an item.
Non-Stock - On-hand quantities are not not tracked within Non-Stock items. The cost of these items remains constant. A couple of examples would be labor, shipping and bulk or departmental sales. Non-Stock items may have the Variable Cost option selected so that the system will automatically calculate the cost of goods sold based upon a percentage of the retail price.
Rental - If the Rental Module is present, the Rental item type is utilized to manage this select portion of inventory. The Matrix field for a rental item may be serialized or non-serialized.
Coupon - There are six different types of coupons that either discount the purchase by a dollar amount or by a percentage off.
Kits - A Kit describes a collection of items that will be sold at a designated price and the available number of kits is limited to the quantity of the least available item. The kit’s retail price is only changed by the creator of the item. Unlike an item with associated items where the system presents the list of associated items at the current retail prices. Kits are set to fixed prices by design while Items with Associated items are dynamic in the retail price but fixed at the list of items.
Example 1: If you want to sell a Paint kit to go along with a big paint sale, you could have the paint pan, the paint roller, the paint brush and a drop cloth that make up the Paint kit. The cost of the paint kit is made up of the costs of each item and the total of available kits is based on the on hand quantity of the individual items. So, if there were 3 of each item in the kit except for the drop cloth, which only had 2 on-hand and available, then the on-hand quantity of the kit is 2.
Comment. The item that has this type is the item “_comment”
Finance. The item that is reserved for finance charges is “ _Finance_Charge” and the item type for this item is finance.
Fee Item. This is the item type of fee items that are attached to other inventory items. An example of this is the paint fees that are added in the state of California when pints, quarts and gallons of paint are sold. When a gallon of paint is rung up at the ring sale screen, the paint fee will also be added to the sale.
Gift Card. This is the item type for the item “_Gift_Card”. This is used when selling Gift Cards.
Note: The Item Type field and the Matrix field cannot be edited if there is stock on hand for an item. If you need to change either of these fields, make sure that you change the on-hand-qty to 0 and when you are done making the changes then you want to make sure that you put the correct on-hand-qty back in.
Inventory File - General Tab - Matrix Field
The Matrix field further enhances the Item Type Field to further break down specific functions as explained below.
-
Serialized item - This option allows the store to track an item by the serial number from the time it is received until it is sold.
NOTE: You can go from a non-serialized item to a serialized item, but you can’t go from a serialized item to a non-serialized item. So make sure that if you choose an item to be a serialized item, that you want it to always remain as a serialized item or always tracking it by the serial number.
-
Cut pieces - The user is prompted for the length and quantities to calculate a total price. This option is typically used in the case of metal siding sales. The user is prompted to enter the length and quantities of each linear piece. When completed, the total length is presented within the Quote, Sales Order, Invoice, and/or Purchase Order along with the individual cuts and the respective quantities. The purchase order generated from a quote will contain the detailed lengths and quantities for the vendor.
-
Board Foot - the cost is entered by board foot and the Bd Ft field will be displayed on the item screen. The total board feet of the item can then be entered. The MBF or thousand board feet for the item will be displayed and printed on the invoice. The Board Foot includes calculators Thickness / Width / Length for dimensional, hardware, plywood/wallboard and siding products.
-
Square Feet - The Sq Ft field will be displayed allowing you to enter the thickness, the width and the length for a particular material (ex. Plywood/WallBoard), and the square feet will be calculated for you. The cost will be entered by square feet.
-
Gross and Tare - Weights will be entered to calculate the Net weight for the retail price.
-
Distinct Item - The Distinct Item behavior creates a new item posting for each entry into the detail screen of the selected document.
-
Core - Indicates that that item is a core charge item. This option is certainly utilized within battery and alternator sales and exchanges.
-
Lot Number - Indicates that a number (lot) has been assigned to a group of items
-
Firearms - Management of firearms includes serial number, gauge and type of action. TransActPOS does not replace the ATF record keeping.
-
Petroleum - When selling fuel products, the petroleum matrix supports three decimal place fuel prices and the appropriate rounding characteristics. To streamline the posting process, select the Get Quantity and the Decimal options found on the IC > General tab.
-
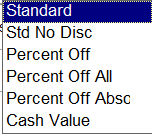
Coupons. In the Matrix field, you will select the type of coupon that has been created. Those types are listed below:
-
Standard - Standard coupon – No Discount awareness
-
Std No Disc - Standard coupon but ignores No Discount Item setting
-
Percent Off - Discounts all prior items by this % except for No Discount Items
-
Percent Off All - Discounts all prior items by this % from Retail, including No Discount Items
-
Percent Off Absolute. Discounts all prior items by this % from the current price
-
Cash Value. Value allows for cash return
-
Reward Certificate. Requires a reward member ID and no price change
Moving to the right, you will see that you can track or assign physical locations in the store to different items. Typically, aisles will be assigned a location code (A, A2, B1, B2, etc.) by entering the location code in this field. Notice in the box with ellipsis (3 dots) to the right of that field gives you four more location fields.
NOTE: For reporting purposes, only the main location field is used.
-
Catalog Page Field. Used to indicate the page number where the current item is located in the manufacturer’s product catalog.
-
Country of Origin. Allows you to enter the country where that item came from.
-
Price book. Price books are groupings of items presented within a designated sequence for easy selection of items within the Point of Sale, Sales Orders and Purchase Orders. Some stores will use this feature to print a “Price Book”, while others will use the printed report as a quick order form for a customer. Others will use the report to take a quick inventory and then create a purchase order. Additionally, the Price Book filtering and sequence can be applied to Navigation controls within the Inventory file, General Screen. The Price Book field allows you to select a Specific Price Book. The P.B. (Price Book) Sequence is a numeric value used to index the item listing.
-
Q-ECat. This lists a little bit of information from the E-Catalog for this item if a catalog is available.
-
Resellable. This needs to be checked for an item that you will be selling. When this is checked, you will be able to see the item in the Ring Sale screen, the Sales Order Screen and the Purchase Order screen.
When this is unchecked, the item is no longer available to be sold and will not be able to be seen in the Ring Sale screen, the Sales Order Screen and the Purchase Order screen.
-
Not Available. Indicates to the user that the specific item is no longer available from the vendor.
-
Discontinued item. The Resellable and Not Available boxes are both checked.
-
Variable cost. This will generally be done for a non-stock item. This will allow you to enter a % that you designate for a particular item…so let’s say you would like to show that when an item is sold, you want to show a 40% GP% for any sale...then you would enter 60% in the percentage field. Normally there is no set MSRP or Retail price for that item.
-
Special order. If you check an item as being a special order item, then when using the reorder report, these items will not show up in the report unless you choose to include them in the report.
-
No discounts. Prevents any discounting on the particular item.
Inventory File - General Tab - Taxation and Options Area
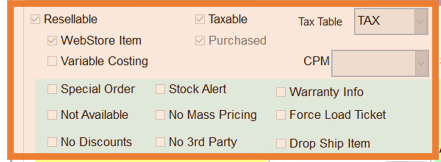
Let’s go back up and refer to the taxable area. Notice that you have a box that can indicate if sales tax applies to the item. A check mark indicates that the current item is taxable. If the box is not checked, then that means the item is non-tax and you must choose the reason for the non-tax in the drop down in the non-tax table field to the right of the Taxable check box. The current sales tax report will provide a summary of collected tax for a specific period.
The Tax Table field further defines the tax status of the current item. The taxable and nontaxable classes are created under System, Support Files, Sales Tax Menu.
-
Resellable - With the Resellable option checked, the item does appear within inventory listings indicating the item is sellable. Unchecking this option omits the item from the listing. This option can be used to control the sale of some items that may have on-hand quantities but need to be hidden from view. This option could be used to hide select seasonal items.
-
Webstore Item - TransActPOS communicates with a variety of e-commerce solutions and utilizes this check box to determine if the item should be uploaded to the website. Unchecking this option would omit the item from the communications of retail price and on-hand changes .
-
Variable Costing - Select this option to automatically calculate the cost of goods sold based upon a percentage of the retail price.
-
Special Order - With this option selected, the system will create a Sales Order and corresponding Purchase Order, if configured, during the sales process at point of sale. Additionally, Special Order items may be filtered during the Reorder process.
-
Not Available - When a vendor does not have the product available, checking this option will omit the item from the reorder process.
-
No Discounts - Selecting the No Discounts option omits the selected item from the discount calculations except for the Price Matrix calculations.
-
Stock Alert - When checked, this allows the system to notify the user that a reorder requirement has been met for the indicated item. If a stocked item has the stock alert checked and the item’s on–hand quantity is below the Min stock level, then this item will meet the requirements to be posted to the Stock Alert item list. To run the stock alert, go to IC, Stock alert and set the counter for the interval of time for TransActPOS to recheck itself. If any items are found in the status, select Details to view the listing. The Inventory Stock Alert runs on your specified workstation. If TransActPOS is closed on this workstation, the Stock Alert must be restarted. If you are interested in this feature, for certain items…we will take a closer look at that after the store goes live.
-
No Mass Pricing checkbox - When checked, the retail price of the item is protected from automatic price adjustments of the Mass Price Program and filters the item within the Ecatalog Price Control Utility. These items will also be recognized when running the Recalc Mins utility.
-
No 3rd Party checkbox. When checked the item is excluded from 3rd party pricing tools. The ecatalog price control can be set to only these checked items
-
Warranty Info. - Checking this option will prompt the user to select a customer to record to whom the product was sold. Typically, the tracking of serialized inventory can be enhanced with the option. Knowing the original purchaser of the product is helpful when using the TransActPOS Service Ticket module since a search by customer name can auto-fill the service ticket.
-
Force Load Ticket field. If this is checked, when the item is sold, it will always print a Load Ticket.
-
Drop Ship Item - The Drop Ship indicator is utilized during the
-
If you are using Commodity Price Matrix, then it must be selected in System | Company Setup | Inventory Page 2. On the inventory screen, you will select Column, Matrix Quantity Breaks, or Lmbr. The Column Quantity Breaks allows for price breaks for quantity purchases. The Matrix Quantity Breaks allow price breaks for different types of quantity price breaks and the lmbr is for lumber.
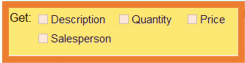
Inventory File - General Tab - The Gets Area
-
Description
-
Quantity
-
Price
-
For all general items which do not have a specific description, quantity, or price, your sales clerk will be prompted to enter the desired information.
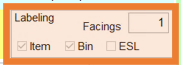
Inventory File - General Tab - Labeling Area
-
You can print an item label or a bin label. If the item has been linked to the electronic shelf label (ESL) services, that ESL box will be checked. This can also occur during the receiving process and is dependent on the options selected at the time of processing. A number of variables will determine if the label will print.
-
Facings. You can enter the number of facings that a sku/item id occupies on the shelf. When printing the labels, the number of labels printed for this sku will match the number placed in this field.
-
Decimals. My rule of thumb says that if it is something that you are going to cut or partial amounts of the item that you are selling can be sold, then the decimal point will be set to 2 or 3. Otherwise, the decimal point will be set to 0.
-
Weight. Allows you to enter the weight of the saleable unit.
Inventory File - General Tab - Units of Measure
-
TransActPOS deals with 3 units of measure. We have already taken a look at the Display unit of measure found in the upper right hand corner. So today,let’s look at the other 2 units of measure. These are the purchase unit of measure and the stock unit of measure.
-
Purchase unit of measure. The purchase unit of measure describes how you are going to purchase the item. Is it a roll of something that you are purchasing or is it an each?
-
Stock unit of measure.The stock unit of measure describes how you are going to stock the item.
Inventory File - General Tab - Continued
-
No Price checkbox. One would want to check this box in order to ONLY print the quantity break price on the label…This box will only be available if “Turn ‘ON” No Price Item Feature “ is checked within the Company Setup on Inventory Page 1.
-
This is also a useful feature when you stock a roll of chain, you DO NOT sell the entire roll and you only sell by the foot. This will avoid confusion among customers who see the roll price and ask to buy the roll but are unable to, as you only sell by foot.
-
“Only”. The item can only be purchased in the selected Purchase Units.
Inventory File - General Tab - Order Quantity Area
-
Order Quantity. This field indicates the default quantity to place on an order when reordering an item.
-
Min. Indicates the minimum quantity that you want to keep on the shelf. If you check the Protect box, it will remove the min from being recalculated when running the recalc mins utility.
-
Max. Indicates the maximum quantity that you want to keep on the shelf.
Inventory File - General Tab - Continued
-
Substitute Number. Indicates if applicable that this is the substitute item number for the current item.
-
Comment. Allows you to put in an internal note for the item.
-
Mfg or Manufacturer. Represents the manufacturer of that product. If you go to IC, Support Files, Manufacturer, this is where a list of the various manufacturers are found. You can select the down arrow and see a list of the manufacturers or you can press the box with the ellipsis (3 dots) and choose from the list that is displayed.
-
Mfg model. The manufacturer’s model number for the current inventory item.
-
Class. Indicates the class or department for a particular item. This field is used for advanced lookup and reporting functions.
-
Code. This field is also used during advanced lookup and reporting functions. I get a lot of questions as to when this field might be used. I’ll share how a customer used this field. They were tracking some information on certain colors of their shingles. They put a code in that field…I think it was GRS for green shingles and BRS brown shingles. They were then able to run reports based on those codes.
-
Fine, sub-Fine and the Fineline. Fields that further classify the class field as provided by the vendor for a particular item. These fields are also used for advanced lookup and reporting functions.
-
Seasonal field. Allows you to set various inventory items as seasonal items. You can choose from the pick list as to what season to assign. The setup of the seasons is done under IC, Support Files, Seasons.
-
Fee Item. This is the area where you can attach a fee to an item. Remember that in some states, when you purchase an item there is an extra fee associated with that item. An example of this is in the state of California, when a customer buys paint, there is an extra fee attached to that paint based on the size of the paint, (pint/quart, gallon, 5 gallon). The fee is created as an item id and then is associated with the different paint skus in the fee item area.
-
Comm Cost. Allows you to enter the cost of the commission for an item if it is different from the original cost of the item
-
Spiff. Indicates the available spiff also known as incentive dollars for sales people of the current item. The spiff will be included in the commission’s calculation and report.
-
Last Physical. This field gives the date that the amount of the physical inventory was changed via the Change Qty option or when a physical inventory has been done the adjustments were posted.
-
Entered. This gives the date the information for this item was entered.
-
No Commission. When checked this indicates that the item is not a commissionable item, and that item is excluded from commission calculations.
Inventory File - General Tab - Pricing Area
-
MSRP (Manufacturer’s Suggested Retail Price). The MSRP should be greater to or equal to the retail price. If the user enters an MSRP lower than the retail price, the system will ask if you want to change the MSRP to the stated retail price.
-
Retail price field. If no other discounts are applied during the sale of the current item, this will be the price that appears on the invoice screen and will be the price charged to the customer. If you select the edit button, you can modify the price.
-
Catalog Cost. The cost derived from the vendor electronic catalog.
-
Last Cost. The cost of the item the last time it was received.
-
Average Cost. The current average cost of the item. I’d like to talk about the Weighted Average Cost. The unit cost is based on an average of all the units of that item. When you receive the inventory, the program will add the total cost of all units of an item received to the total current cost of the current items on-hand. This is then divided by the total on-hand quantity.
In this example, the current item shows 10 units on-hand at $10 per unit. The store received 5 units at $11.00 per unit. The new on-hand quantity will be 15 and the cost per unit will be $10.33. The Weighted Average Cost is calculated by dividing the total extended cost ($155.00) by the total quantity (15) resulting in a Cost per Unit of $10.33.
|
|
Quantity
|
Cost Per Unit
|
Extended Cost
|
|
Beginning Inventory
|
10
|
$10.00
|
$100.00
|
|
Inventory Receipt
|
5
|
$11.00
|
$55.00
|
|
Ending Inventory
|
15
|
$10.33
|
$155.00
|
Inventory File - General Tab - Gross Profit % Area
-
These fields help you to make sure that you are getting the desired profit from any given item.
-
GP% is based on an equation that takes the retail price and subtracts the item’s cost from it and divides that total by the retail price multiplied by 100.
-
Example: The retail price is $5 and the last cost is $1. So applying these to the equation we have the following:
-
$5 (retail price) - $1(the last cost) / $5 (retail price) *100
-
4/5 * 100
-
.80 * 100 = 80%
-
So this means that you get 80% for every item sold.
-
Cat. Cost GP%. The catalog cost uses the same equation but instead of the last cost that we used in the equation above, it uses the catalog cost for that item.
-
Replace GP%. This is the profit you are gaining based on how much it costs to replace a unit in your inventory. This value is based on the Cat. Cost. If there is no catalog cost for this item, the system will use the Last Cost to calculate the percentage.
-
Desired GP%. When you enter what you would like the desired GP% to be, it will adjust the retail price based on that GP%.
-
Retail GP%. The Retail GP% is based on your Average Cost. This percentage is based on Retail versus Avg. Cost.
Inventory File - General Tab - Continued
-
Bd Ft. Button. If the Matrix is set as “Board Ft.” and the dimensions are set, this button will display at a glance the prices and costs of 1000 board feet.
-
Product Code. The product codes, 01, 02, 03, etc. are set up in the price matrix. This identifies a particular type of pricing. You can have multiple groupings of prices for the different product codes. The customer will get the given pricing for the group they are assigned to.
-
Quantity Code. This is a code and this allows you to set up groupings of quantities for pricing purposes.
Inventory File - General Tab - Adjust Qty On-Hand
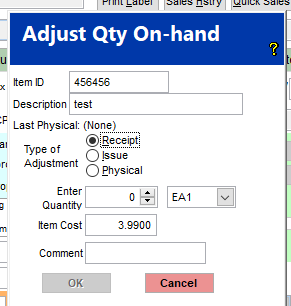
This is the screen to adjust or change the On-Hand Qty. The Item ID and the Description fields are already filled in.
1. Select the type of adjustment
-
Receipt - When you are receiving something into inventory
-
Issue - When you are taking something out of inventory
-
Physical - Whey you are physically counting and then adjusting the quantity on hand2. Enter the Quantity3. Confirm that the Unit of Measure is appropriate for the quantity being entered.4. Confirm that the Cost is appropriate for the item5. Enter a Comment - this text will be presented within the associated Adjustments Report6. Click the OK button
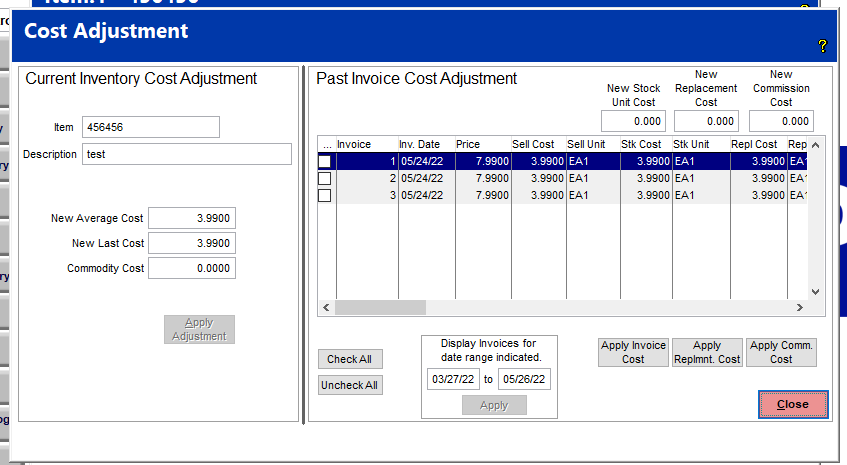
Inventory File - General Tab - Adjust Cost
Current Inventory Cost Adjustment. The left hand side of the screen allows you to change the current Average Cost, Last Cost and Commodity Cost. The right hand side of the screen allows you to adjust the Stock Costs, the Replacement Costs or the Commission Costs of Past Invoices.