07-010-5 IOR Training - Orgill
Overview
The application Inventory Order and Receipt module (IOR) manages multiple aspects of the vendor merchant relationship, from maintaining the associated electronic catalog to downloading invoices and sales promotions.
The enhanced communication with the following vendors provides a competitive advantage for your store. Options like one button receipt of truck invoices or a scanned procedure confirming each line allow you to control how you decide to process your orders. With the ability to order products, track backorders, update prices, and receive orders, you save time and money.
Whether Orgill is your primary vendor or a secondary vendor, TransActPOS maintains the following information via direct internet communications. TransActPOS is a Preferred POS Vendor.
-
-
-
-
-
Uploading purchase orders
Orgill Screens
Inventory Order and Receipt (IOR) is an inventory management tool specifically designed to make maximum use of the electronic catalogs for True Value, Do it Best, Emery Jensen, House-Hasson, United Hardware and Orgill, hardware stores in the ordering and receiving process. IOR assists in creating orders, communicating with centralized ordering, and receiving of ordered products. Streamlining the entire process of ordering and receiving inventory is the main objective of this application. The Options | IOR Menu | Reports screen provides a convenient way to review vendor events, costs, and sales history all in one place. Many of the inventory processes described are similar for True Value, Do it Best, Emery Jensen, House- Hasson, United Hardware and Orgill stores, but specific variations are described in detail within the individual help screens. Cost and time savings have been proven within specific customer installation studies.
Note: Your Windows firewall can interfere with the correct operation of the required communications ports. So, when the communications client requests access to the internet, please grant it.
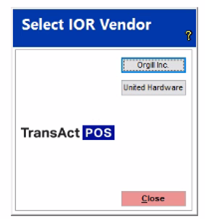
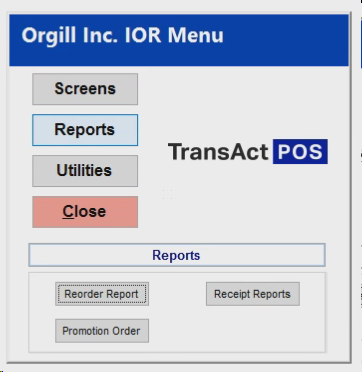
On the TransActPOS main menu, select Options |IOR Menu. Select the Proper IOR Vendor that is defined by the modules in your system. In this document we will be reviewing Orgill as the vendor.
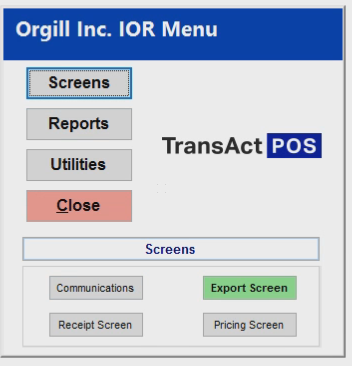
After selecting the proper vendor, the IOR Menu will appear. You may select the screens, reports, or utilities submenus.
From the United Hardware IOR menu, select the Screens, Reports, or Utilities options. The Screens option has four selections:
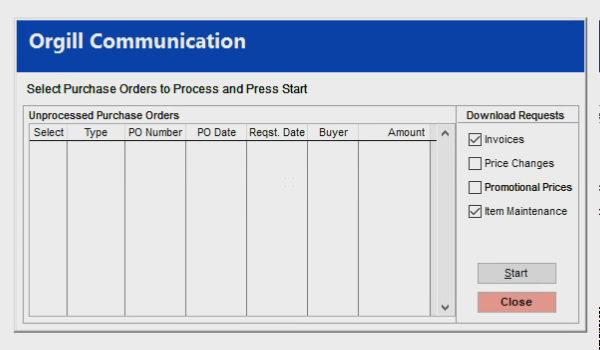
Orgill Communications
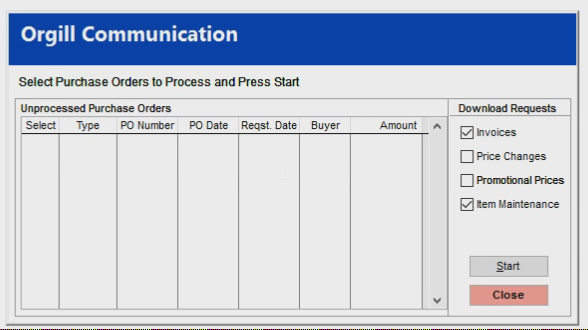
The Communications portion of the Orgill interface allows the user to transmit purchase orders. Check the box of the purchase orders to be processed. The download requests are also performed from this screen. Check the boxes on the right for the appropriate downloads. Click the Start button to begin.
Invoices
All warehouse invoices from United Hardware will be downloaded.
Price Changes
Any item price changes will be downloaded.
Promotional Prices
All promotional prices will be downloaded.
Item Maintenance
Any changes in item information will be downloaded and updated in the electronic catalog file.
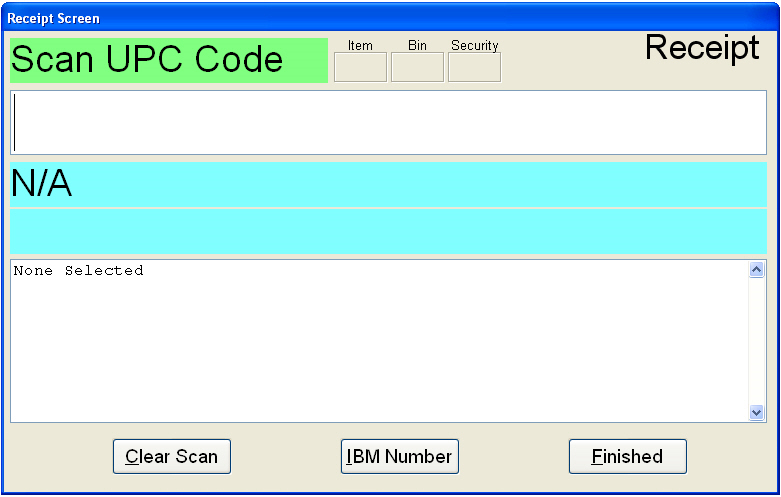
Orgill Receipt Screen
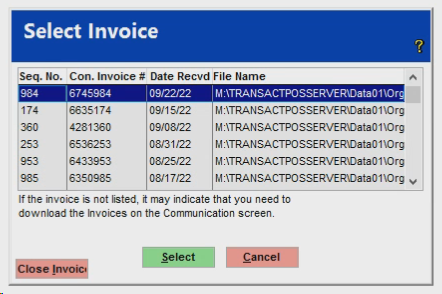
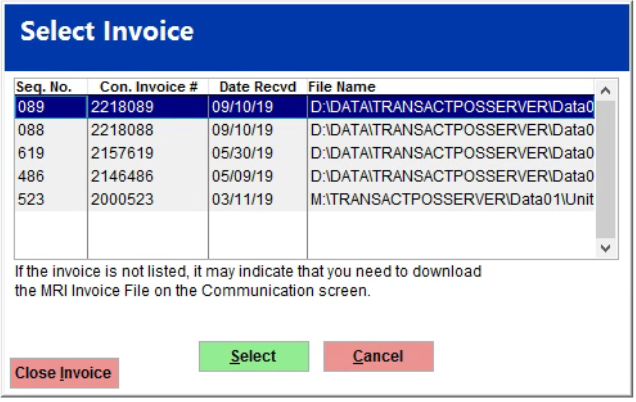
The Orgill IOR Receipt screen allows the user to check received orders from Orgill easily. The user selects one of the entries in the text box and then presses select to work with that set of Invoices. Each group is a file containing invoices that are on the consolidated invoice from Origill. It will be in order by date received.
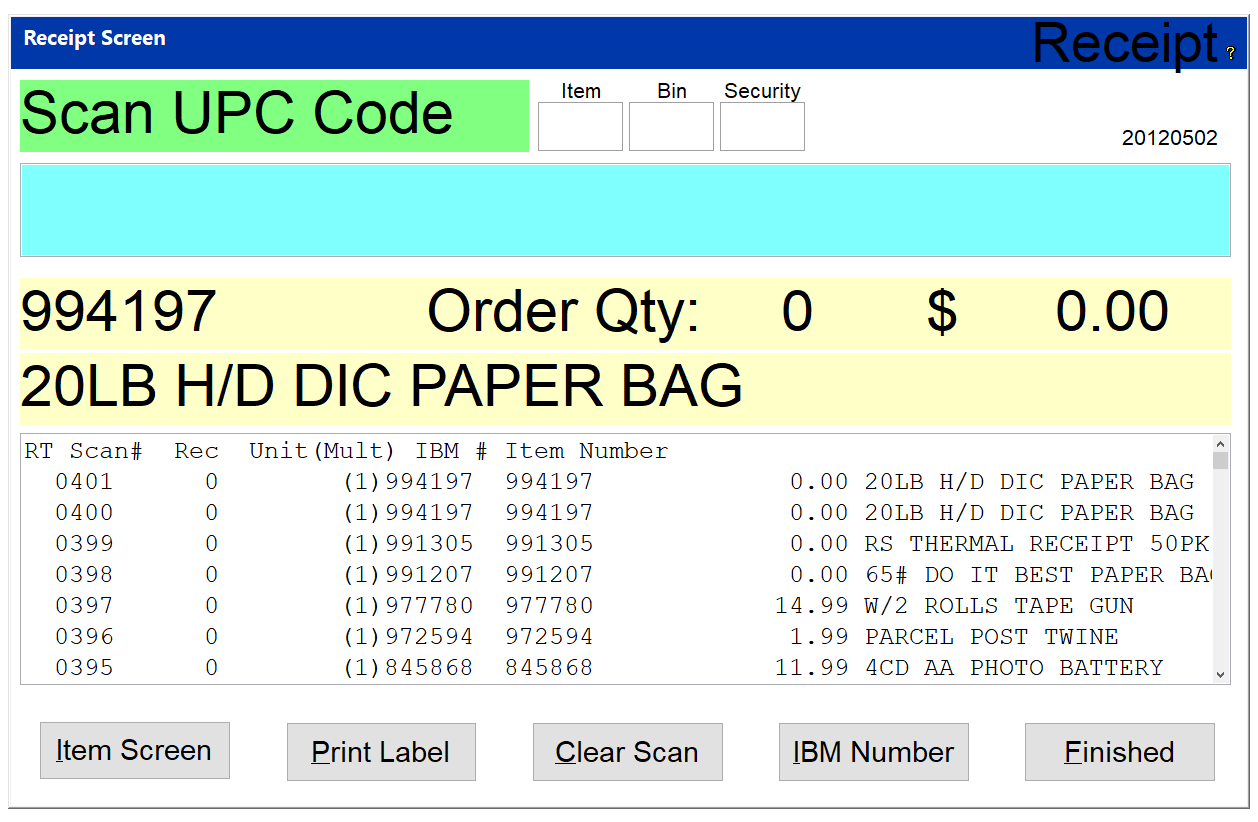
A list of the Invoices as well as a hard copy for them should accompany the shipment. The receipt screen, however, allows the user to scan the incoming order rather than recording the order by hand. Once the Invoices are selected, clicking the Select button opens the Receipt screen. The Receipt screen allows a user to scan received items from Invoices with either their UPC Code or IBM Number. As each item is scanned, it will appear in large text in the blue section as well as a line item in the listing.
• Item - This box will be checked if the selected item needs an Item label
• Bin - This box will be checked if the selected item needs a Bin label
• Security - This box will be checked if the item needs an anti-theft device placed on/in it
• Print Label (not shown) - You can now print labels on this screen by clicking this button
• Clear Scan - This clears the line item list box of all scanned items
• IBM Number - Clicking this button allows the user to scan an IBM Number instead of a UPC Code
• Finished - Clicking this button records the items scanned as received into inventory
How to Receive Order In Full/All Item Import
You may want to receive the order in full instead of scanning each individual item. This will definitely save you a lot of time.
To do this:
Step I - Click on Communications
Step 2 - Check Invoice box and click Start.
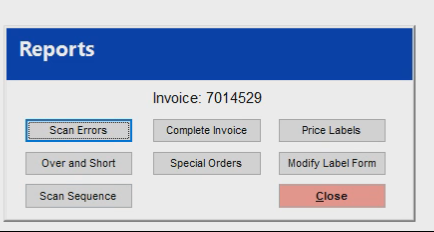
Step 3 - Click on Reports and then click on Receipt Reports
Step 4 - Select the downloaded invoice.
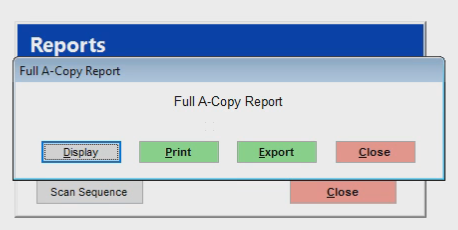
Step 5 - Click on Complete Invoice.
Step 6 - Click on Display
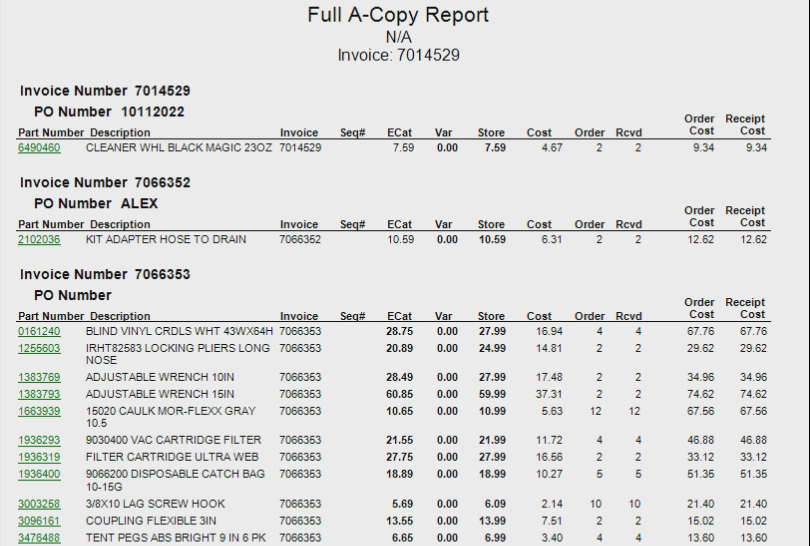
Step 7 - Review the Invoice
Look through the invoice to make sure the total is close to what you ordered. Look for any items that they were not able to send and possibly put on back order. Look for any items that have been discontinued. Look to see if they may have sent substitutes for something you ordered.
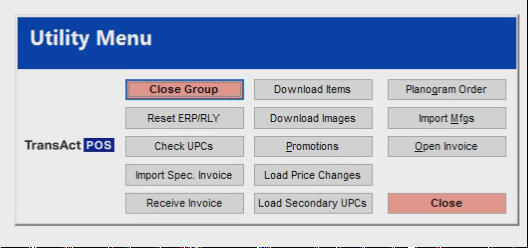
Step 8 - Click on Utilities and then click on Maintenance.
Step 9 - Click on Receive Invoice
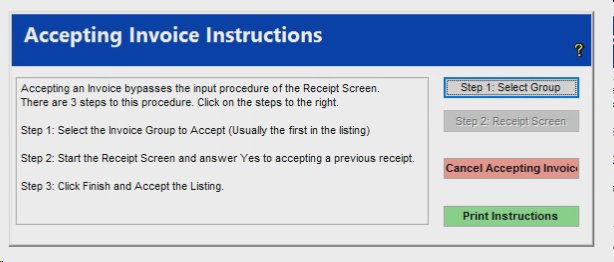
Now Follow the Steps in Accepting the Invoice:
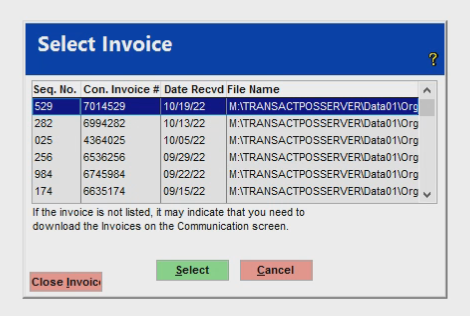
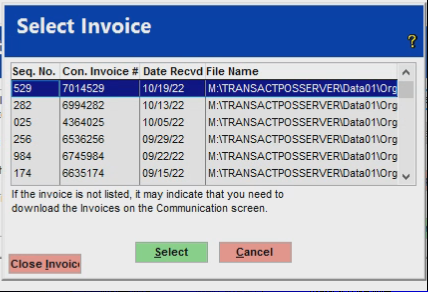
Step I - Select the Invoice Group to Accept by clicking on Step I Select Group
The below screen will appear and you click on the invoice you want to receive.
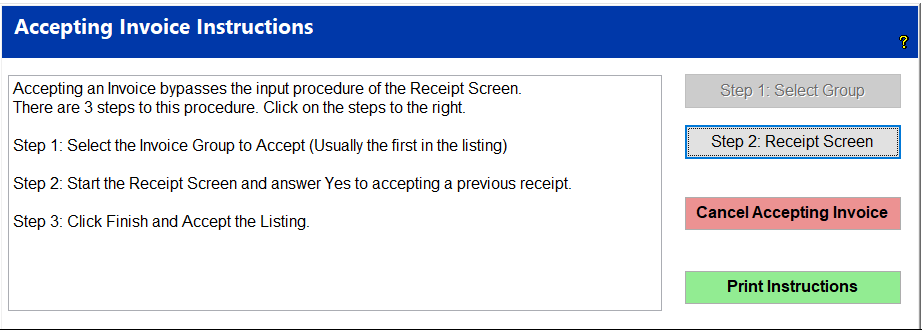
Step 2 - To start the receipt screen - Click on Step 2.
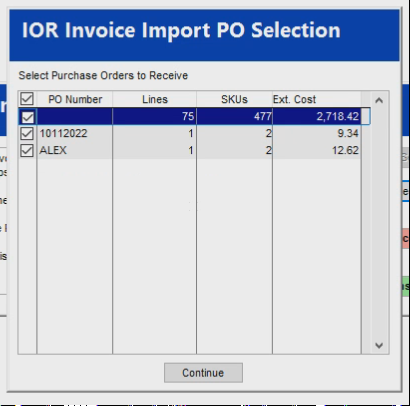
Click the Continue Button, leaving all of the PO’s checked.
TransActPOS will start receiving the items. Once finished click on the Finish button. Now all your inventory will be updated to the new on-hand quantities.
How To Receive An Order By Scanning Items
To do this:
Step I - Click on Communications
Step 2 - Check Invoice box and click Start.
Step 3 - Click on Reports and then click on Receipt Reports
Step 4 - Select the downloaded invoice.
Step 5 - Click on Complete Invoice.
Step 6 - Click on Display.
Step 7 - Review the Invoice.
Look through the invoice to make sure the total is close to what you ordered. Look for any items that they were not able to send and possibly put on back order. Look for any items that have been discontinued. Look to see if they may have sent substitutes for something you ordered.
Step 8 - Click on Receipt Screen.
Step 9 - Select the Invoice.
Step 10 - Scan the items. When finished click the finished button and the inventory will be updated.
Orgill Screen
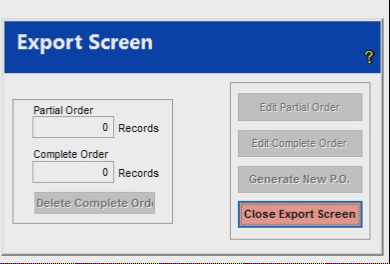
The Orgill IOR Export Screen allows a user to evaluate a Reorder Purchase Order before having it sent to Orgill. The process starts when the user runs a Orgill reorder report on a certain segment of their inventory. Once complete, they then Export that report to IOR. The user can then go to the Orgill IOR Export screen and select Edit Partial Order.
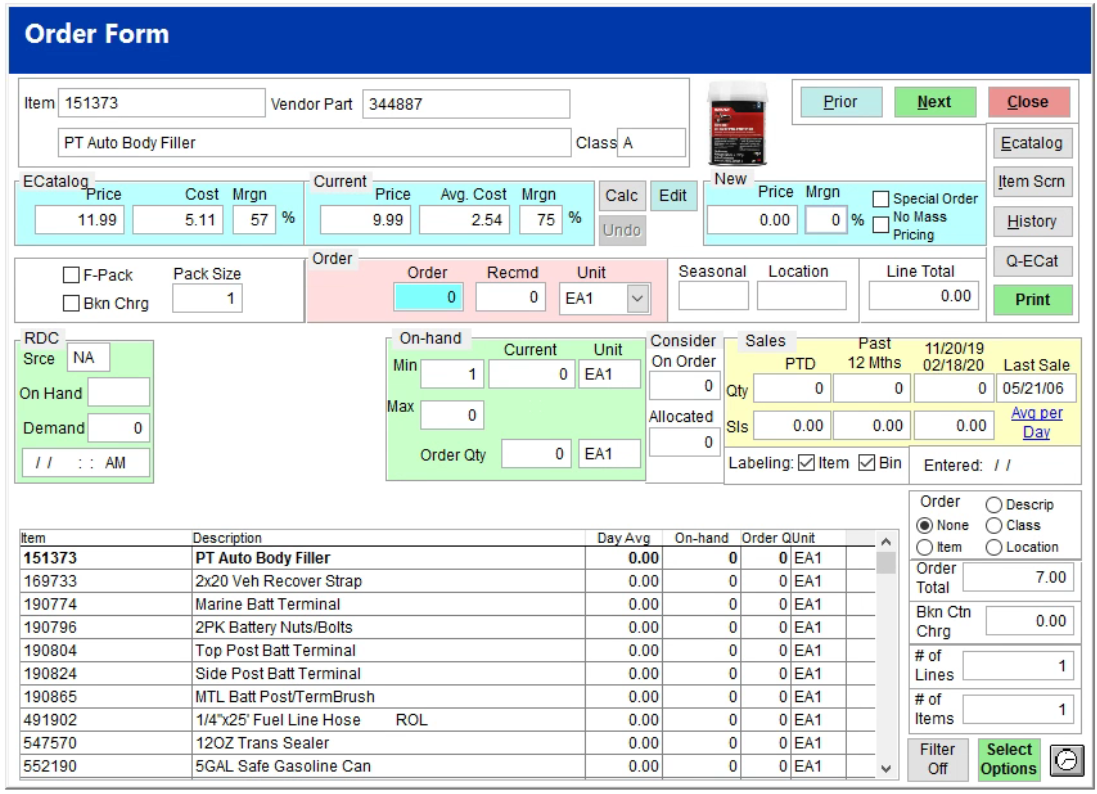
The Order Form will be populated with the partial reorder report they ran. If a user wanted to, they could run a reorder report on the entire store's inventory, but it might be easier to only do a portion of the inventory at a time.
The various text boxes in the form are representative of the line highlighted in the list box at the bottom. After editing the report the user can click the Close button and they will be asked if they wish to add the partial order to the complete order. The various fields on this screen are detailed as follows:
• Price - The suggested Price for the item
• Cost - The cost of the item
• Margin - The profit margin of the item
• F-Pack - Indicates if the item can only be purchased in packages of individual items
• Bkn Charge - Indicates if there is a charge for a broken package
• Pack Size - Indicates how many individual units are in a package
• Item - The item number
• Vendor Part - The manufacturer part number for the item
• Description - The item description
• Order - The number being ordered
• Recmd - The recommended number to be ordered
• Unit - The unit of measure used in conjunction with the item
• Seasonal - Is it a seasonal item
• Order Total - The total cost for the number of items ordered
• On-Hand - Indicates what the minimum and maximum number of the item that can be on hand as well as what is currently on hand and what is on this order
• Consider - This indicates how many of the item are already on order and how many are needed by customers
• Sales - Gives a brief sales history of the item
• Prior Button - Moves the focus to the previous item in the list
• Next Button - Moves the focus to the next item in the list
• Close Button - Closes the form and prompts the user to save the changes and forward the partial order to the full order
• Item Screen Button - Opens the item screen concerning the item
• Sales History Button - Opens the sales history screen concerning the item
The Edit Complete Order button opens the Order Form and displays all items of previously accepted partial orders.
This allows the user to review the entire order one more time before sending it to Orgill. Once that is done, the user can select the Export Complete Order button. This will create a purchase order which can be selected in the Orgill IOR Communications screen and then prompt the user to delete the Complete Order file. Once it is deleted, the user can start the process over again from the beginning when it is time to run the next reorder report. Clicking the Close Export Screen button returns the user to the Orgill IOR Menu screen.
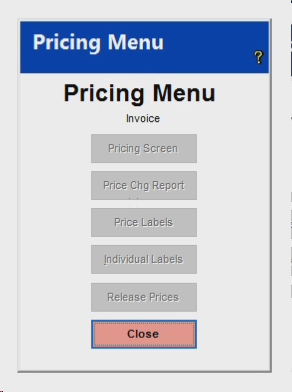
Orgill Pricing Screen
The Orgill IOR Pricing screen is a collection of utilities that allows the user to change retail prices that have been set in the received MRI invoices and to print labels for them. Upon selecting the IOR Pricing Screen, the user will be presented with the Select Invoice screen. The user selects one of the entries in the text box and then presses Select to work with that set of Invoices. Each group is a file containing invoices that are on the consolidated invoice from Orgill. It will be in order by date received.
-
Pricing Screen - The pricing screen displays all the items in the selected invoices in the list box at the bottom of the form. On the top left, the item number and description as well as all pricing information is displayed for the highlighted item in the list box. In the top right there are a few controls that allow the user to adjust which records are displayed, navigate through the list box, and change the price and number of labels for the highlighted item.
-
Price Chg Report - This selection allows the user to display or print a list of items whose price has been changed including the old and new price.
-
Price Labels - This selection allows the user to display or print a list of labels for the items received in the invoices. The labels will be set up for sheet labels as opposed to an individual label printer. The number of labels for each item can be adjusted in the Pricing Screen.
-
Individual Labels - This selection allows the user to print off individual labels on a label printer. The user will be prompted on whether labels for all items should be printed or just for those with price changes. Next TransActPOS will prompt them to select either item or bin labels. Once these choices have been made, the user will have the option to either view the list or print it.
-
Release Prices - When this option is selected, the user is asked if they wish to update the MSRP price to the new retail price where the new Retail price is higher. If they accept, all the items in inventory that have a lower MSRP than the adjusted prices in the invoices will be adjusted to reflect the new price.
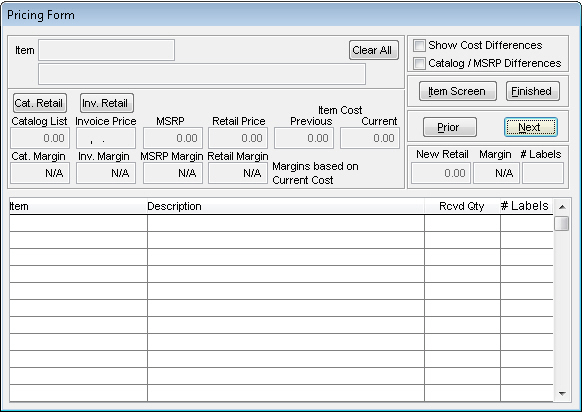
Pricing Form
Show Cost Differences - Selecting this check box will limit the list of items to only those whose cost differs from the cost for that item in inventory
Catalog/MSRP Differences - Selecting this check box will limit the list of items to only those whose price differs from the cost for that item in E-catalog. If the Show Cost Differences check box is also checked, the list will contain all items that have cost or price differences.
Item Screen - Clicking this button will open the inventory screen and populate it with data for the item currently selected in the list
Finished - Clicking this button will return the user to the IOR Pricing Menu
Prior - Clicking this button will set the focus to the prior item in the list
Next - Clicking this button will set the focus to the next item in the list
New Retail - This allows the user to change the retail price of the item
# Labels - This allows the user to specify how many labels will be printed for the item