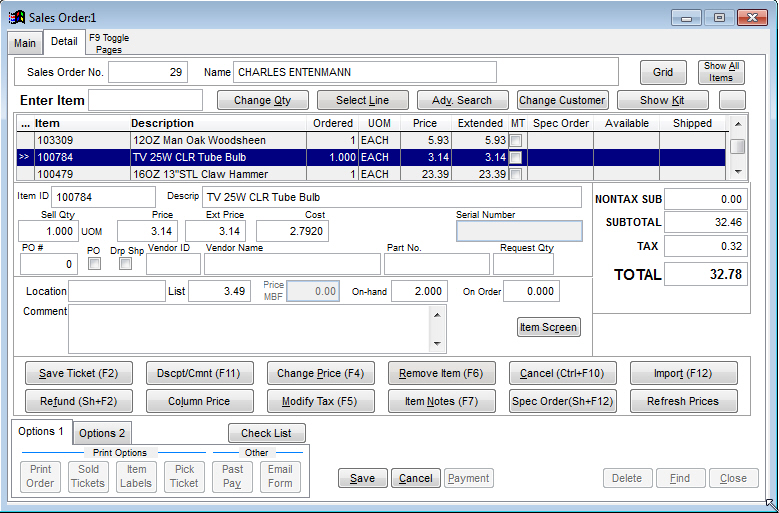
Sales Order Screen details
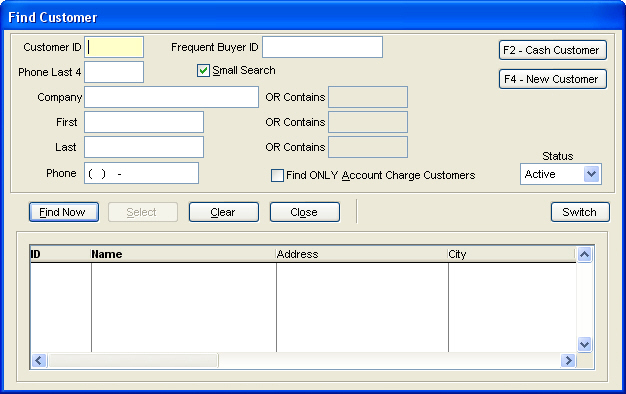
Select Create Sales Order to create the item detail. Features found within Sales Order Module are similar to POS | Invoice Detail. Creating a Sales Orders begins with selecting the customer and then proceeding to the item detail portion of the order. Use the Find Customer screen to locate the specific customer. The search fields are the same as the other Find screens located throughout TransActPOS.
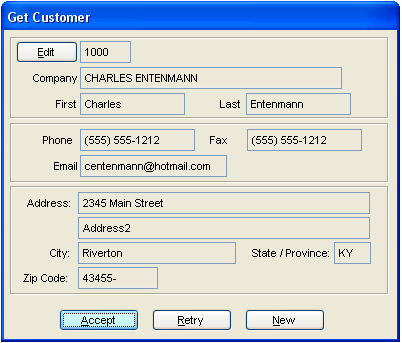
Once the customer has been located, select Accept to proceed to the detail screen.
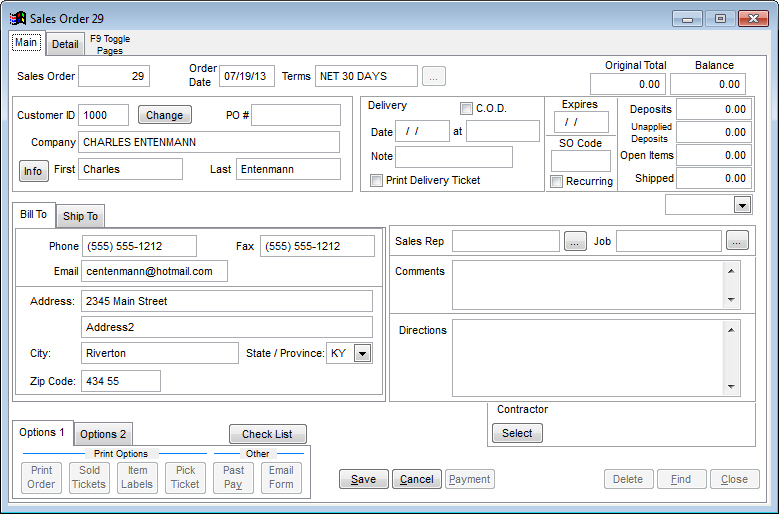
Once the customer is selected, you will be brought to the Sales Order screen. On this screen, you will see two tabs: Main and Detail.
The characteristics of the item detail screen are similar to that of the point-of-sale detail screen. Placing an item within the detail of a sales order changes the allocated value of the item, not the on-hand quantity. When a sales order is shipped, the shipped quantity is reduced from the on-hand quantity and the allocated quantity is reduced by the shipped quantity.
Note: The screens below are shown with Enhanced Sales Order enabled in Company Setup | Properties | Sales Order 2. This is our recommended setting, but you can disable if you like. The non-enhanced version is very similar to Ring Sale.
Enter Item
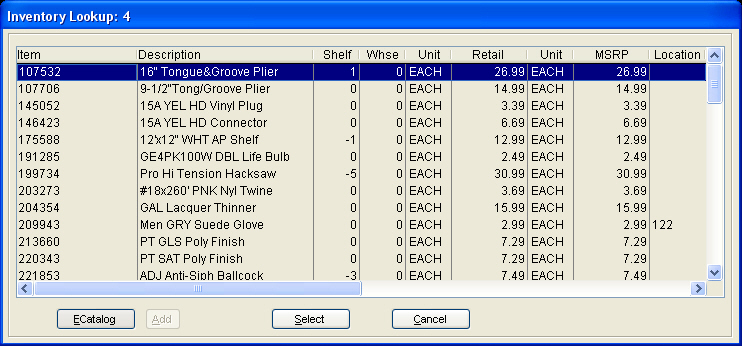
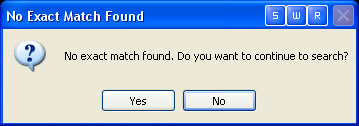
By changing to the Detail tab, you can begin to enter items on the Sales Order. The system should display a blinking cursor in the "Enter Item" field, indicating to the user that an item number may be entered. Based upon the length of the item number entered and the configuration of the TransActPOS system, the system will retrieve the item information and populate the appropriate fields within the Sales Order Detail screen. When a value is placed in the Enter Item field, the system will compare this value to the item number established within the Item field of the General tab and the values established within the Lookup By tab (both of which are located in the IC | Inventory File). The Lookup By tab has the ability to track multiple reference numbers for a single item. Further information is available within the IC chapter of this manual. If the item lookup does not have an exact match, the system will prompt the user if they want to continue the search based upon all items containing a close match to the item number provided (unless the Remove Prompt "Continue Search" is disabled in System | Company SetUp | POS Information 1, in which the system will continue the search without asking).
If the user selected Yes to continue, the system will then present a count down screen of the close matches. You may or may not see this countdown, as it may appear very quickly.
If the search is taking a while, pressing the Spacebar will stop the search and present the currently found items in a select window.
Using the up and down arrows will highlight the item to select for the Sales Order, then press Select or Enter to add the item. Pressing the Esc key will return the user to the Sales Order Detail screen.
Departmental sales can be made under a generic, non-stock item. For instance, create an item called "Shipping Charge” with an item number of ”SHIP”, stock status of non-stock, and a zero price. When the item number of SHIP is entered into the Enter Item field, the system will request a price for the shipping charge. This idea can be expanded into other areas of the inventory that does not allow a perpetual inventory, such as the ”Nuts and Bolts” department.
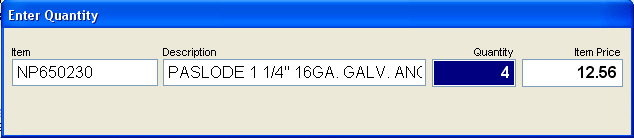
Change Quantity
Press Change Quantity to the change quantity of the last or selected current item. Once the Enter Quantity screen appears, the cursor is already positioned in the quantity field to allow changing of the quantity to the appropriate value. Enter the appropriate quantity for the sale; press Enter to accept the new quantity and return to the Sales Order - Invoice screen. The new quantity will be reflected in the extended price column.
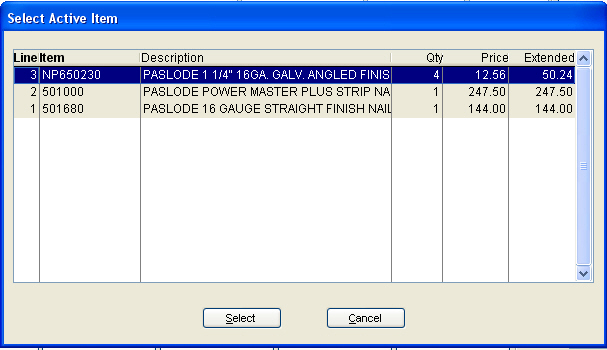
Select Line
By default, the focus of any item related feature of the Sales Order Detail screen is on the last item entered into the invoice, the item on the top of the displayed list. The Select Line button is used to change focus of the system from the last item entered to some other item in the detailed list. Press the Select Item button to display the item listing and use the up and down arrows to select the desired item. Upon returning to the Sales Order Detail, the left column will present a >>, indicating the currently selected item. This item will then be the focus of the next function. This feature is most commonly used to change quantity, modify tax, or customize the description of an item already entered into the invoice. Focus is automatically changed back to the top item after the function has been completed so reselecting an item is required if more than one alteration is needed on an item other than the top item.
The following scenario describes the use of the Select Item feature:
The sale clerk has entered three items into the sales order detail screen and then decides that the customer wants to change the quantity of the #2 item. Since the focus is on the third item (most recent) by default, you must press the Select Line button. This brings up the Select Active Item screen.
Using the up and down arrows, the item will be highlighted to select it for the sales order. Press Select or Enter to select this item in the sales order. Pressing the "Esc" key will return the user to the Sales Order Detail screen. The system will return to the Sales Order Detail screen indicating the selected item with a >> in the left column.
Modify the quantity sold by selecting the Change Quantity button and making the required change. After the change has been made, the system will reestablish the top item as the currently selected item.
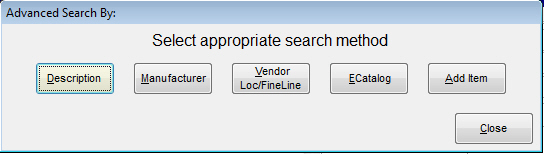
Advanced Search
The Advanced Search locates inventory based upon several criteria: Description, Manufacturer, Vendor/Location/Fineline, or ECatalog. You can also use the add item wizard through this selection. For more information about these search options, click here.
Change Customer
The Change Customer option changes the current customer to the newly selected customer, invoking any special pricing within the current invoice. This step is required if the payment method is an account charge, otherwise the system is unaware of the customer’s identity and possible discounts when the customer’s charge account is selected. For cash, check, credit card, and gift card payment, either selecting the customer at the invoice or payment screen is required if the customer is to have the allowed discounts.
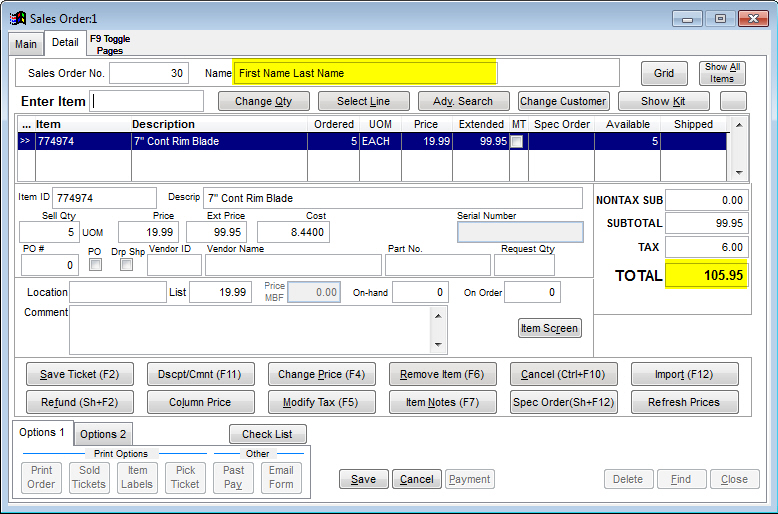
The example below displays the current price of an item utilizing the system’s default customer of ”Cash Sale”.
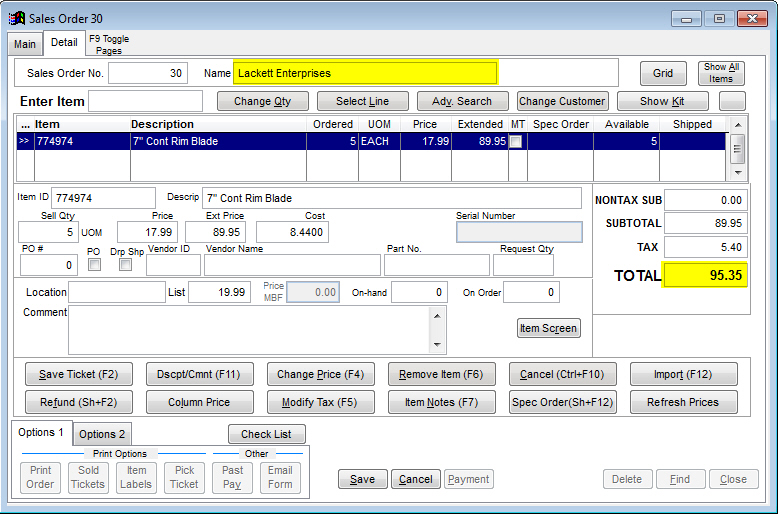
Within the Accounts Receivable module, the customer Lackett Enterprises has been given a 10% discount on all purchases. When this customer is selected with the Chg. Customer feature, the system automatically recalculates the current invoice to indicate all available discounts.
After the customer has been selected, all additional items will be discounted as indicated within the customer’s setup. For additional information regarding customer discounts, review AR | Customer File | Accounting and Settings tabs.
Show Kit
The Show Kit option will display the contents of an inventory item that has been established as a Kit, inventory items that contain a component listing. Review Kits Overview for further information regarding kits. Select Show Kit to display the contents of the item within the invoice screen. Whether or not the item is displayed in the detail invoice screen, the invoice will contain the kit’s component listing. Selecting Hide Kit will display only the kit item without the detail components. After a Kit Item has been entered into the invoice, the user may alter the Kit’s price and the quantity of the individual component items. If the component item quantity is changed, the Kit’s retail price DOES NOT automatically change. Changing the kit price is the responsibility of the user.
Sales Order Detail
The next area of the screen contains specific information about the items entered into the sales order:
Line
Indicates the line number of the items entered into the sales order. The last item entered always appears on the top of the list.
Item
This indicates the item number of the entered item.
Description
From the inventory control module, this is the description of the item will be displayed within this field. The description of the field can be modified with the Item Desc (Shift + F3) button.
Note: Changing the description in a sales order or invoice DOES NOT change the description in the Inventory Control file. The change is only for the given invoice.
Ordered
With the default value of 1, this field indicates the number of units being entered into the sales order. Using the change quantity option will change this. You may also use the * key and the quantity wanted for the selected item to change the quantity. Or you can simply scan additional items. Depending on the settings in the Company SetUp, the detail screen may or may not "summarize" the items listed. This means that when an additional item is scanned again, it will show up as a new line item if the system isn't summarizing like items.
UOM
The unit of measure for the given line/item. Some examples of this are EACH, 12PK, 6PK, etc.
Price
The retail price of the item being sold appears within the price column of the sales order, derived from the Inventory Control module and other system options. Further discussion of the pricing mechanism will be reviewed within the Inventory Control and Accounts Receivable Modules. To change the price of the current item, select the Change Price button and enter the new price. If the system’s price for the selected item is zero, the system will require confirmation if the price remains zero. The system will prompt the user to enter a price if the retail price has been set to zero.
Extended Price
The extended price column indicates the total retail price of the line item. This is equal to the quantity times the indicated retail price.
TX
The TX column is an indicator of a modification to the item's default tax status. If the tax type is different then the default type set, there will be an abbreviation for the selecting tax type. This is by using the Modify Tax button. Otherwise, this field will remain blank.
Spec Order
Used to denote if the item is special order or not.
Available
This is the number of items currently available for the customer at this point in time.
Shipped
This field shows how many of the given line/item have been shipped and on their way to your store.
Subtotal
The sum of all taxable products appears within this field.
Tax
The total tax collected from the taxable items within the invoice appears within this field. Depending upon the items within the invoice and the different tax calculations, direct interpretation of this value may only be realized after the invoice has been printed. Further tax information is found within the System | Support Files portion of the manual.
Total
The sum of the NONTAX, SUBTOTAL, and TAX fields appears within this field.
Item ID
The current item ID of the highlighted line/item.
Descrip
This field displays the item description assigned within the Inventory Control Module for the currently selected item.
Sell Qty
This field shows the quantity of the highlighted line/item is being sold.
Price
The current price for a single unit of the highlighted line/item.
Ext Price
The extended price (total) of all units being sold.
Cost
The cost of the highlighted line/item.
Serial Number
Will display the serial number, if applicable, of the line/item.
PO #
You can manually enter a PO # to place this item on.
PO
Checking this box will fill in the vendor information for a purchase order.
Drp Shp
Checking this allows you to drop ship this item to the customer/store.
Vendor ID/Vendor Name/Part No./Request Qty
This is vendor information for the purchase order.
Location
Displays the location of the line/item.
List
Displays the list price of the item.
On-hand
Shows the on-hand quantity in your inventory.
On Order
Shows the quantity currently on order.
Comment
Shows the item comment (if applicable).
Item Screen
The Item Screen button will display the Inventory File Item screen for the selected line item.