04-010-3 Inventory Control Training #3 - Pricing
Overview
There are a variety of methods that will allow you to manage your retail pricing. In this document, you will be introduced to those various methods. The store will identify which methods work best to meet their needs. You will see that you can manage the retail pricing through specific customers, specific inventory items as well as through a combination of customers and inventory items.
Inventory File - Prices Tab
In TransActPOS there are a variety of ways to set up some type of discount or promotional pricing. You can set up discounting of prices based on customers, based on items or a combination of both. Let’s start with what I term to be the simplest method and it is found in the Customer File.
Customer File
Sales Discounts
1. Select AR.
2. Select Customer File
3. Locate the customer.
4. Select the Accounting tab.
5. Select Edit
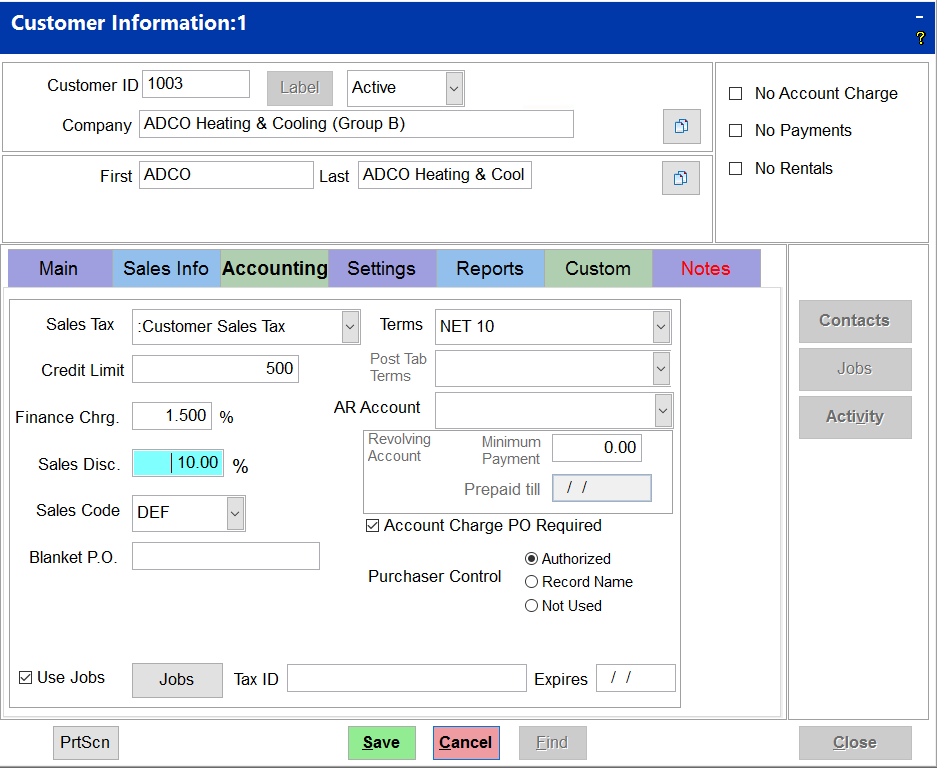
6. In the Sales Disc field and enter the desired % off as seen in the screen displayed below.
So for example, if you want to give the customer 10% off purchases, then enter 10.00 in the Sales Disc. field. As this is a customer specific discount, you will not see it in the pricing tab of an item. We wanted to include this in our pricing discussion so that you will know where the sales discount can be set.
Discount Groups
How to Create Discount Groups
The next type of discounting that we will talk about is creating discount groups and then applying customers to that group. These types of discounts will show on the Inventory file on the prices tab.
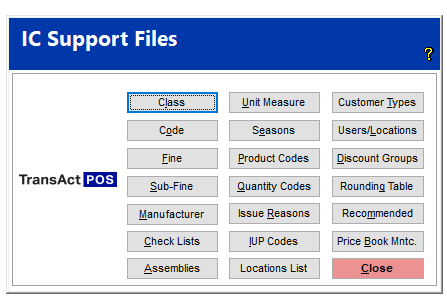
1. Select IC
2. Select Support Files
3. Select Discount Groups (the 3rd column, 3rd button down)
4. Select on the New button.
5. Enter a descriptive Group ID
6. Enter a long description for the select group
7. Select the Add button to describe the parameters of the discount
1. Item ID or portion of the Item ID
2. Specific Class, Code, Fine, Sub Fine, or Mfg.
8. Choose the type of discount that you are going to apply to this group by indicating either Discount from Retail Price % or Cost Markup % for the designated Type of Cost.
How to assign a customer to a Discount Group
1. Select AR
2. Select Customer File
3. Locate the Customer
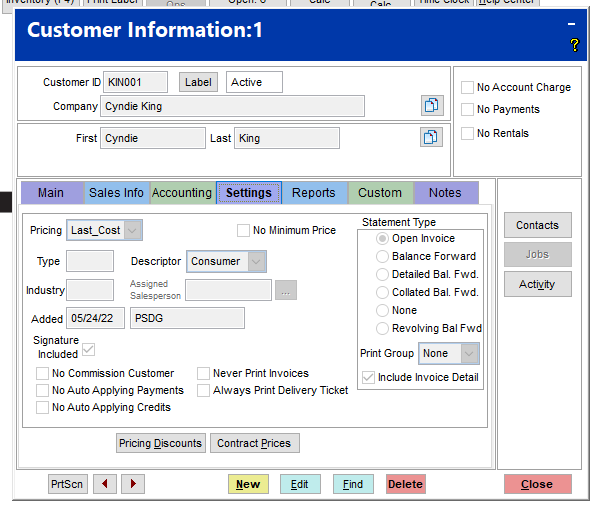
4. Select the Settings tab
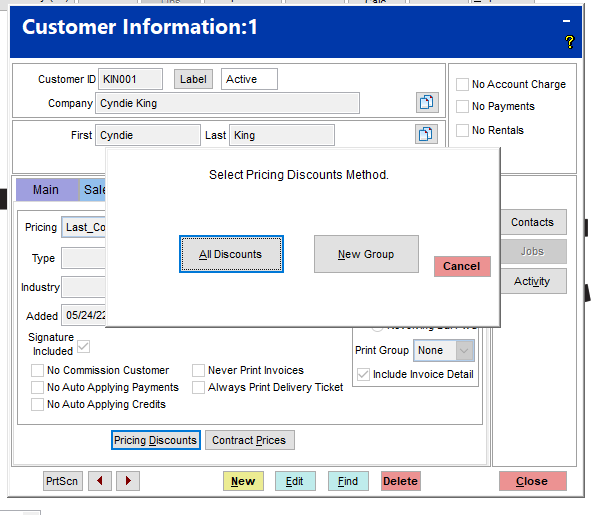
5. Select the Pricing Discounts
6. Select New Group.
7. Highlight the appropriate Discount Group .
8. Click on the Select button.
Repeat the selection process for additional Discount Group relationships.
Employee Discount Group Example
1. The example we will use is setting up Employee Discount Groups. If you go to IC, Support Files and then select Discount Groups.
2. Click on the New button.
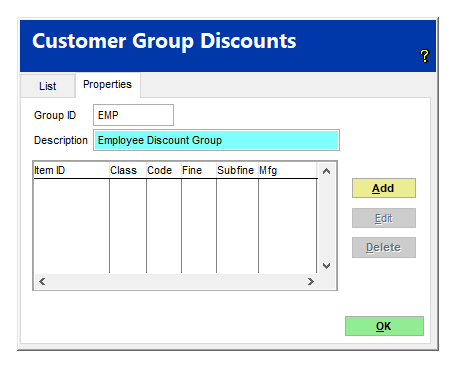
3. After clicking the New button, the screen below will be displayed. In the Group ID field, call that group whatever you want. You can put in up to 10 characters to identify that group and you can use numbers and letters. After entering the Group ID, enter the Description of that group and then click the Add button.
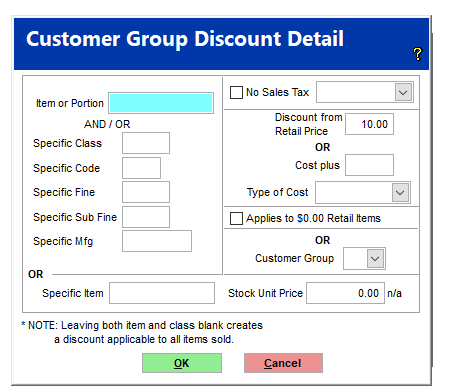
4. After clicking the Add button the screen below will be displayed. After entering the Group ID, enter the description of that group and then click the Add button. This will then display the Customer Group Discount Detail.
5. On this screen you can Discount from Retail or a Cost plus a percentage and choose the type of cost. The costs to choose from are the catalog cost, the last cost, the average cost or the absolute published cost. This can be applied to an item, and/or a specific class, code, fine, sub-fine, mfg or a specific group. If you don’t fill in any of those fields, the discount will apply to all items sold.
6. In our example, go ahead and put 10.00 in the discount from the retail price field and then click OK.
7. You now have a group called EMP created.
8. Next go to the customer file and locate the customer that you want to have assigned to this group.
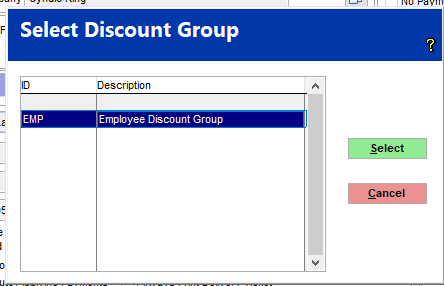
9. Go to the Settings tab and click on the Pricing Discounts and Click on the New Group.
10. Highlight the group that you want this employee to be a member .
11. Click on the Select button. That customer is now a member of that group.
Learning Moment #1
1. Where do you set up the Discount group?
2. If you are doing a Cost Plus, what are the types of costs that you need to select from
3. What tab do you go to in the Customer File to assign the group discount for that customer?
4. Can you set up your group discount to do a retail minus or a cost plus pricing?
Contract Pricing
Contract Prices
Customer contract pricing assigns a price per selling unit for a specific item. For example, specific items will be sold at the stated contract price per selling unit. Contract pricing differs from pricing discounts in that a specific item is required.
1. Go to the Settings tab in the customer file for the desired customer.
2. Click on the New Button.
3. Enter the item.
4. Enter the Contract Price.
5. Decide if you want to have an expiration date.
6. Decide if you want to check the Absolute Price box. Selecting the Absolute option disallows the customer access to a promotional lower price. Some state and county contracts are based upon an absolute price and restricts access to the lower promotional price.
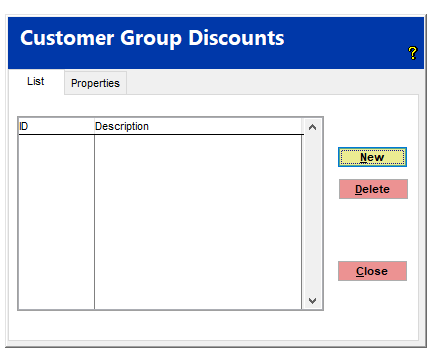
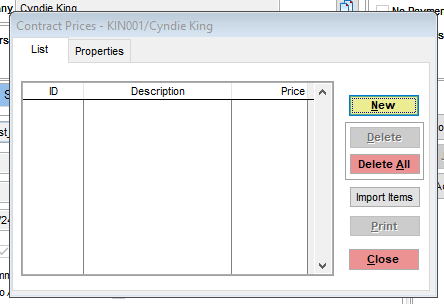
List Tab
The screen below displays the list of items currently loaded into the system for contract prices.
New Button - to create additional contract prices or
Delete Button - to remove any existing contract prices.
Delete All Button - to delete all of the contract prices in the list.
Import Button - You can make a spreadsheet of the list of items and their contract prices and import that spreadsheet into that contract prices area.
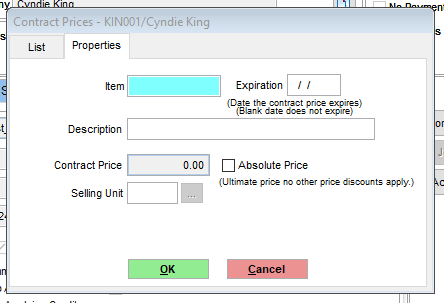
Properties Tab
1. This is the tab that you will use to assign a contract price to a specific item.
2. Enter the desired item.
3. Enter an expiration date if desired. This is the date the contract price expires. If you live this blank, that means that the contract price does not expire.
4. The description and the selling unit will already be filled in.
5. Enter the desired contract price. If you check the absolute price box, that indicates that the contract price is the ultimate price and no other discounts apply. Once that is entered, then you can
6. Click the OK button.
Learning Moment #2
1. Contract pricing assigns a price per selling unit for a specific item? T or F
2. Contract Pricing differs from pricing discounts? T or F
3. What does the absolute price mean?
4. What is the expiration date for?
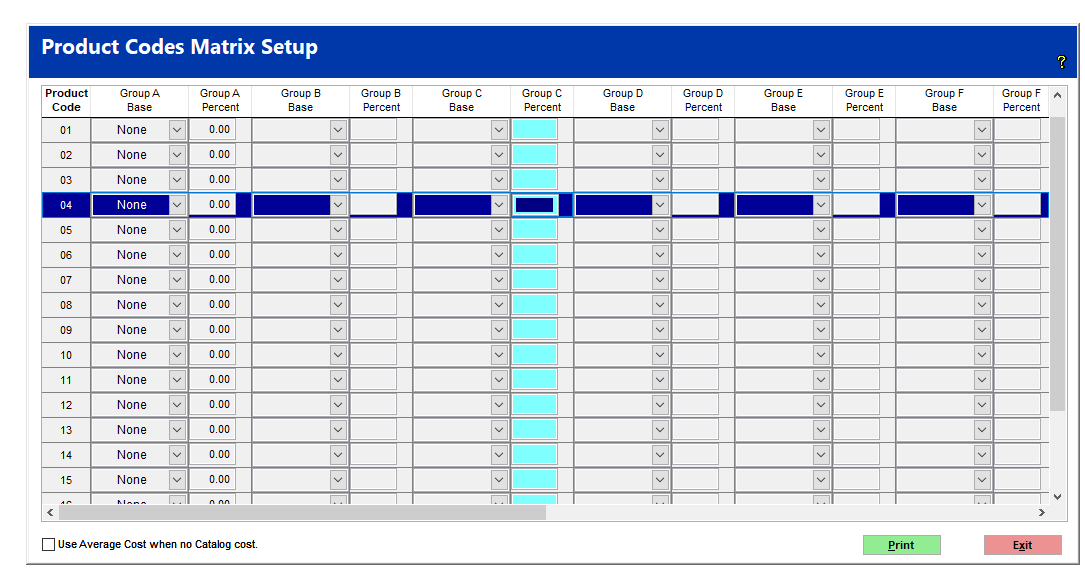
Matrix Pricing
With Matrix Pricing, it combines the items and the customers.
1. Assign product codes (1st column) to items in the inventory file.
2. Assign specific Group A, Group B, Group C etc. pricing to the product code based on the row of Product codes (ex. 01, 02).
3. Assign the customer to Group A or Group B etc. This allows you to set different types of pricing for the same product or products for different customers.
Example:
You could assign a product code (05) to all of the paint brushes. You could assign different types of pricing for different types of people (paint contractors - (Group A) retail - 5%, general contractors (Group B) retail-10%, regular customers (Group C) none.
Promotional Pricing
How to get to the Promotional Pricing Area
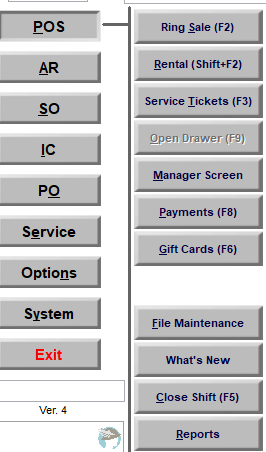
1. Click on POS
2. Click on File Maintenance
3. Click on Promotions
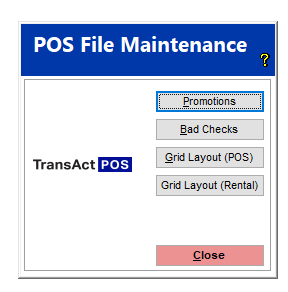
To get to the Promotional Pricing area, you want to click on POS Button in the left hand column of the Main Menu. Next select the File Maintenance button.
Once you click on the File Maintenance button, the following screen will be displayed.
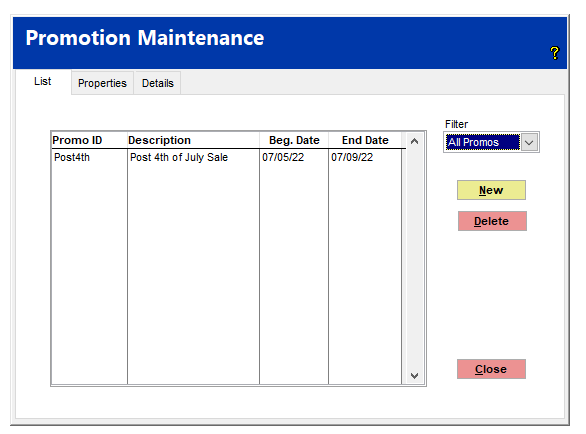
Once you click on the Promotions button, you will see the Promotion Maintenance screen with two different views. The first view is the List View and the second view is the Properties View.
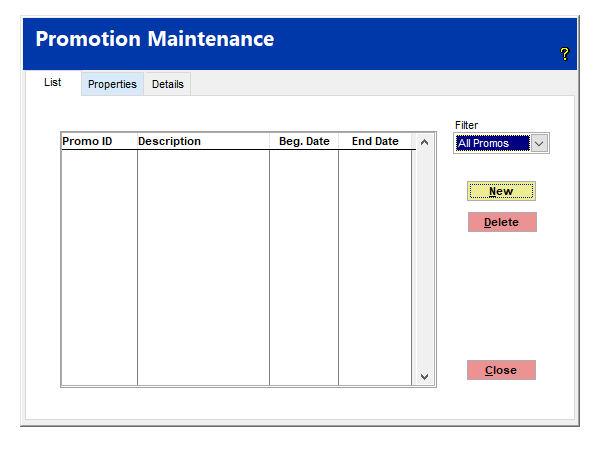
Promotion Maintenance List View
Promo Id - this is the name of the promotion.
Description - this is the Description of the promotion
Beg. Date - This is the date the promotion begins
End Date - This is the date the promotion is due to end
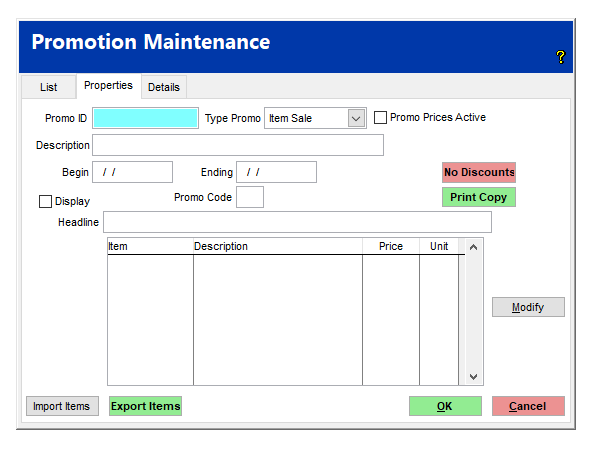
Promotion Maintenance Properties View
Promo Id - This is the name of the promotion.
Type of Promo - There are 7 different types of promotions. These are item sale, no tax sale,
rental reset, DIB Loyalty, Rwd Group Sale, Limited Qty, Group A-G, Bogo #1-#4
Promo Prices Active - A checkbox that you can manually check to turn the promotion on
Description - this is the Description of the promotion
Begin - This is the date the promotion begins
Ending - This is the date the promotion is due to end
Promo Code - This allows you to enter a promotion code for the promotion
Display - the items in the promotion will be displayed on the workstation extended monitor
Headline - a headline for the display of this promotion on the workstation extended monitor
Item - This is the item that will be on the promotion and it will be at a price lower than the retail price
Description - This is the description of the item that is
Price - This is the sale price of that item
Unit - This is the unit of measure for that item
How to Create a Promotion
There are 3 different ways to create a promotion.
1. Manually enter each item that is going to be in the promotion
2. Create the list of items that are going to be in the promotion using the item listing report
3. Enter the items into a spreadsheet and import the spreadsheet into the promotion area using the import button.
Method 1 - Manually enter an item into the promotion
1. Click the New Button.
2. Enter the Promo ID.
3. Select the Type Promo.
4. Enter the Description.
5. Enter the Begin Date.
6. Enter the End Date.
7. If you are using an Extended Monitor, you can check the Display Box.
8. If you want a Scrolling Headline, you can put in the Headline that you want to Scroll along the top of the Extended Monitor.
9. Click the Modify Button, you can then add the items that you want to have in the promotion.
10. Click OK.
Method 1 - With Screenshots
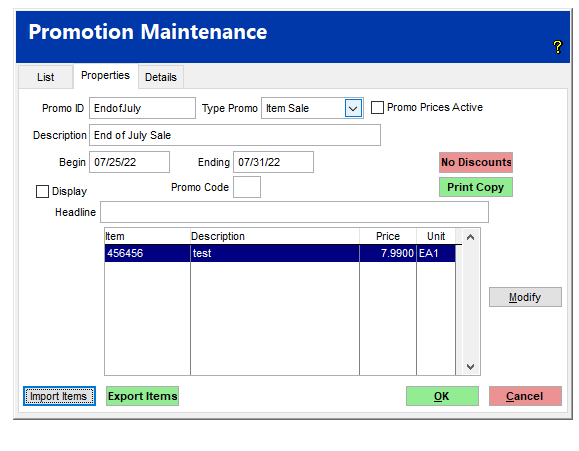
Click the New Button and the following screen will be displayed
Next fill in the Promo ID, the type promo, the description and the begin and end date. If you are using an extended monitor, you can check the Display box. If you want a scrolling headline, you can put in the headline that you want to scroll along the top of the extended monitor.
When you click the Modify button, you can then add the items that you want to have in the promotion and then click the OK button.
Method 2 - Create the list of items for the promotion using the item listing report
1. Click the New Button.
2. Enter the Promo ID.
3. Select the Type Promo.
4. Enter the Description.
5. Enter the Begin Date.
6. Enter the End Date.
7. If you are using an Extended Monitor, you can check the Display Box.
8. If you want a Scrolling Headline, you can put in the Headline that you want to Scroll along the top of the Extended Monitor.
9. Click the Import Items Button.
10. Click on the Item Listing Button.
11. Select the desired Report Parameters.
12. Click the Generate Button to run the report
13. Click the To Promo button.
14. Click Modify Button to update the prices
15. Click OK
Method 2 - With ScreenShots
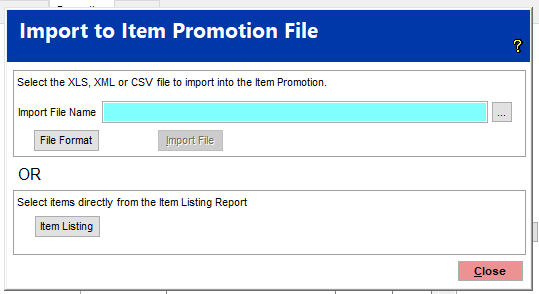
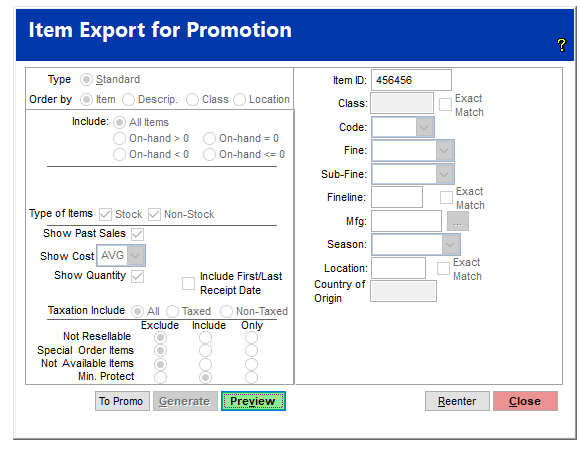
You still want to create the promotion as you did above except instead of Pressing the Modify button, you will press the Import items button. After pressing that button, the following screen will appear.
Click on the Item Listing button. The following screen will be displayed. You will click the Generate Button to run the report and click the To Promo button. In the example below, we ran the report for one item.
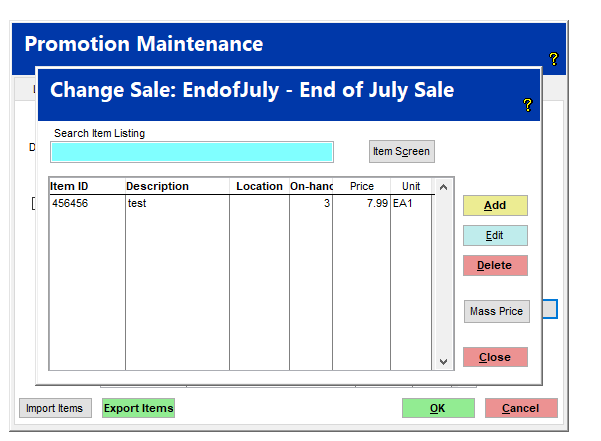
In the screen below, you see that the item was added to the screen. Notice it was added at the regular price. At this point you can modify the price using the Modify button as shown in the How to Modify the Promotion Section.
Method 3 - Import a spreadsheet into the Promotion area
1. Click the New Button.
2. Enter the Promo ID.
3. Select the Type Promo.
4. Enter the Description.
5. Enter the Begin Date.
6. Enter the End Date.
7. If you are using an Extended Monitor, you can check the Display Box.
8. If you want a Scrolling Headline, you can put in the Headline that you want to Scroll along the top of the Extended Monitor.
9. Click the Import Items Button.
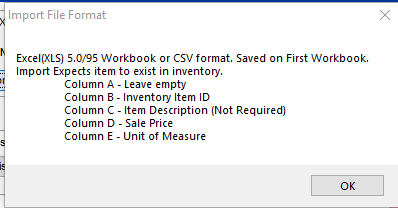
10. Click on the File Format button to make sure that your spreadsheet is formatted correctly.
11. Click on the box with the three dots to the right of the Import File Name field to insert the spreadsheet that you are going to import
12. Click the Import file button to import the spreadsheet into the promotion.
13. Click Modify Button to update the prices
14. Click OK
Method 3 - With Screenshots
In this method, you can import a spreadsheet into a promotion that has already been created. This is done in the top area of the above screen. There are two buttons. The first button that we will discuss is the File Format button. If you are going to create a spreadsheet to import into a promotion, the format of the spreadsheet must be as shown in the screen below. Notice that the spreadsheet must be saved as an Excel (XLS) 5.0/95 workbook or a .CSV format and it has to be saved on the First Workbook. Make sure that you also know where the file is saved.
Once that is complete, you will want to click the Import File button. The file will then be imported into the promotion that you created.
You want to select the line that you want to modify and click the Modify button
.
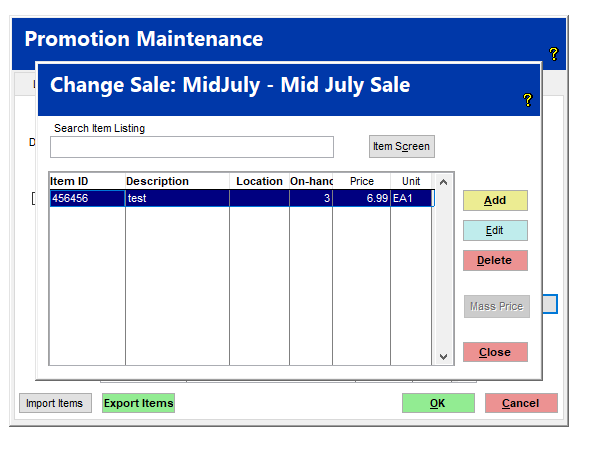
Once you click the Modify button, the following screen will be displayed.
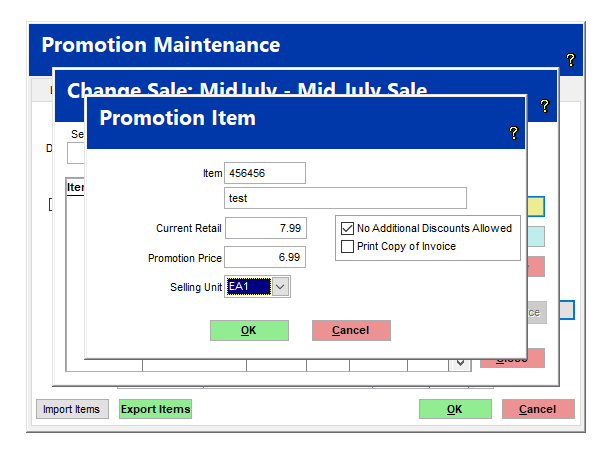
Notice on the right hand side, you have an Add, Edit and Delete and Mass Price button. If you click the Edit button, the following screen is displayed. Note that the Delete button here deletes the item not the whole promotion.
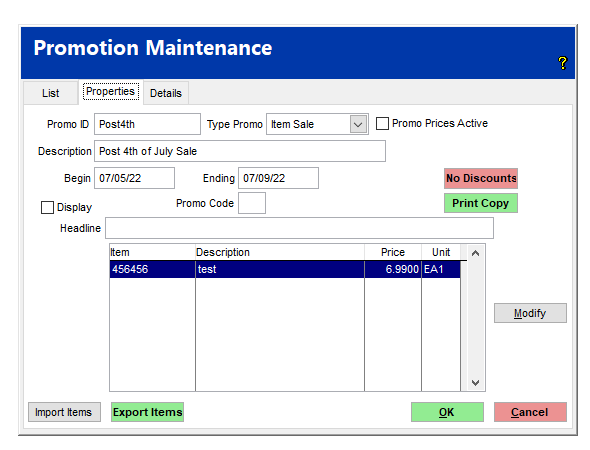
You can enter the Promotion Price that you want. In this example 6.99 and then press OK. The following screen will be displayed and you can see that the promotional price is now displayed for that item.
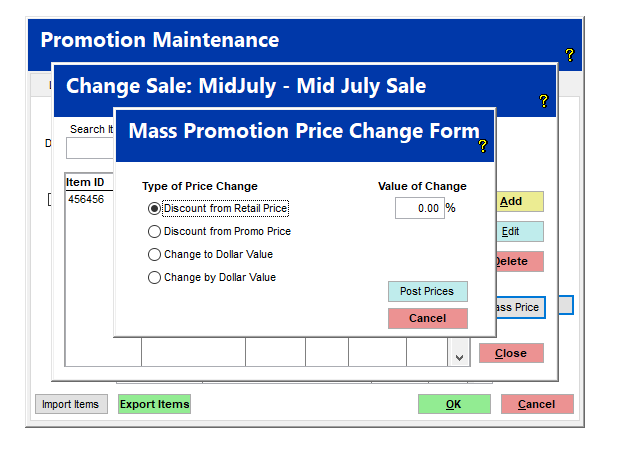
If you want to do a Mass Price change or update, you would click on the Mass Price Button. The following screen will be displayed.
Notice that you have several options underneath the Mass Price Button. You have 4 different types of price changes:
1. Discount from Retail Price
2. Discount from Promo Price
3. Change to a Dollar Value or
4. Change By a Dollar Value.
That value of change can be either a percentage (%) or a dollar ($) value. Once you have decided on the type of change, you will then click the Post Prices button. Notice that you can cancel if you change your mind.
How to Delete a Promotion
1. Go to POS, File Maintenance, Promotion
2. Highlight the Promotion that you want to delete
3. Click on the Delete button
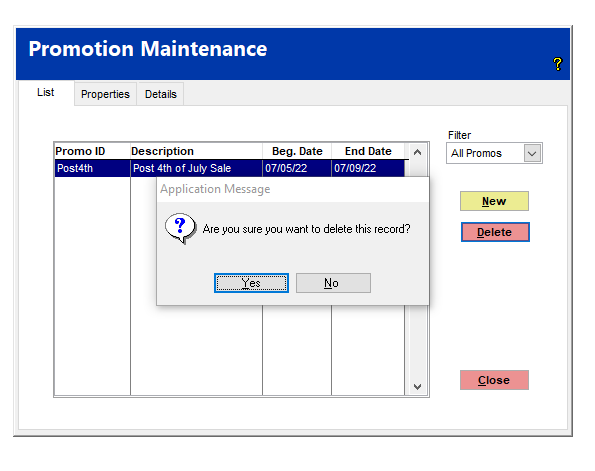
4. Click on the Yes button if you want to delete the promotion
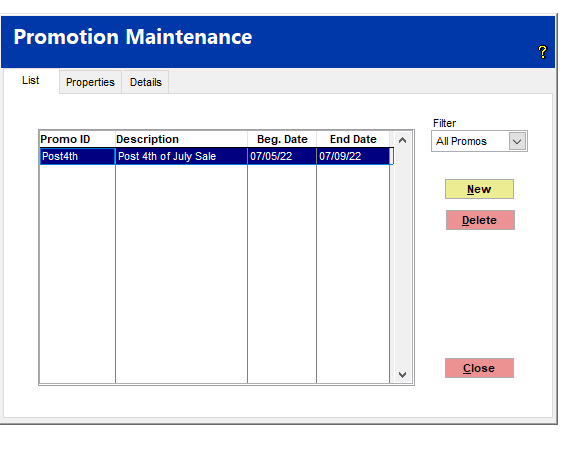
This is the screen that is displayed after you go to POS, File Maintenance. If you want to delete this promotion, just click on the Delete button, and the following screen will be displayed.
At this point, select the Yes button and the following screen will be displayed, and you will see that the promotion is longer displayed.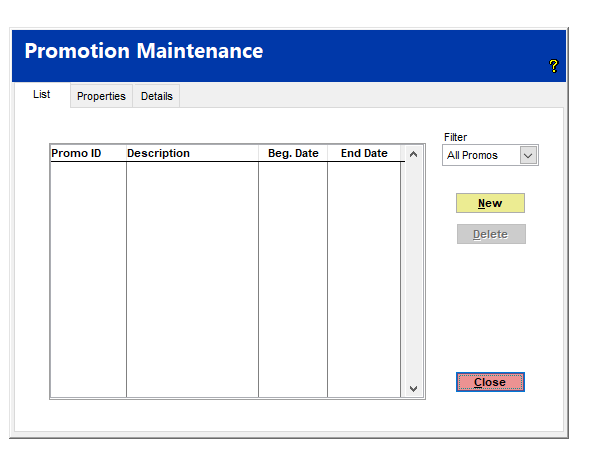
Learning Moment #3
1. Where do you go to set up a Promotion?
2. How do you delete a Promotion?
3. How do you modify the price in a promotion?
4. What two ways can you import a promotion
5. What does the Mass Price button do for you?
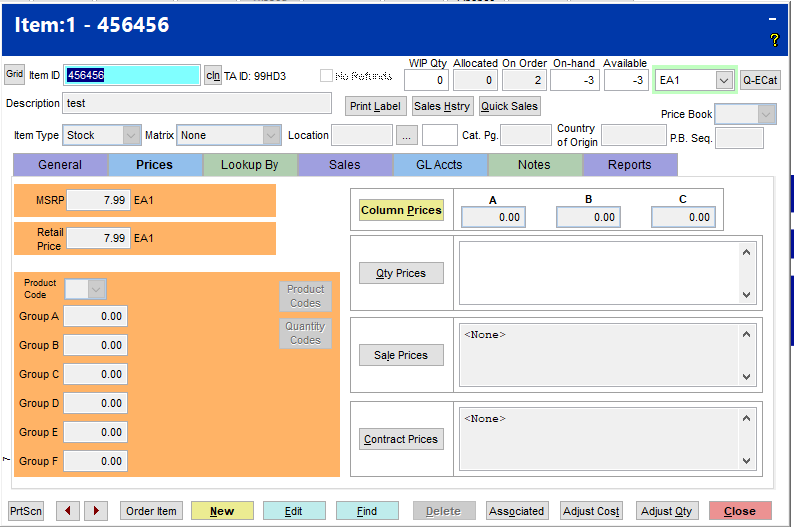
Qty Break Pricing
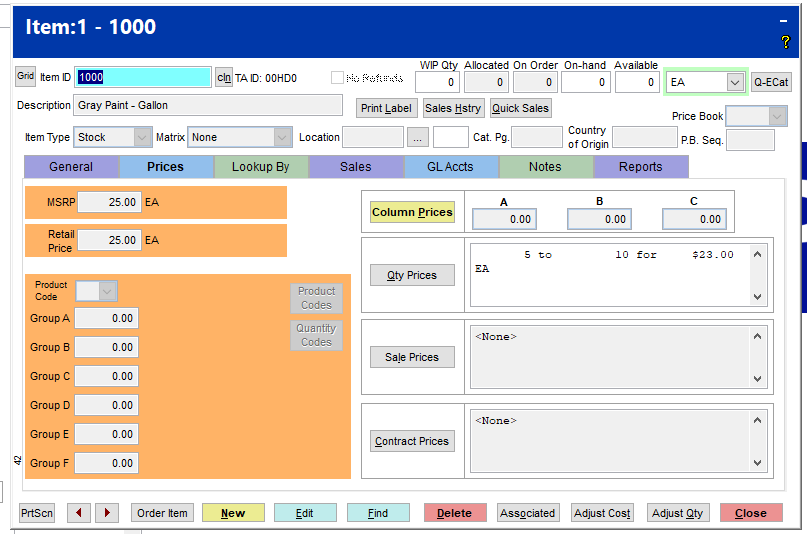
With this type of pricing, you will set different prices of an item based on the quantity that is sold. For example, let’s say that for a gallon of paint, if the customer buys 1-4 gallons, the price will be 25.00. Note: you don’t have to set that up under the pricing tab as it will take the price that is on the General Tab for that quantity. If they buy 5-10 bags they will pay 23.00 and anything over 10 bags (11-9999) they will pay 21.00. This is what we refer to as quantity break pricing.
Notice in the screen below, you will click on the Qty Prices button.
How to Set Up Qty Break Pricing
1. Go to IC, Inventory File and bring up the item
2. Click on the Prices Tab
3. Click on the Qty Prices button
4. Click either on the New button or the Properties tab
5. Enter the Selling unit of measure
6. Enter the Beginning Qty
7. Enter the Ending Qty
8. Enter the % of Retail or the Dollar amount
9. Click OK
How to Set Up Qty Break Pricing with Screenshots
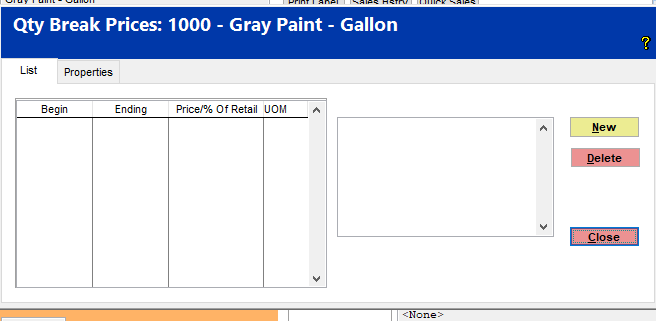
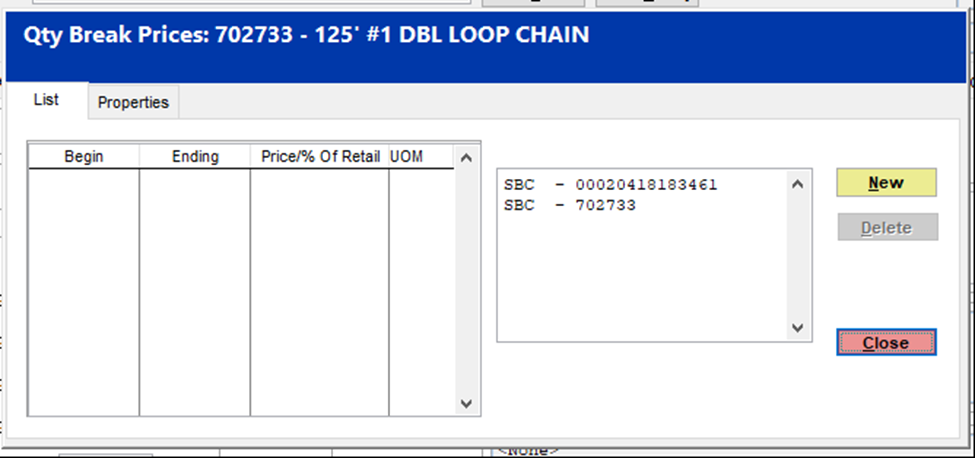
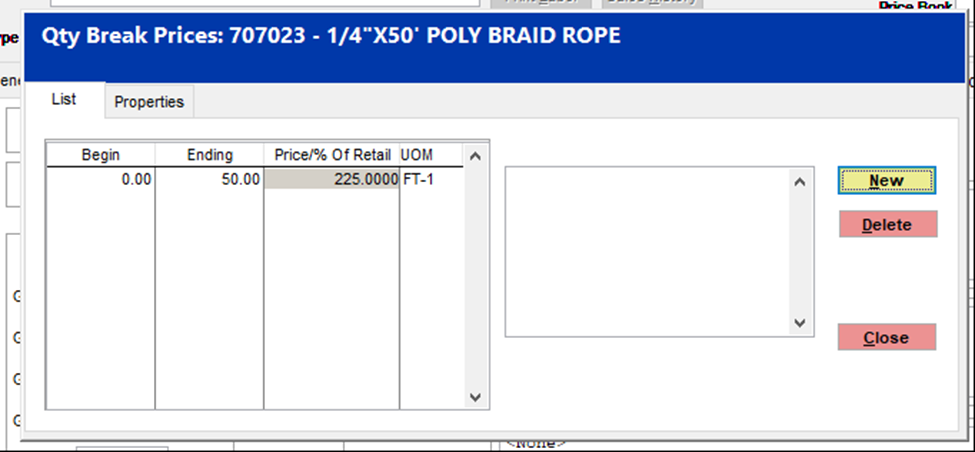
When you click on the Qty Prices button, the following screen will be displayed.
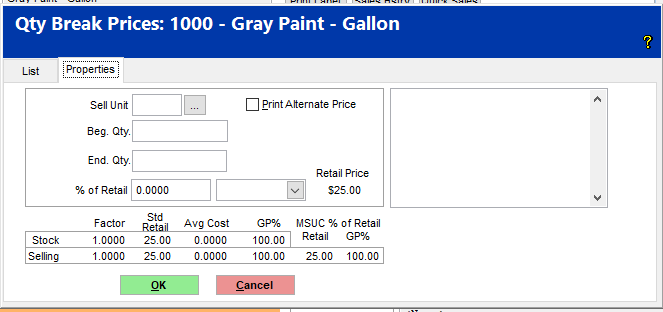
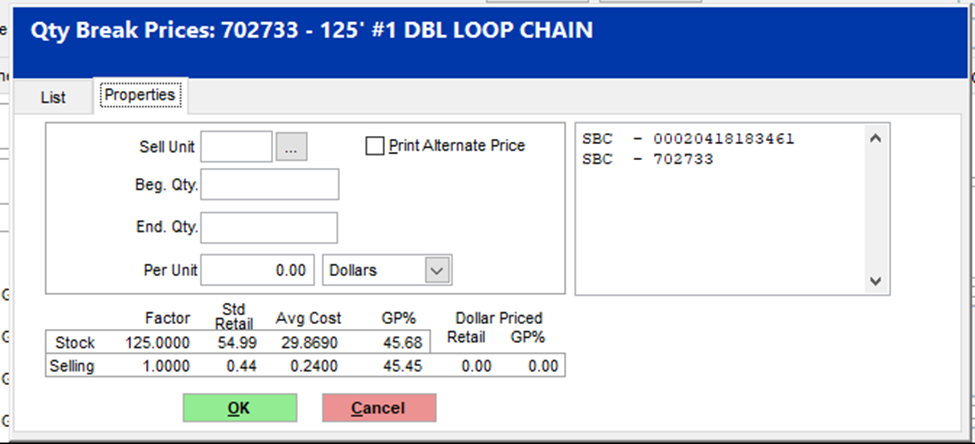
Click either on the New button or the Properties tab and the following screen will be displayed. On this screen, you want to set the Selling unit of measure, the Beginning Qty, the Ending Qty and the % of Retail or the Dollar amount.
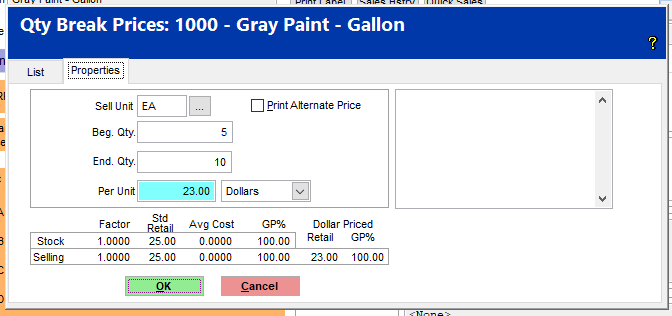
In the screen displayed below, you will see where we have filled in values for each of the fields. Below this screen you will see each field defined.
-
Sell Unit - In this field, you will select the Selling Unit of Measure. Ex. EA1, FT1
-
Beg Qty - In this field, you will enter the Beginning Quantity. Ex. you want to sell between 5 and 10 cans of paint at a certain price. The 5 goes into the Beg. Qty field
-
End Qty - In this field, you will enter the End Quantity. Ex. you want to sell between 5 and 10 cans of paint at a certain price. The 10 goes into the End. Qty field
-
Per Unit - This field allows you to enter the per unit retail price of that item. Ex 23.00 per gallon for the retail price if the customer buys between 5 and and 10 gallons
-
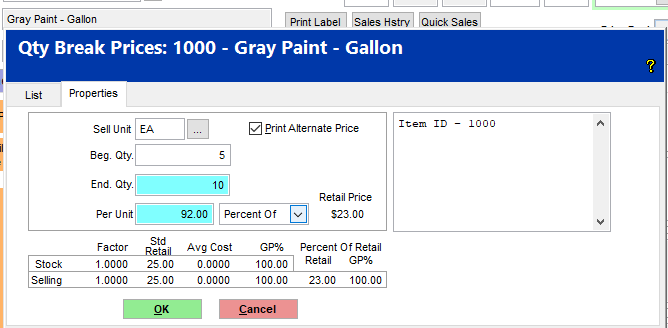
% of Retail - You can set that $23.00 as a % of the retail price instead of the dollar value. If you want to retain the $23.00 but you want to represent it as a % of retail, it would look like the screen below.
Once you click the OK button, it looks like the screen below.
If you want to add another Qty Break, for example 11 to 9999, then you would repeat the above process and it would look like the screen below after you added the 2nd Qty Break.
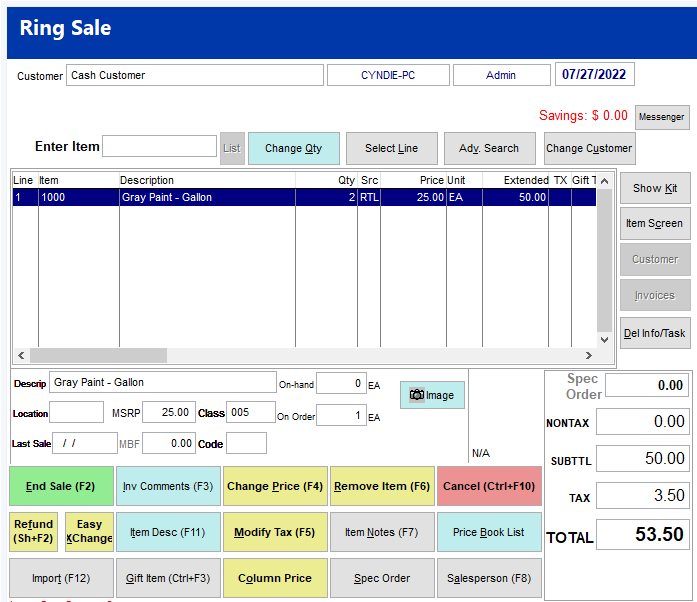
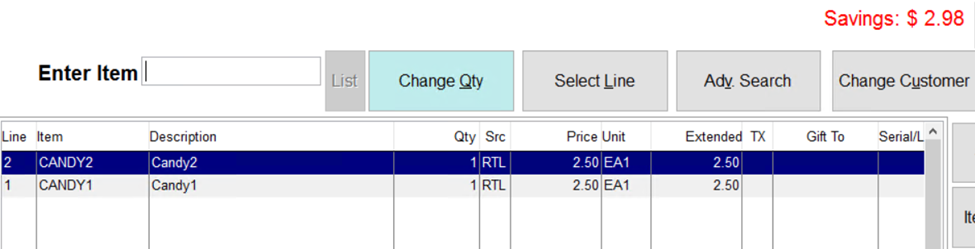
Once you have the Qty Break set up, let’s see how it looks at the Point of Sale screen. In the following 3 screens, you will see that all the clerk has to do is to change the quantity of what is being purchased and it will adjust the price accordingly.
In the screen above, the customer is purchasing 2 gallons of the paint, so the price is $25.00 per gallon based on our examples that we have been setting up and using.
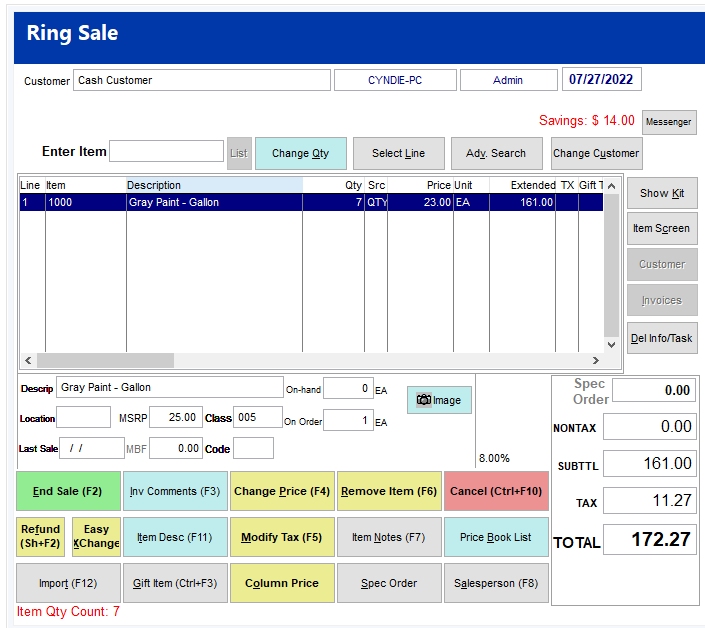
In the screen above, the customer is purchasing 7 gallons of the paint, so the price is $23.00 per gallon based on our examples that we have been setting up and using.
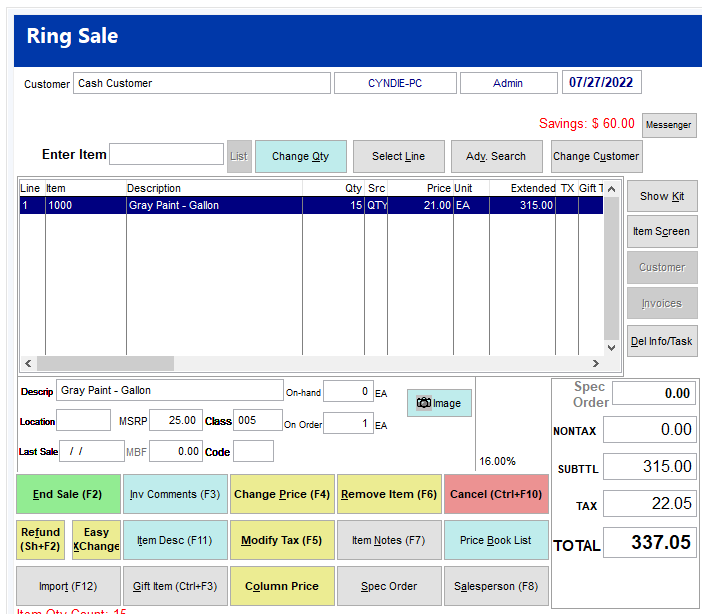
In the screen above, the customer is purchasing 15 gallons of the paint, so the price is $21.00 per gallon based on our examples that we have been setting up and using.
Learning Moment #4
1. What is Qty Break Pricing?
2. How do you set up Qty Break Pricing?
3. How does the Qty Break Pricing work at the Ring Sale Screen?
4. What tab will the Qty Break Pricing be set up under?
Multi Unit Pricing
How to Set Up Multi Unit Priced Items
1. General Tab Of the Inventory File (IC, Inventory File) – Set up the Big Unit (Roll, Box, Case etc.)
1. Make sure the qty on hand is set to 0, if it is not, you will need to select the adjust qty button and physical that to zero.
2. Set the purchase unit and the stock unit to that of the big unit such as roll or case and set the factor to quantity of the roll or case. For example RO100, CA24, BX100.
1. Click the Edit button, go to the Purchase Unit and click on the Ellipse (...).
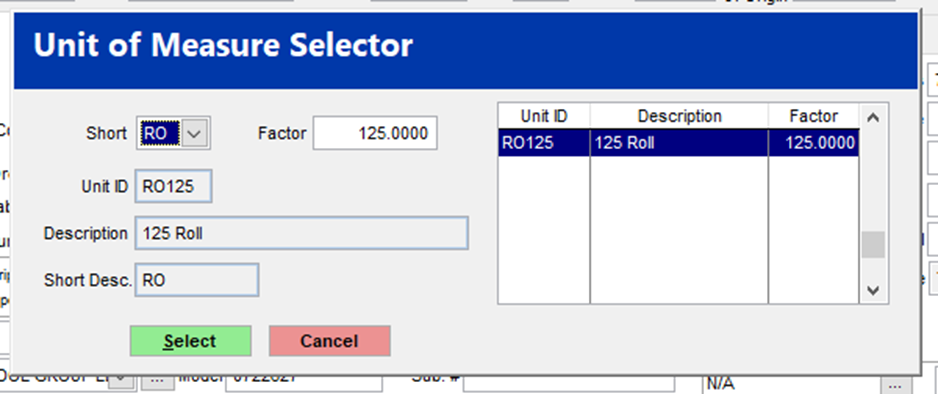
2. The system will display the screen below. The Short field is the prefix that represents the unit of measure to be used. For example, RO for Roll, RL for Reel, BX for Box and EA for each. The Factor is the qty related to the selected unit of measure. There are methods to select the applicable unit of measure,
1. Either the desired unit of measure will appear within the right hand column upon which you will just highlight it and press the Select button.
2. Or you will enter the Short prefix, enter the Factor and then click on the newly created selection.
3. You will do the same thing for the stock unit. Once you have completed both units of measure make your decimals either 2 or 3.
4. Make sure your retail price is what you want to sell the big unit for…ex. Roll, Case, Box.
2. Prices Tab of the Inventory File (IC, Inventory) – Set up the Small Unit
1. Click on the Prices Tab
2. Click on the Qty Prices button. The screen that will be displayed is shown below
3. Click on the New utton and the following screen will be displayed – this is where the small unit (FT, EA, etc.) is set up.
4. Set up the selling unit of measure just like we did the units of measure on the General Tab.
5. The Sell Unit in this case would be FT1
6. The Beg. Qty. would be 0 (zero). The Rule of Thumb, if you are cutting something the Beg. Qty. will always be 0 otherwise make it 1.
7. The End. Qty. in this case is 125 because that’s how many feet are on the roll.
8. The Per Unit can be either the dollar amount or the percent of retail. If you use the percent of retail, you can use 125 as the starting percentage and then if you click your mouse in the End. Qty. field it will display the FT. price to the right of the percent of retail field. Keep trying various percentages until you find the percentage that will give you the desired price.
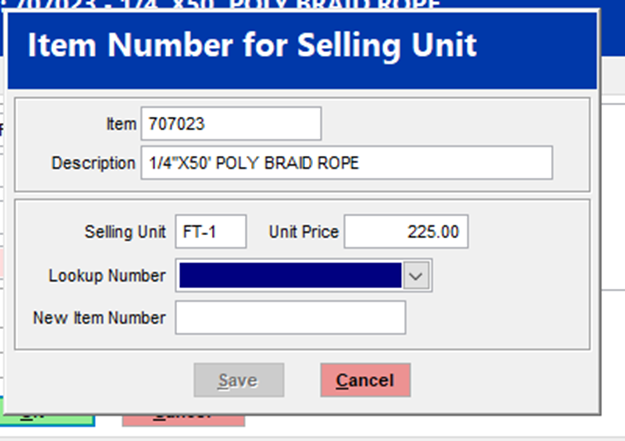
9. Once you Click OK, the following screen will be displayed
10. Select the number that they will be looking up. Most of the time this is the Item Number of that selling unit as seen in the image below.
11. To do this, click on the down arrow in the Lookup Number field and select the item ID.
12. Click on the Save button
13. The image below shows the completed Qty. Break Prices screen
3. Lookup By Tab of the Inventory File
1. The Last Step is to go to the Lookup By tab as seen in the image below in No. 8.
2.
3.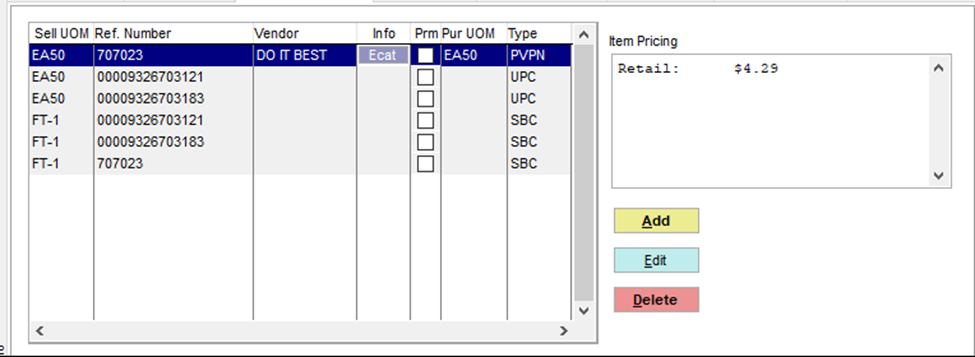
4. 8. You want to make sure that you can find the item for both units of measure for any of the ways that you might want to look up this part, ex. Item Id, UPC codes, vendor part numbers or short barcodes.
5. 9. You have now completed the setup. You can test this by going to the Ring Sale screen and entering the item. You will see both of the units of measure available to choose from depending on how the customer is trying to purchase the item, ex a roll or a certain number of feet.
How to Configure Class Unit Quantity Pricing
This section outlines the process to configure items within a class to receive quantity price discounts with respect to other items within the same class which have matching quantity break price entries.
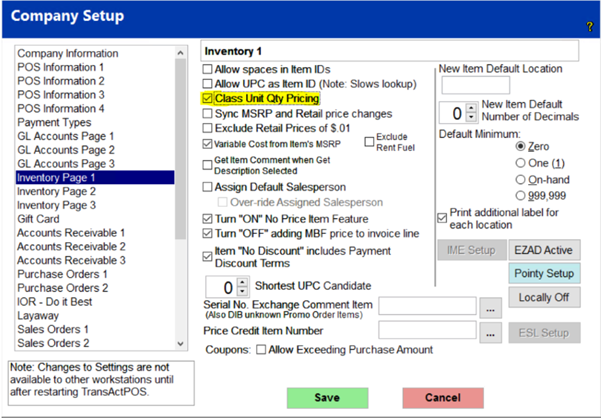
Step 1. Enable the “Class Unit Qty Pricing” option in Company Setup > Inventory Page 1.
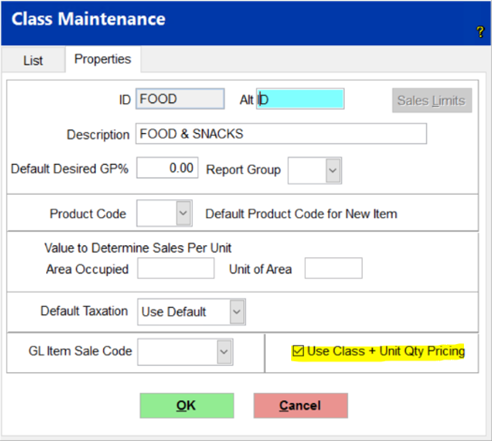
Step 2. In IC > Support Files > Class open the class that will be used and check the “Use Class + Unit Qty Pricing” checkbox.
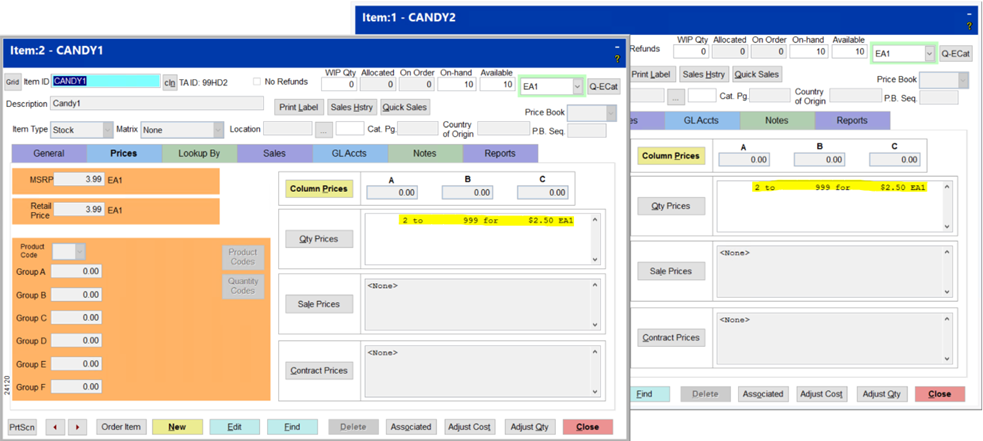
Step 3. For the items that will share quantity breaks, ensure that they are in the same Class and have identical price break entries under the Inventory File > Prices tab > Qty Prices button.
Step 4. Test the discount in the Ring Sale Screen.
In this example the Qty Price goes into effect after the second item is added.