04-010-5 Inventory Control - Importing an Electronic Catalog
Overview
In this document, we will examine the Electronic Catalog Import Utility. For more information regarding the Electronic Catalog, please see the 04-010-1 Inventory Control Training #1 - Vendors and Ecatlog Primer
Steps to get to the Import Catalog Screen
1. Examine the spreadsheet and the vendor to determine what method will be used to bring in that specific catalog. We will go into this in detail below.
2. Click the IC Button
3. Click the Maintenance Button
4. Click the Import/Export Button
5. Enter your User ID
6. Click on the Electronic Catalog Button
7. Click on the Import Catalog Button
How To Get the Electronic Catalog
Call the vendor or service representative for information on how to obtain the file that contains the vendor’s offerings. Some vendors do have this information available on their website for download (Ex. Big Rock).
TIP: If you call the company and you are told that there is nothing like that available, tell them thank you and hang up. Call back and ask for the IT department who can typically help you get what you are looking for.
What to ask for when requesting an Electronic Catalog
1. Request that the catalog is in a spreadsheet (xls or xlsx) or CSV (Comma Separated Values) format. PDF files are of no use for loading electronic catalogs.
2. Request for the FULL catalog, not just a listing of what has been previously ordered from the vendor.
3. Request the following fields:
1. SKU (Item ID)
2. Description,
3. UPC (Universal Product Code)
4. Retail
5. Cost
Examine the Spreadsheet
1. Confirm that the vendor is set up in the vendor file within IC > Vendors and that the
1. Confirm that the ECatalog Vendor field is checked.
2. Determine if the vendor is a pre-formatted vendor by checking to see if the vendor is in the Select Import Source List.
3. If the vendor is in the Select Import Source List, make sure that the spreadsheet matches the format as displayed in the View Format Button. Be aware that there may be a pre-formatted option where the spreadsheet has to be saved as a XLS 5.0/95 format.
4. If the vendor is not in the Select Import Source List, then the Custom Column Import Option (Method 2 below) will be used to import the spreadsheet into TransActPOS.
5. Determine which Custom Column Import type/format (.XLS, .XLSX, .CSV) will be used.
6. Determine if you have the minimum required fields in the spreadsheet.
1. SKU
2. Description
3. UPC (Universal Product Code)
4. Retail
5. Cost
7. If the Retail is not in the catalog, a column can be added to the spreadsheet based on the cost as derived by the store.
Spreadsheet Formatting Tips
Below are listed a few additional formatting tips when working with the spreadsheets that are sent to you.
1. If the cost or retail fields have a dollar sign included in the field, you can use the “Replace all” function. Use the Find window (Ctrl+F). Replace all “$” with “” (nothing in the “Replace With” box).
2. If the UPC column has fields that look like this, “4.33179E+1” there are two things that you can do.
A. First make sure that the column has been expanded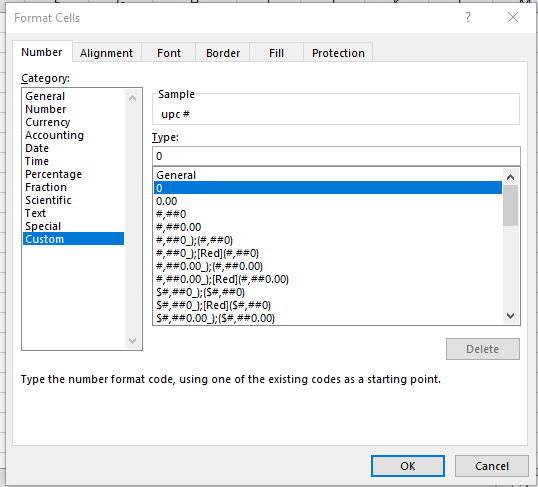
B. If the column has been expanded, and you still see something like this:
“8.7375E+11” then you want to format the column.
C. To format, highlight the column, right click the column and select Format cells,and the screenshot below will be displayed.
D. Click on the custom category and then choose the single 0 option just below the General on the right hand side of the format cells menu and then click OK as seen in the screenshot.
Don’t forget to save your changes in the spreadsheet.
3. If you have a spreadsheet with multiple worksheets then you should either copy each worksheet into its own spreadsheet and import that in or you can make a copy and then delete the other worksheets except the one that you want to load at that time.
4. You cannot use the same column more than once in the Custom Column Import Option. For example, if Column E is the retail, you can’t also use Column E for the Cost or if you are trying to use the same column for the Mfg ID and the Mfg Name.
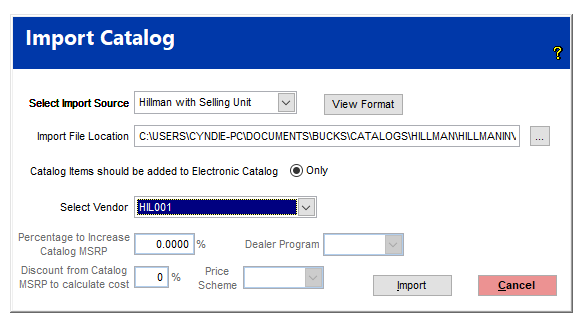
Method 1 - Formatted Option
Select Import Source: the import source will be either the Formatted Vendor (Ex. Hillman with Selling unit) or the Customer Columns (XLS, XLSX, CSV) Import. There are other options available so make sure to use the one that is appropriate for your spreadsheet.
Import File Location: this is where the spreadsheet has been saved. This file needs to be accessible from the server.
TIP: Create a folder under TransActPOS Server/Data01/ called Catalogs. Under that folder, create a separate folder for each Vendor Catalog. This gives a central location to keep your catalogs if you need to reference back to any of them.
Catalog items should be added to Electronic Catalog: by default this is checked
Select Vendor: locate the vendor for the catalog in the list of the vendors
Percentage to increase Catalog MSRP: the user can increase the Catalog MSRP by a percentage if they want to do that by entering the percentage in the box
Discount from Catalog MSRP to calculate cost: the user can decrease the Catalog MSRP by a percentage to calculate the cost if they want to do that by entering the percentage in the box.
Dealer Program: the user can select this if there is a specific dealer program they want to implement for the import of the catalog.
Price Scheme: the user can select this if there is a specific price scheme they want to implement for the import of the catalog. The setup for Price Schemes are found under IC | Maintenance | Mass Pricing | Price Schemes.
Import Button: to start the import process, the user can click the Import Button.
Cancel Button: to cancel the process, the user can click the Cancel Button and will be taken back to the Import Electronic Catalog Items Screen.
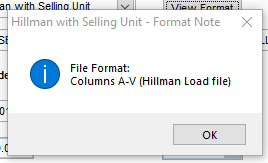
If the user is loading a pre-formatted catalog, that user can click the View Format Button to see the required format of the spreadsheet as shown below for the Hillman catalog.
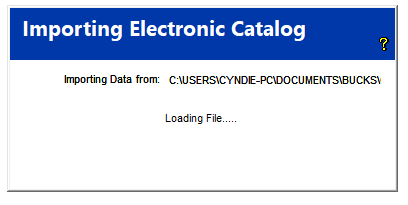
Once the user clicks the Import Button, the screen below will be displayed.
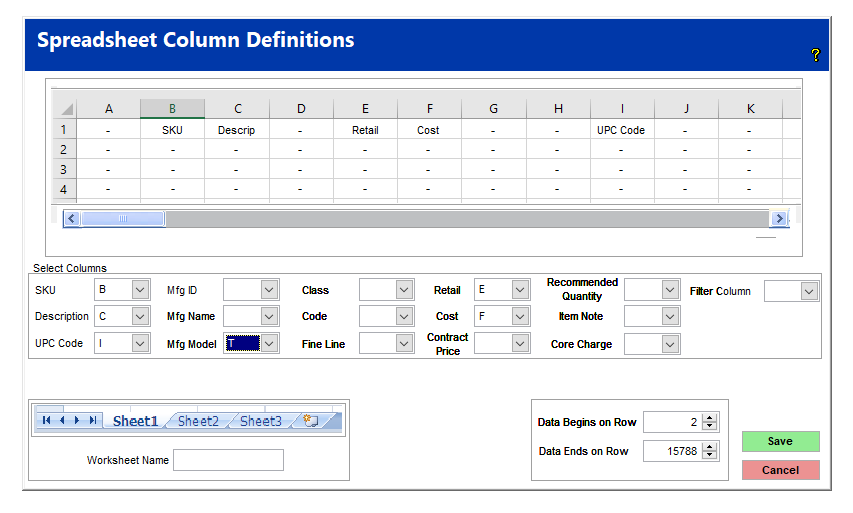
Method 2 - Custom Column Import Option
There are 2 differences between Method 1 and Method 2.
The first difference is the Select Import Source field. With this field, instead of selecting the specific vendor format, the user will select the custom column option depending on the type of spreadsheet that they are loading. For example .xls, .xlsx or .csv. Notice in the screen below, based on the spreadsheet that is being imported into TransActPOS, we are using the Custom Columns XLSX import.
The 2nd difference is that with Method 2, you will assign specific columns from the spreadsheet as seen in the screenshot below. In this example, the SKU was in column B in the spreadsheet. The Description in the spreadsheet was found in Column C etc. The user will enter the beginning row of data in the Data Begins on Row field (Ex. 2 if the data begins in Row 2). The user will enter the last row of the data + 2 (Ex. if the data ends in row 15786, put the ending row as 15788 to be sure to pick up the last row in the last row of the data) in the Data Ends on Row field.
Once the Save Button has been selected, the import process will begin.
Final Reminder
It is recommended that after the import is completed to go to IC, Electronic Catalog and enter the first item in the spreadsheet and verify that the UPC, retail and cost are correct. Additionally, review other items within the catalog to make sure that the data is accurate.