07-030-2 Rental Training #2 - Inventory Configuration
Overview
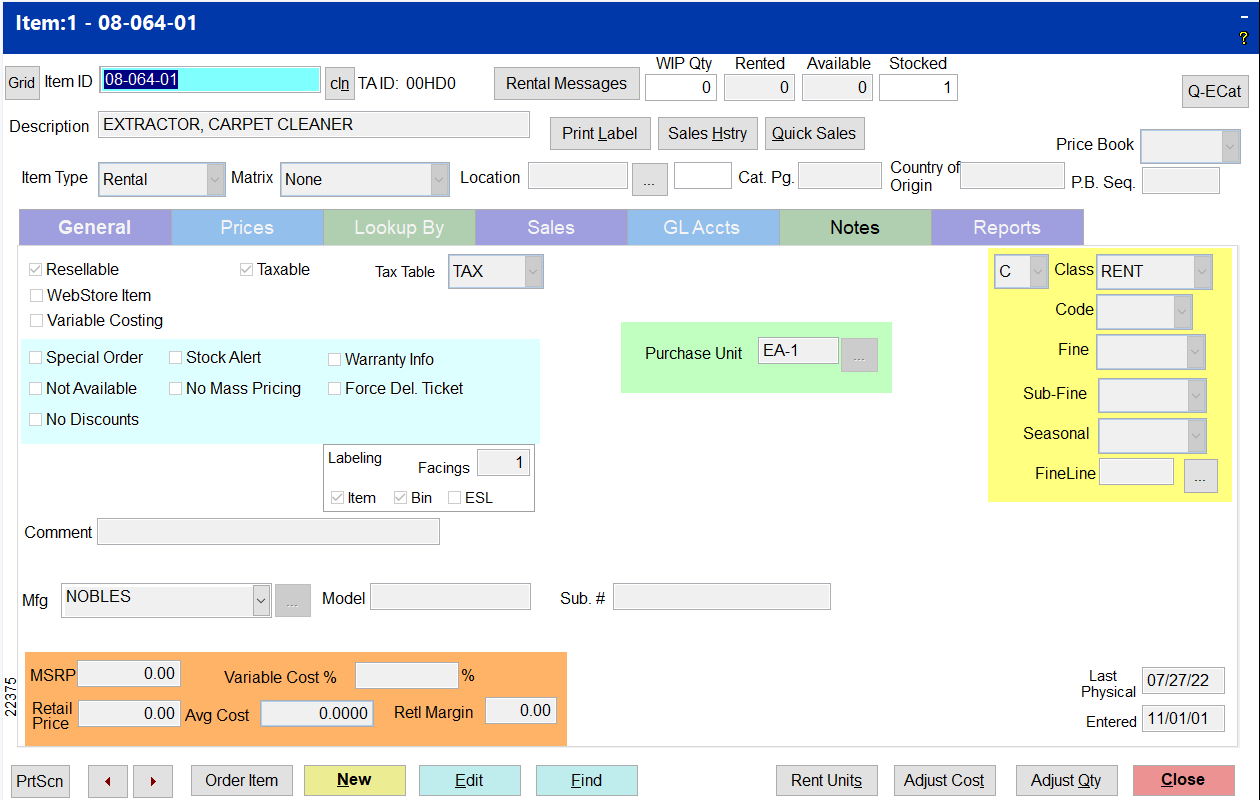
The Inventory File in TransActPOS has a rental item type that automatically makes the item available for rent. Rental pricing can be established at varying time intervals, including Overnight, Weekend, and holidays within the Company Setup. Other options include Deposits, Cleaning Fees, Damage Waivers, and Turn Around time.
Adding New Rental Items
Prior to using the Rental Module, inventory must be created and rental rates established.
Step 1: Go to IC | Inventory File | General Tab | New which will take you to the Inventory Add Wizard to create new rental items.
Step2: If you did not set the Item Type to rental when creating the item in the Add Item Wizard, edit the Item Number in IC | Inventory File | General tab and change the Item Type to Rental.
Note: The item Type can not be edited if the on-hand-qty for an item is zero. The Matrix for a rental item may be serialized or non-serialized. Rental items such as mowers, powered hammers, and Ditch Witches are good examples of items that can be serialized.
Step 3: Proceed to the Inventory Maintenance Pricing screen to complete the pricing schedule. The pricing for the rental item is located in IC | Inventory File | Pricing tab. Enter the appropriate Rental Rates, etc. based on the rates that were set up under System|Company Setup|Rental Manager Pg4 under Rental Rates Utilized and Save.
Rental Messages
Safety and warning messages to be printed on the contract. Messages can be created in Options|Rental Messages.
Rented
The quantity which appears in the Rented field represents the number of units that are currently on rental contracts.
Available
The Available quantity represents the difference between Stocked and Rented, representing the number of units ready for rental.
Stocked
The Stocked field represents the number of the current item placed into the rental program.
Rental Rates
The Rental Rates fields indicate the rate for the specified rental period of time. If a rate is left blank, the specified rate will not be available during the Reservation selection process.
Minimum
The Minimum rate is the least amount of money needed for the unit to be released from the property.
Hourly
Whole hour rentals begin with this basic rate. Depending upon the minimum rate established for the rental item, a single hourly rate may not be the cheapest total rental.
4 Hours
The 4 Hour rate is typically cheaper than four individual hourly rates and is utilized until the total rental time is equal to the next available rate.
Day (8 Hours)
Day rental is typically an eight hour period of time and is a lower total rate than two 4 Hour rates.
Over Night
The Over Night rate is regulated within System|Company Setup|Rental Manager Pg1. An overnight rate is simply the rate specified for an item that leaves at the end of the normal business day and returns at the beginning of the next business day.
24 Hours
The 24 Hour rate allows the customer to return the rental unit at check out time on the next day. If there is no value in this field and a customer rents an item for 24 hours, three 8 Hour rates will be charged.
Weekend
Weekend rates may not apply to all items, but are at times an excellent deal for the customer. The Weekend rate is controlled by the weekend beginning and ending time established within System|Company Setup|Rental Manager Pg1. Typically, the weekend rate begins near the end of business on Saturday and ends Monday morning at the beginning of the business day.
Week
Weekly rates have return dates and times that are seven days after the checkout date and time.
Month (4 Weeks)
The Monthly rate is based upon a four week rental and is the maximum rate established within the system. If a customer keeps a unit out for two months or even six months, the established rates per month will be the stated Month rate.
Holiday
Within System|Company Setup| Rental Manager Pg2, the selected holidays establish the recognized holiday schedule. The Day Prior and Day After indicate the times at which the holiday rate is in effect.
Meter Hours
For rental items with metering devices, the number of meter hours that are permitted per rental period. Extra meter hours will be charged per hourly rate.
Deposit
The Deposit amount is the secured amount while the rental unit is out on a rental contract.
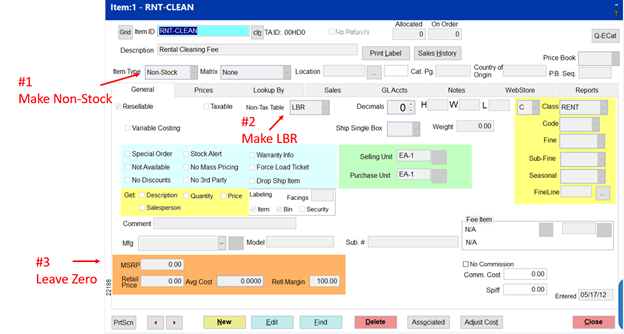
Cleaning
The Cleaning fee may be applied to the rental unit if a fee is required. If an inordinate amount of cleaning is required after the unit is returned, this fee can be charged to cover the additional overhead. A non-stock cleaning fee rental item must be created for this charge.
Damage Waiver
An extra percentage charge to cover damages up to the set deductible. A non-stock damage waiver rental item must be created for this charge.
Fuel Charge
An extra charge will be upon return for refueling. A non-stock fuel charge rental item must be created for this charge.
Create Service Ticket on Return
Automatic integration into the TransActPOS Service Ticket module allows the service department to create a service ticket specifically for the returned unit. A documented service history is then established for future reference. An in-house shop ticket will be created upon return to service the rental item.
Turn Around
The in-house estimated time needed to service the rental item before it is available for renting again.
Grace Period on Return
The in-house amount of time that may be given to the customer without being charged for additional rental fees.
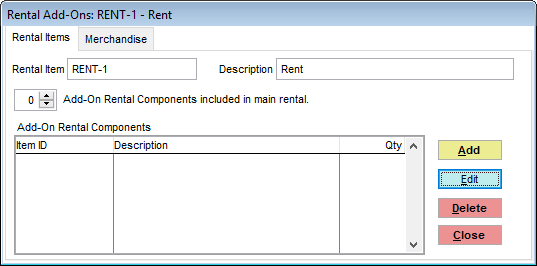
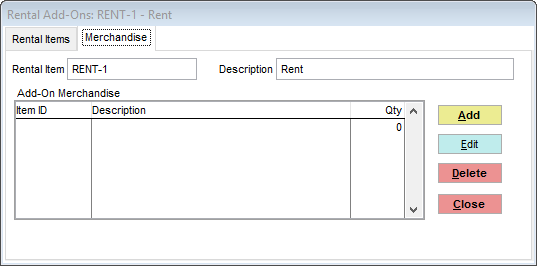
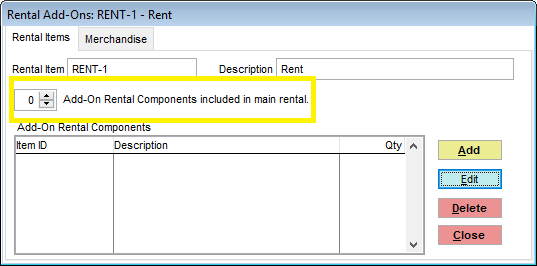
Rent Units
Rent Units work similar to associated items. Any items in this section will be part of the selection when you rent this item.
Rent Units is broken into 2 sections Rental Items:
and Merchandise items:
The Rental Items tab will allow you to add additional rental items that will be attached to this item. You can add different rental items and then select the number of add-on that are included at no extra cost. You can have as many add-ons as you have added to the list.
An example would be renting a drill as the main item, and then you can have the various drill bits for rental. You would add each bit with the add button, but only have add-on set to 1. This would allow one bit to be included at no extra cost and any of the additional selected would have a rate based on the rental rates that were setup for each bit as separate items.
#1 Learning Moment:
1. Create a New Rental Item for a Drill.
2. Create a New Rental item for a Drill Bit
3. Set Up Rental Rates.
4. Create your Add-on Item to the Drill as the Drill Bit.
Setting Up A Cleaning Fee Item
Go to IC, Inventory and create your rental cleaning fee item (example RNT-CLEAN). Make sure to make it a non-stock item, non-tax labor, leave retail price zero.
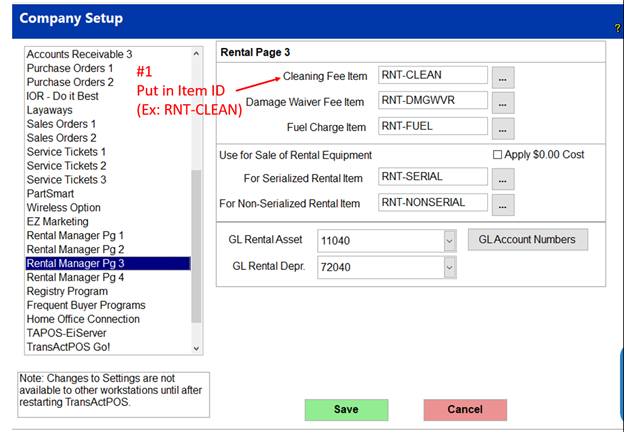
Go to System, Company Set Up, Rental Manager Page 3. In the Cleaning Fee Item Box make sure it has the same Item ID as you created for your rental cleaning fee above.
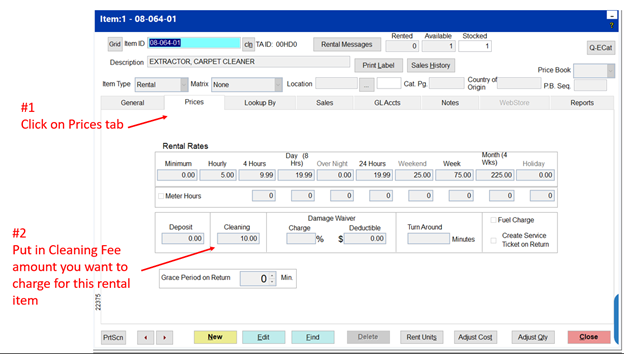
Go to IC, Inventory and look up the item you want the rental cleaning fee to be associated with. Click on the Prices tab and in the Cleaning Box put in the dollar amount you are going to charge for the cleaning of this item.
#2 Learning Moment:
1. Set up a Cleaning Fee Item.
How to Rent an item with a Cleaning Fee.
How to rent the item with a cleaning fee attached and customer pay up at time of check out.
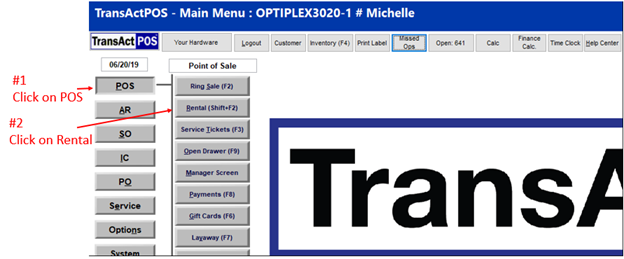
Step 1:
Click on POS then click on Rental
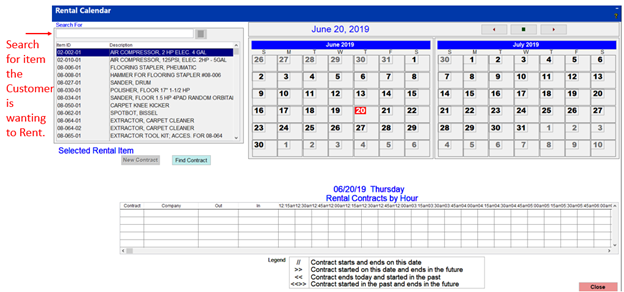
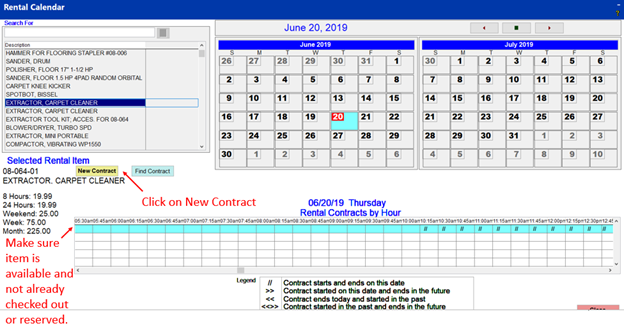
Step 2:
Search for an item a customer wants to rent.
Make sure the item is available and not already checked out or reserved.
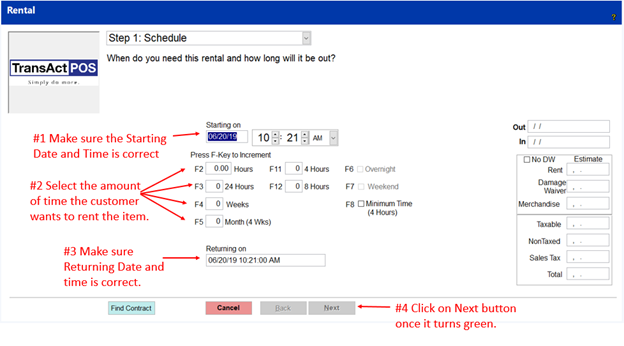
Step 3:
Make sure the starting date and time is correct for when the customer wants to start renting the item. Next you will select the amount of time the customer wants to rent the item by pressing the appropriate F Key or clicking in the appropriate box and typing the amount of time. Make sure the planned returning date and time are correct. Finally, click on the Next button once it turns green.
Step 4:
If the Rental Cleaning fee is set up under the prices tab, the Get Desc, Get Qty and Get Price box comes up and press Ok and the Cleaning fee will be entered.
You can add more rental items if a customer requests them. Once you have all the rental items added, click on the green Next button.
You can add any merchandise the customer wants to purchase here. Note it is just like the POS Ring Sale screen. Then click the green Next button.
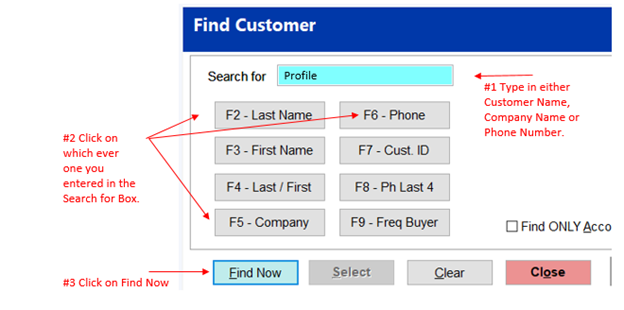
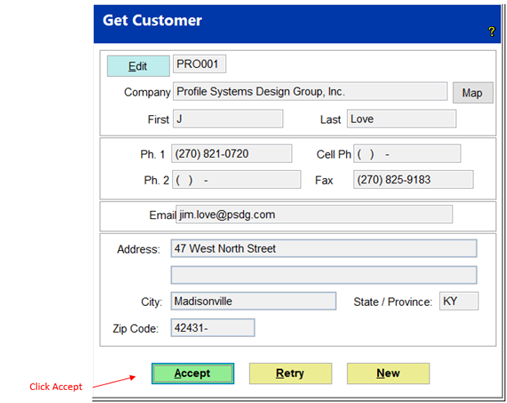
Step 5:
In the Search for box, type in either the Customer Name, Company Name, or phone number (keep in mind you do not have to type the entire name). Click on whichever one you entered in the Search for box, then click Find Now and then click Accept.
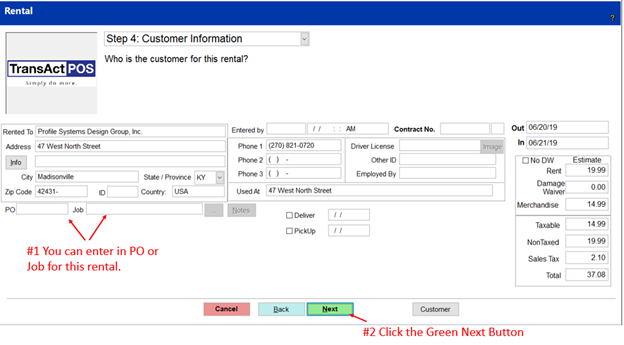
Step 6:
You can enter the PO number or Job for this rental. Next click the green Next button.
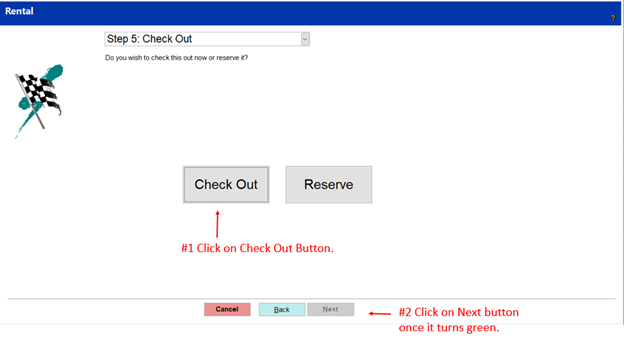
Step 7:
Click on Check Out then click on the Next button once it turns green.
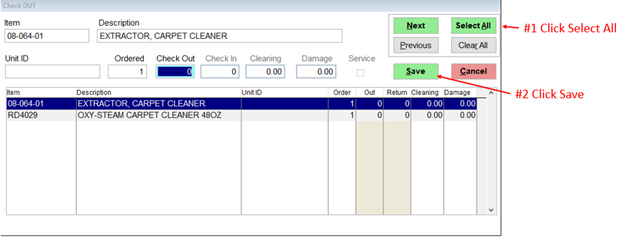
Step 8:
Click Select All and then click Save
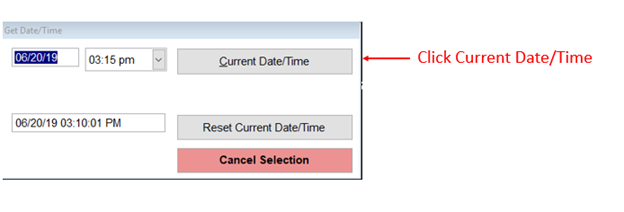
Step 9:
Click Current Date/Time
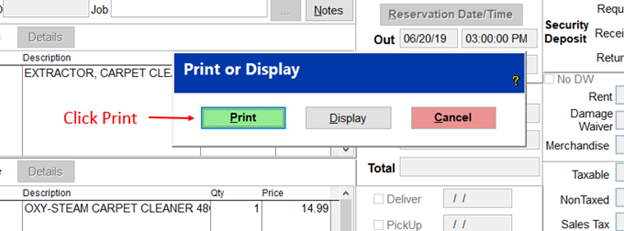
Step 10:
Click Print
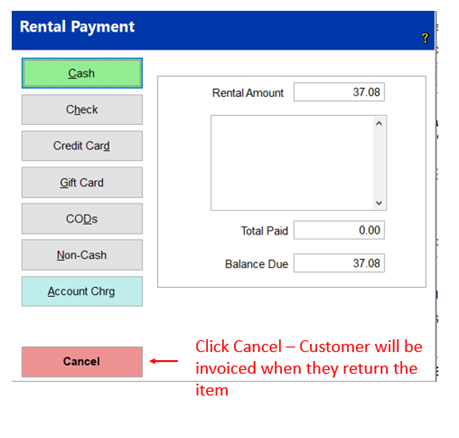
Step 11:
Take Payment
#3 Learning Moment:
1. Create a New Contract.
2. Select Rental Item to Rent with a Cleaning Fee..
3. Put in the Start Date and time.
4. Put in the amount of time for the Rental.
5. Find the Customer that is making the Rental.
6. Save the Contract.
How to return a rental item with or without cleaning fee.
Step 1:
Click on POS then click on Rental
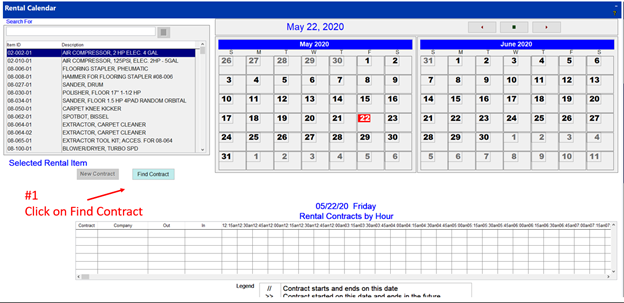
Step 2:
Click on Find Contract
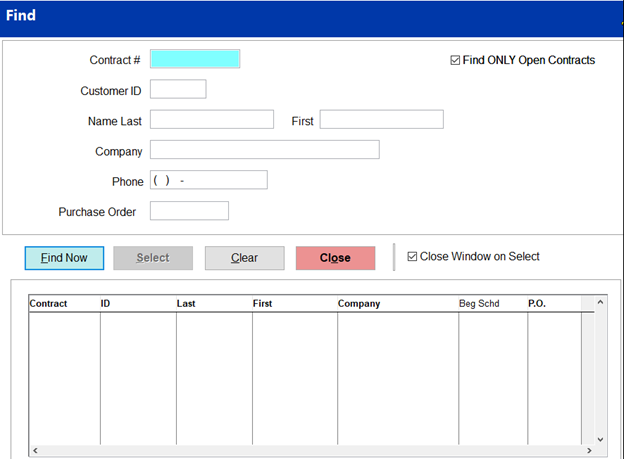
Step 3:
Search by Contract #, Customer ID, Name, Company, etc. then click Find Now and then Select.
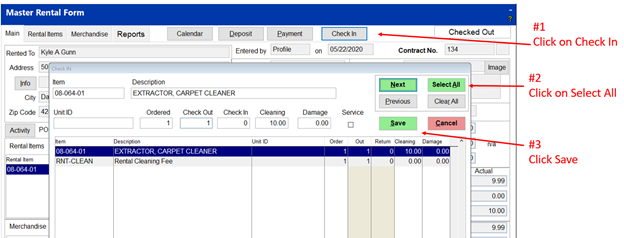
Step 4:
Click on Check In, click Select All and then click Save
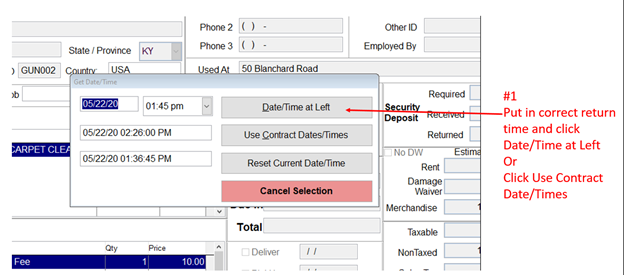
Step 5:
Put in the correct return time and click Date/Time at left.
Step 6:
Rental is now closed.
#4 Learning Moment:
1. Create a New Contract.
2. Select Rental Item to Rent with a Cleaning Fee.
3. Put in the Start Date and time.
4. Put in the amount of time for the Rental.
5. Find the Customer that is making the Rental.
6. Save the Contract.
7. Now Return the Rental reimbursing the Cleaning Fee.
Setting up Fuel Charge Item
Go to IC, Inventory and create your rental fuel charge fee item (example RNT-FUEL). Make sure to make it a non-stock item, non-tax labor, leave retail price zero just like the instructions for a Cleaning Fee Item. You would rent and return the exact same way as a Cleaning Fee item. See above.
#5 Learning Moment:
1. Create a Fuel Charge Item.
2. Create a New Contract.
3. Select Rental Item to Rent with a Fuel Charge.
4. Put in the Start Date and time.
5. Put in the amount of time for the Rental.
6. Find the Customer that is making the Rental.
7. Save the Contract.
8. Now Return the Rental.
Setting up Damage Waiver Item
Go to IC, Inventory and create your rental damage waiver fee item (example RNT-DMGWVR). Make sure to make it a non-stock item, non-tax labor, leave retail price zero just like the instructions for a Cleaning Fee Item. You would rent and return the exact same way as a Cleaning Fee item. See above.
#6 Learning Moment:
1. Create a Damage Waiver Item.
2. Create a New Contract.
3. Select Rental Item to Rent with a Damage Waiver.
4. Put in the Start Date and time.
5. Put in the amount of time for the Rental.
6. Find the Customer that is making the Rental.
7. Save the Contract.
8. Now Return the Rental.