07-030-3 Rental Training #3 - Contract Processing
Overview
Upon completion of the 07-030-1 Rental Training #1 - System Configuration and 07-030-2 Rental Training #2 - Inventory Configuration, rental contracts may be created. The following document outlines the best practices for creating and managing rental contracts. The creation of a rental contract is based upon a 5 step selection process that guides the user to a reservation or a rental contract. Upon checking out the selected rental equipment, the system will create the customer invoice. Upon returning the rental items, the system can recalculate the applicable rental rates based upon the preferences of the store management.
Begin a Shift
An open shift is required at the workstation on which a rental contract is being created. The following steps complete this task.
1. Select POS.
2. Select Begin Shift (F5) from the sub-menu or press the F5 function key on the keyboard.
3. Enter your User ID.
4. At the Open Cash Drawer? Prompt, select Yes to open the cash drawer.
5. At the Begin Shift Screen, enter the Beginning Drawer Balance, the combined value of the coin, and cash placed into the cash drawer.
6. Select Begin Shift.
7. The Shift Indicator will appear within the main screen for this workstation, indicating the assigned Z-Number for the workstation.
The current Shift can be closed at any time during the day, and a new shift is started to address the change in staff. The shift is often closed at the end of the business day and then reconciled.
Rental (Shift+F2)
How to create a Rental Contract using the Rental Contract Wizard:
1. Press the Shift+F2 function key from the main screen or select POS > Rental (Shift+F2)
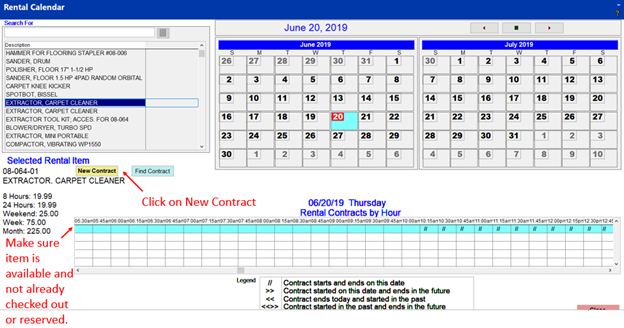
Rental Calendar
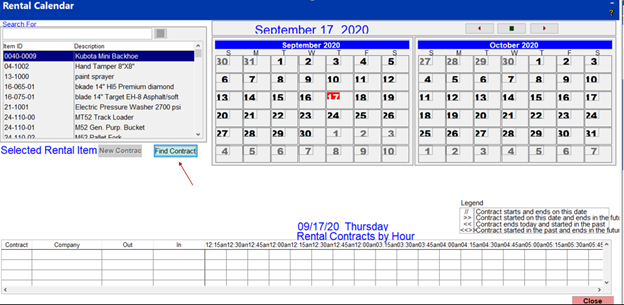
With the rental calendar you get the fully integrated rental system that will give you a list of all the rental items that you have in your store, any contracts, the rental rates per item and the ability to either create new rental contracts or edit existing rental contracts.
The reference to fully integrated means that the rental customers are a part of your customer file and all of the rental items are found within your current inventory file based on the item type of rental and there is a class associated with all of the rental items.
Above is the Rental Calendar screen. When the calendar opens, the cursor defaults to the top left corner of the screen in the Search For field . This is the rental item search box and as you can see will display every rental item in your system. You can enter text in the Search For box to find your specific rental item or you can scroll down to the item and highlight it.
Notice that if you highlight the rental item the rental rates will be displayed for that item, any contracts that the item is currently out on and the color code on the calendar to the right to show any activity.
Let’s talk a little bit about the calendar on the right. You will see that by default, it displays the current month and the next month. You can use the arrows to cycle either forward (using the right arrow) or backward (using the left arrow) through the different months. Pressing the middle button will go back to the current month. Any days that are highlighted will show rental activity for the highlighted time frame. Normally the day that is highlighted in red will show the current date.
Below the search window, you can create a new contract by pressing the New Contract button. When you press this button, it will take you through the Rental Contract Wizard which will quickly help you create your contract. We will go through this in detail in just a little bit.
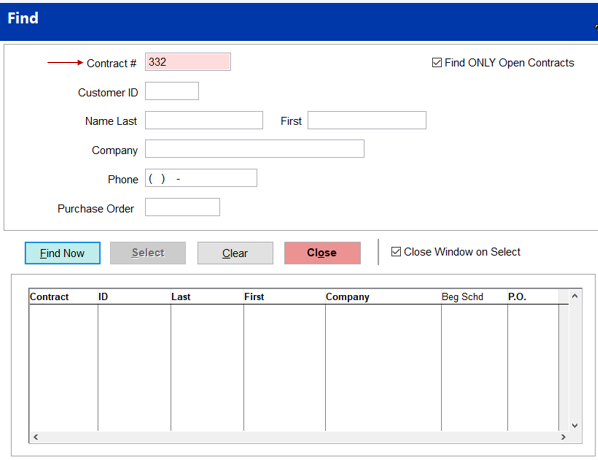
You can modify a new contract by pressing the Find contract button which will take you to the find contract screen. Here you can find a contract by the contract number, the customer ID, the last name, the first name, the company, phone number or purchase order. Again we will be looking at that in a few minutes.
Along the bottom of the rental calendar you will see the overview of the selected day/item. It will show you what is out for the selected rental item on the selected day and what times they are not available. Use the legend at the bottom to determine what the different symbols mean. You can see that you can see whether a contract starts and ends on a date, whether the contract started on this date and ends in the future, whether the contract ends today and started in the past, whether the contract started in the past and ends in the future.
Select Rental Items
2. The Search For field allows for the following three lookup methods.
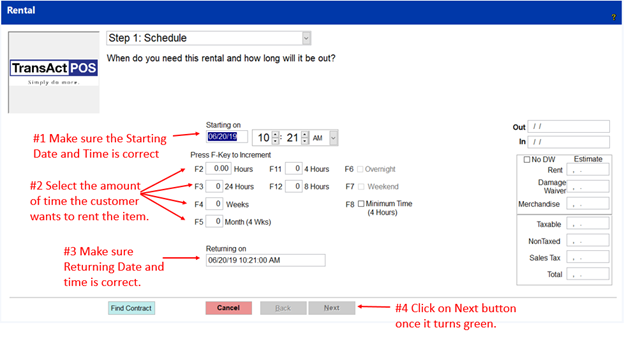
Step 1: The Schedule Page
Where you define when you need this rental and how long it will be out….notice that the starting on field is already filled in with today’s date. If you are just reserving the item, be sure to enter the date the customer wants to reserve the item. Next you can enter the time…..again the current time is filled in, but you can change the hour and minutes.
Next, you will choose the amount of time the customer will be using the rental item. To do this, I find it easiest to use the function keys. For example, if a customer wants to rent this item for 2 hours, you can use the F2 function button by pressing it two times. If you don’t want to use the keys, you can place your cursor into the hours field and enter 2 and press enter. If a time is grayed out, that indicates that your store is not using those time options. Also notice the Returning on Field will be calculated as you put in your time.
4. Enter your User ID
5. Fill in when the customer wants the rental.
6. Press F Key or click in the appropriate box and type in the amount of time.
7. Make sure the planned returning date and time are correct.
8. Click the Next button.
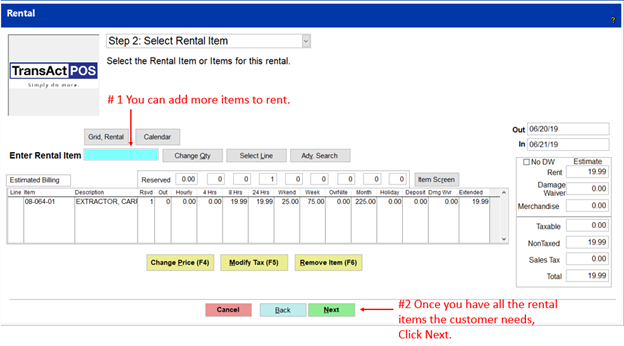
Step 2: Select Rental Items
This screen allows you to select more items if the customer needs to rent more than one item. There are several ways you can add more items: You can enter the item number, use the Grid, or advanced search.
9. You can add more rental items if the customer requests them.
10. Click the Next button.
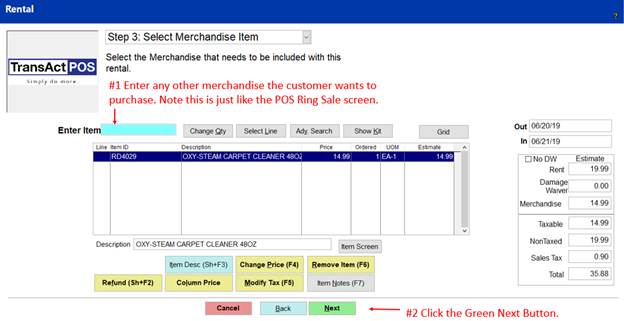
Step 3: Select Merchandise Items, Deposits and Fee items
This is the screen that you will input any Rental Deposits, Fee items (i.e. Fuel Fees, Cleaning Fees, etc.) and NON-Rental merchandise. This screen is just like the Ring Sale screen. You can, as always scan the item, key the item in or use the grid. If you use the grid on this page, you are using the grid from the ring sale screen that contains the regular items. After you have added the needed items, click the Next button.
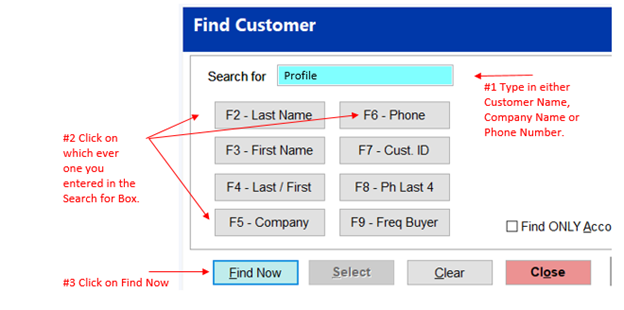
Find Customer
This is the Find Customer screen that you have seen before. This is where you can either create a new customer or find a customer that already exists in the customer file. We won’t spend much time on this screen because you are already familiar with how it works. Go ahead and we will move to the next screen by selecting the Next button.
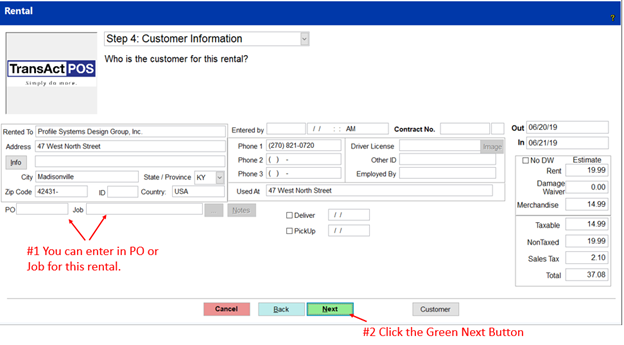
Step 4: Customer Information
You can enter a PO number or Job for this rental. Then click the Next button.
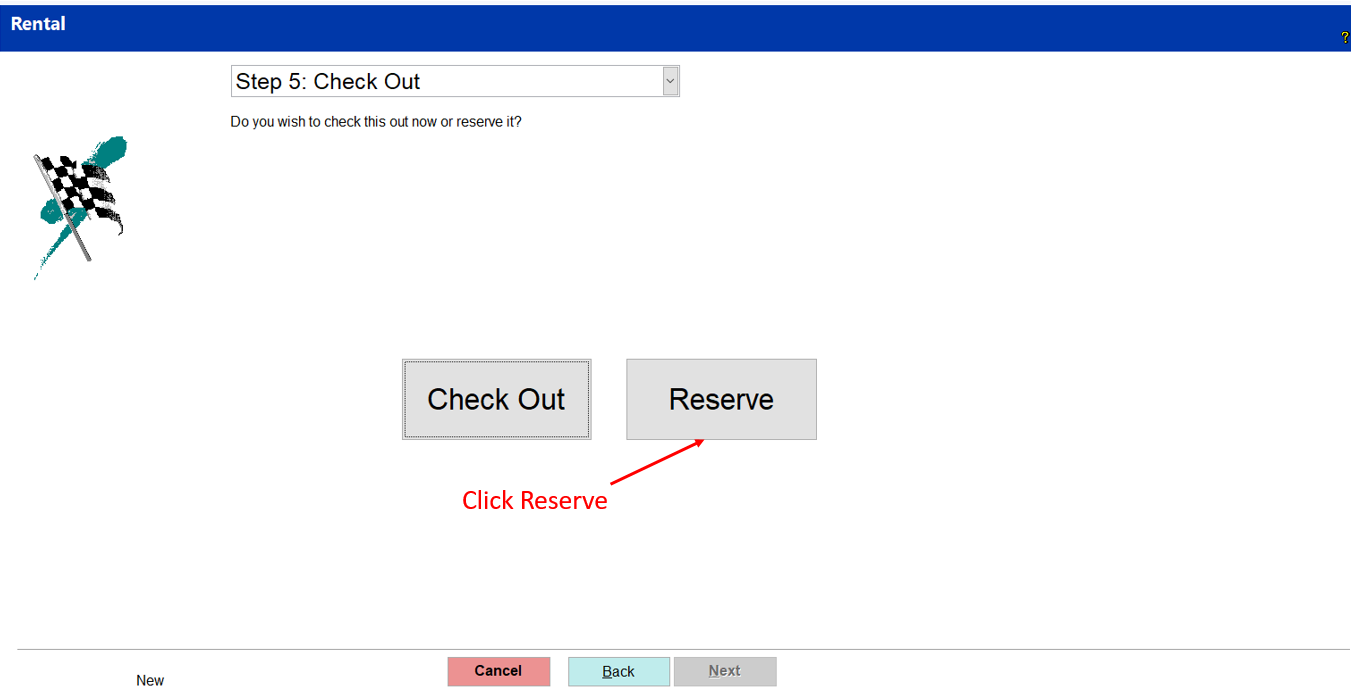
Step 5a. Reservation
This is the page where you will choose if you are checking the customer out or you are reserving the contract. This example we are Reserving the contract. Then click on the Next button.
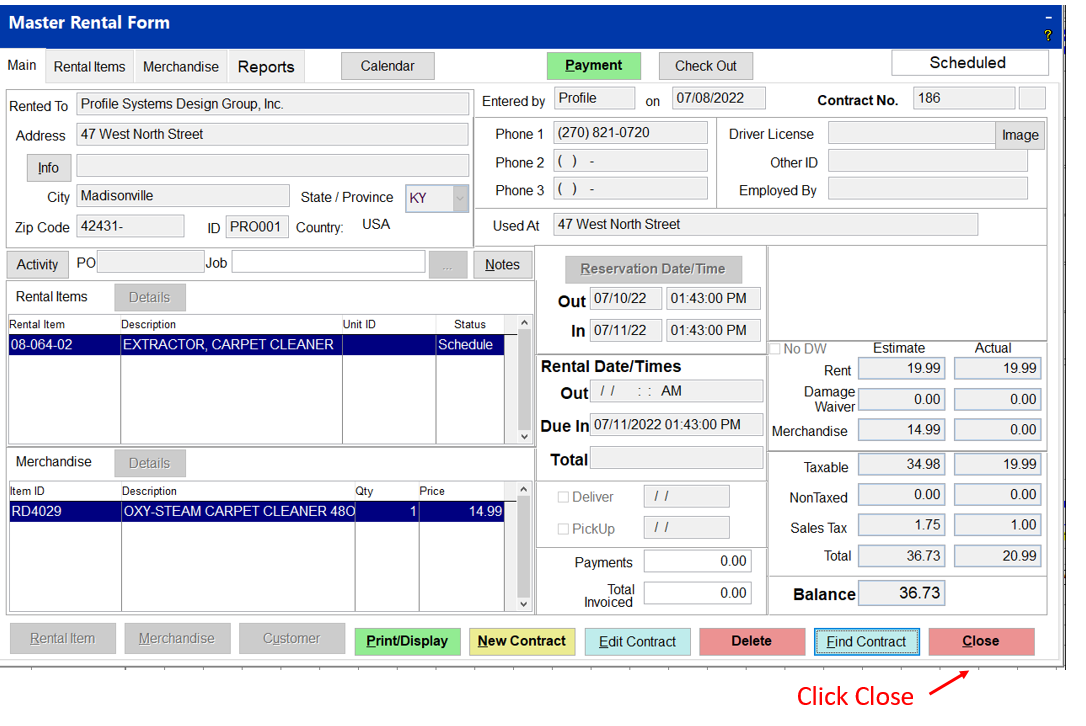
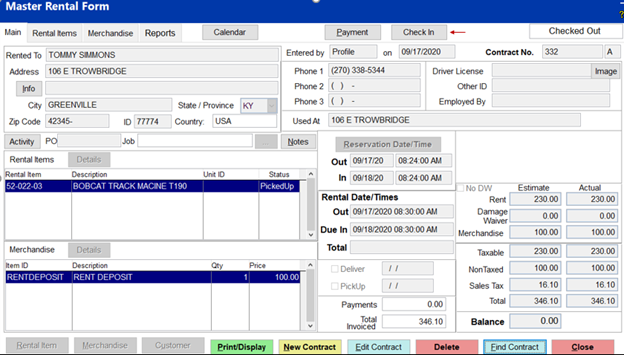
You will go to the Master Rental Form and you will see Check Out and Scheduled in the top right corner. You will now click Close and wait for the customer to come in and Check out the reserved equipment.
#1 Learning Moment:
1. Create a New Contract.
2. Select Rental Item to Reserve.
3. Put in the Start Date and time.
4. Put in the amount of time for the Rental.
5. Find the Customer that is making the reservation.
6. Save the Reservation.
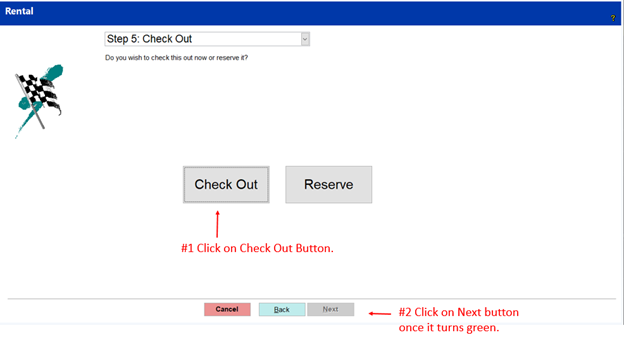
Step 5b. Check Out
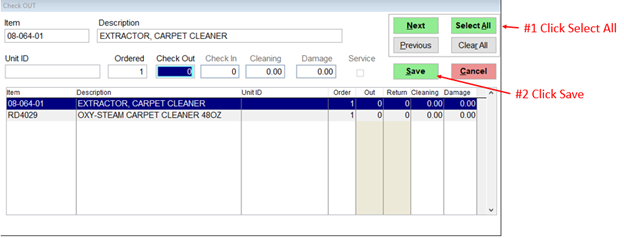
This is the page where you will choose if you are checking the customer out or you are reserving the contract. In this example we are checking the customer out. Then click on the Next button.
In this example, I chose to check out, and you are taken to this screen. I chose the Select All button. If you have several items, you can enter the number they are checking out in the Check-Out field and then choose the Next button. Once you have checked each item out click the Save button.
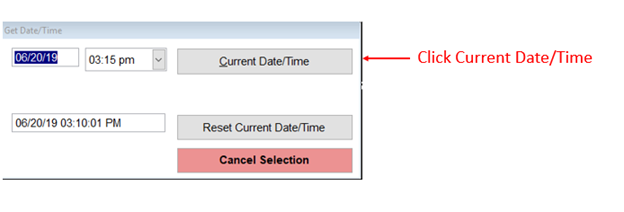
Normally you will choose the top button that says Current Date/Time, which selects the date/time entered. If you have been talking for a period of time with a customer before you get to the final check you can do a reset of the Current Date/Time which sets the Return Time to the Original Date and Time.
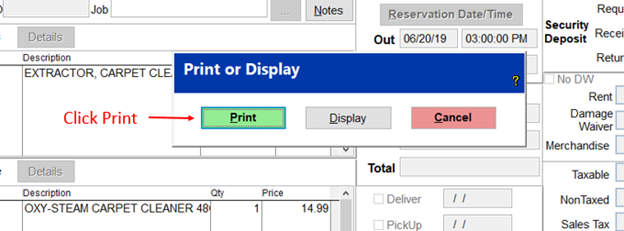
The contract has now been created and you can print the checked out receipt.
#2 Learning Moment:
1. Create a New Contract.
2. Select Rental Item to Rent.
3. Put in the Start Date and time.
4. Put in the amount of time for the Rental.
5. Find the Customer that is Renting the equipment.
6. Check the equipment out.
7. Print the Contract.
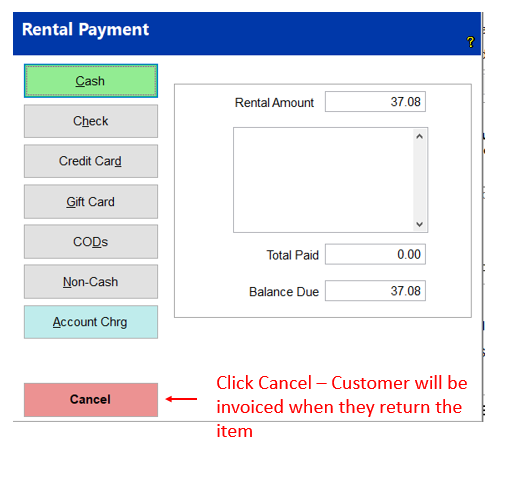
This is the screen that comes up if the customer is paying prior to the invoice of the rental item. If they are not paying until they return the item, then all you need to do is select the Cancel button.
How to Check in a Rental
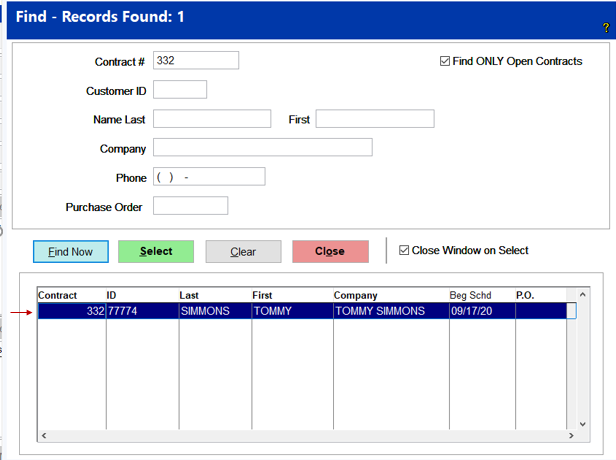
Find the contract by pressing the Find Contract button.
Enter the Contract # in the Contract # field or enter the customer’s name or Company name and then press the Enter.
Click on the correct contract and click on the Select button or press Enter.
Notice the Check In button along the top. Go ahead and click on the Check In button.
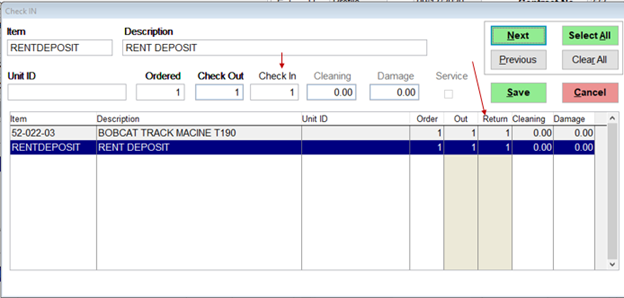
Once you click on the Check in Button, the following screen is displayed.
If you want to return the rental item and return the Rental Deposit or any fee items, then you will fill in the Check in field with the quantity that the customer is returning and then click the Next button and do the same for each item that is being returned, When you have completed selecting all of the items that are being returned then click the Save button. Once you press the Save button, the following will be displayed.
Here you will select the date and time that the rental contract is being returned. In our example we selected the Date/Time at the Left button. Once you select the Date/Time, the following screen will be displayed.
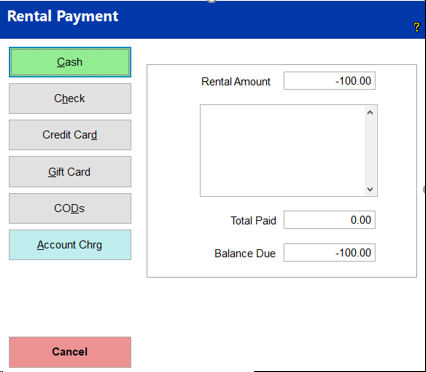
This is where you will give the $100.00 to the customer either as Cash, Check, Credit Card, Gift Card, or Account Charge. Once you have returned the Rental Deposit the system will ask you if you want to Mark the Rental Contract as Closed.
Select the Yes button and the contract is now completed and closed.
#3 Learning Moment:
1. Find the Rental Contract.
2. Check the Rental Items in.
3. Put in the correct date and time for the check in.
4. Invoice the customer.
5. Close the Contract.