(c) Profile Systems Design Group, Inc. 2026 Build: 4.008.810 Help ID: 608
If you do not see the expected content,press CTRL + F5 to clear your Browser's cache.
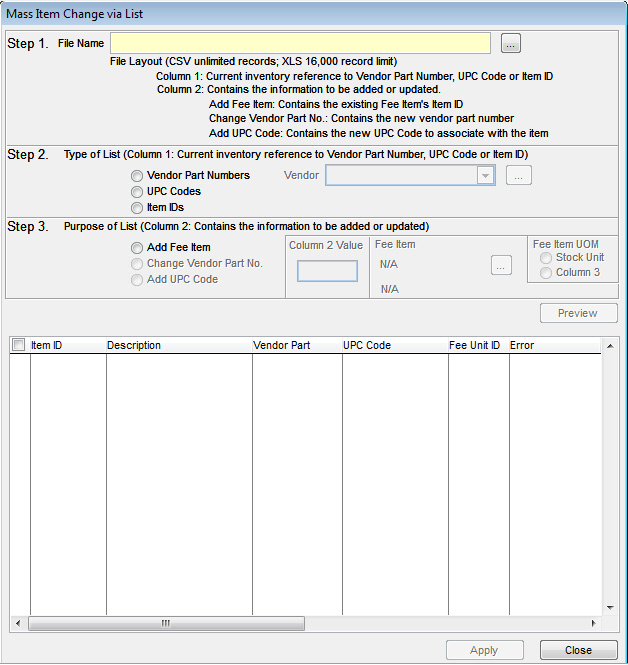
Mass Change via List
The Mass Change via List tool allows you to make certain item changes by importing a spreadsheet. This program is split into 3 steps to allow for easy use.
Step 1
In this step, you need to locate the spreadsheet you wish to use. If you use a CSV file, you can have unlimited values. If you use an XLS file, you are limited to 16,000 records. Column 1 of the spreadsheet the reference to the inventory item (vendor part number, UPC code, or item ID). Whichever value is in column 1, you will need to make sure to select the correct value in step 2 (below). Column 2 of the spreadsheet will be the information needing to be added or updated (selected in step 3). This information can be either a fee item ID to be associated to the item listed in column 1, a new vendor part number, or a new UPC code to associate to the item in column 1.
Step 2
This is where you select the type of list from column 1 of the spreadsheet above. If you select "Vendor Part Numbers," you will need to select a vendor from the drop down to the right. Once the type of list is selected, you can move on to Step 3.
Step 3
This is where you select the purpose of the list (column 2 of the spreadsheet above). Currently, changing the vendor part numbers and adding a UPC code are under construction. You can however use this utility to attach a fee item to multiple items all at once. This requires you to set up a fee item within your inventory (click here for more information). When you select "Add Fee Item," you will need to locate the Fee Item within your system. You can also assign a unit of measure (UOM) to the fee item being added. You can select "Stock Unit" or "Column 3" (this requires you to set up a third column with the UOM for each item's fee).
Once all options are set, you can click the Apply button to complete the process.