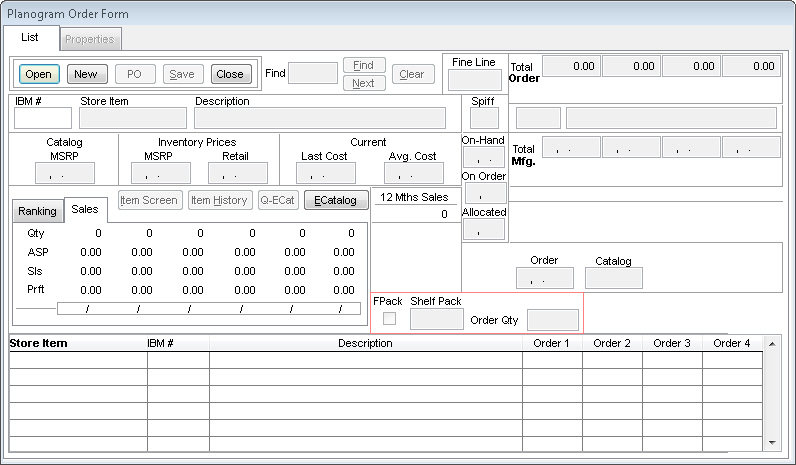
As with any retail store, planograms are ways of displaying hot items and making sure your store profits like it should. Most of the time, Do it Best sends planograms to your store for your use. They also have a Planogram Library software that makes the process of downloading and utilizing planograms in your store very easy. There will come a time where you will not have the items on a planogram, either in stock or even not in your inventory. TransActPOS has an easy to use feature to aid in this process. To reach this feature, go to Options | IOR Menu | (Do it Best) | Utilities | Maintenance | Planogram Order.
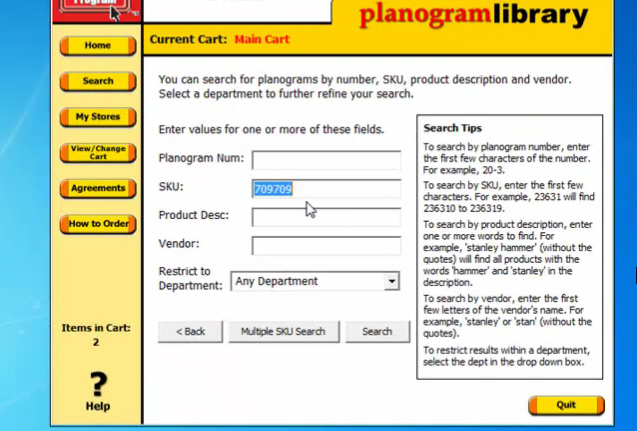
Before you can use this feature, you need a planogram to import into it. Do-it-Best has a Library software that allows you to search planograms and download them to your computer for use. If you don't have this software, you can go to their website at www.doitbest.com or contact your vendor for more information. Once you have downloaded it and opened the software, you should see a screen similar to the one below.
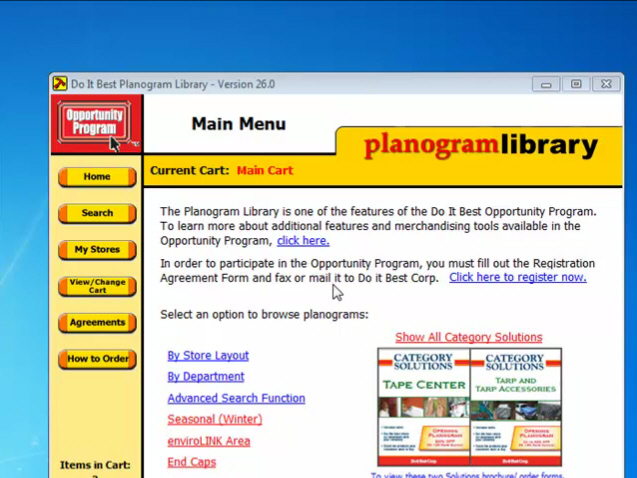
From this screen, you need to search for a planogram. To do this, click on the Search button on the left side of the screen. Once you have done this, you can search for available planograms. You can search by Planogram Number (if you happen to know it), you can search by SKU to find a planogram with a specific item in it, you can search by product description, vendor, and you can restrict the search to a specific department. You can search by as many or as little options as you want. The more in depth the search, the more concise the results will be. Once you have entered the desired fields, click Search.
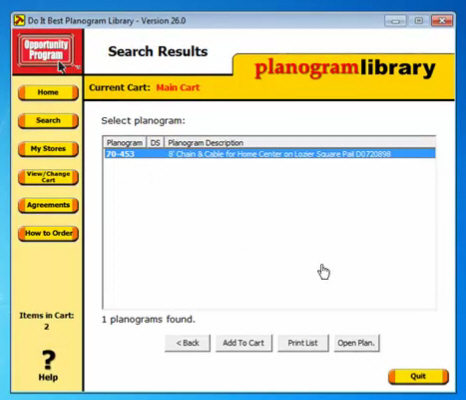
When the search is completed, a list of planograms will display. Highlight the one you wish to view and click Open Plan.
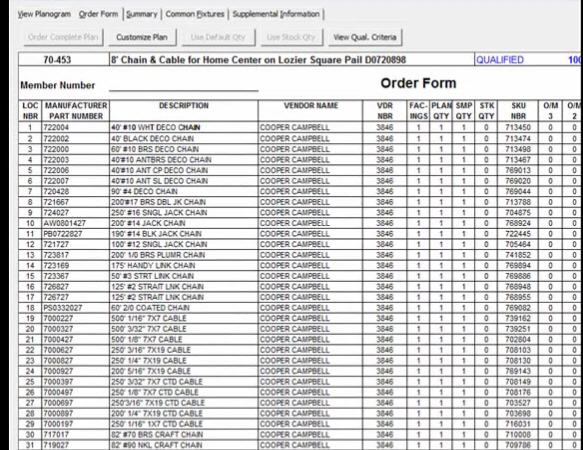
When you open the planogram, you should see a picture of the planogram, as it would look in your store. On the top portion of the screen, you should see multiple tabs. To see a listing of the items on the planogram, click the Order Form tab.
If you double RIGHT click (not left click) in the data area (area with numbers), it will open the spreadsheet in a different window, allowing you to interact with it. Once the new window has popped up, left click in the top left corner of the spreadsheet in the data area (above would be 1) and hold the left click while highlighting all the way to the bottom right corner. Do not include the last two rows on the spreadsheet, as one is a blank row and one is the total. When you have done this, right click the highlighted area and click Copy. This will enter the data into your clipboard.
After this has been done, start Microsoft Excel and start a new spreadsheet. Left click in the first cell (A1) and once it has been selected, right click and click Paste. This will paste the planogram order form into an Excel spreadsheet. From here, you will want to save the document. Make sure you select Save As, so you can ensure that the file type is correct. When you click Save As, you will see the Browsing window where you can choose the location to save the document.
Saving tips:
-Save the file in a location you will remember
-Name the file something that will be easily identifiable (in this case, the best name for the file would be DIB-[planorgram number] which the planogram number can be located on the original from the Library software
-In order to import the spreadsheet into TransActPOS, you MUST save the file as a Microsoft Excel 5.0/95 Workbook; this can be accomplished by clicking the drop down menu beside Save As Type and selecting the correct type
Once you have saved the file, you can close out of Excel and open TransActPOS. In TransActPOS, go to Options | IOR Menu | (Do-it-Best) | Utilities | Maintenance | Planogram Order. Again, you will be presented with the following screen.
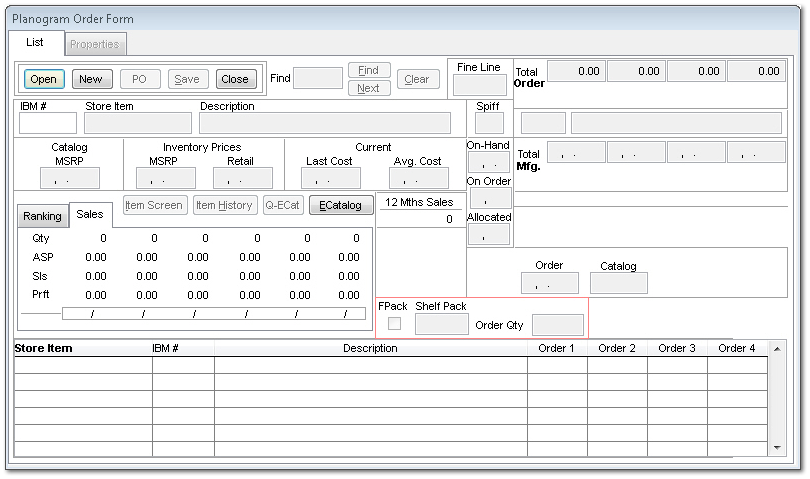
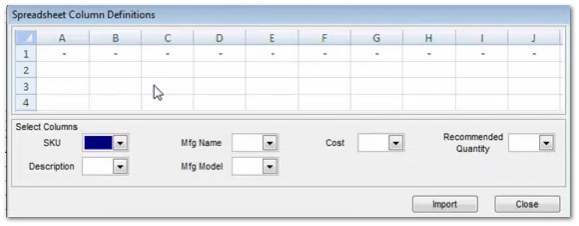
From here, click New to create a new order. The next thing to pop up will ask you to select a range for Sales rankings. Once you have selected the range you want, it will ask you to locate the spreadsheet to import. Locate the file in the location you saved it in earlier, select it, and click Open. Once you have confirmed the creating of a new order, the Spreadsheet Definitions screen will appear.
In this screen, you must let the program know what columns have what information in them. For your reference, here are some of the "not so obvious" fields:
SKU Nbr = SKU
Mfg Name = Vendor Name
Mfg Model = Manufacture Part Number
Cost = Member Cost 1 (normally 1 is the higher one)
Recommended Quantity = Plan Quantity
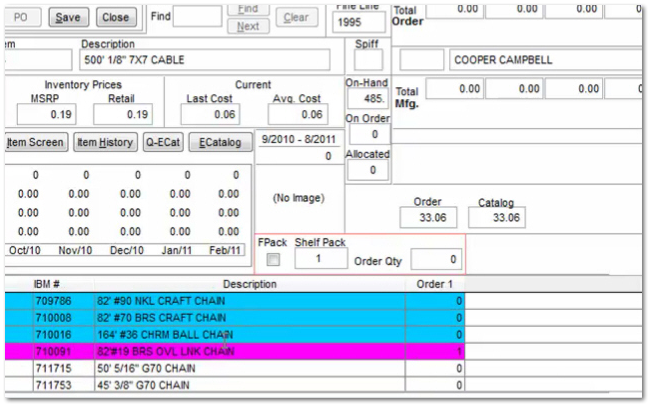
Once you have defined the columns, click the Import button. Once the spreadsheet is imported, you will see a list of items in the bottom portion of the screen. If your store carries the item within the inventory, there will be a Store Item Number indicated on the left. If there is no Store Item Number, that item is not in your inventory, but is also on the given planogram. You will need to order these items in order to fulfill the planogram. To order an item, highlight the item and enter an amount in the Order Qty field. Continue to do this until you are satisfied with the order. Note, in the picture below, there are three colors. White means that you didn't look at the item at all. Blue means you looked at the item, but you didn't order it. Purple means the item was ordered.
When you have completed this task, click Save. Name it accordingly. You may choose to use the Save feature to come back to this order at a later time by clicking Open to open a saved Order. After the order is saved, the PO button will now be available. This will create a PO for the items you set to be ordered.