Wireless Adjustment Inventory Receipt
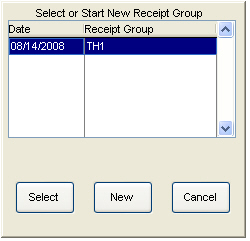
Select a Receipt Group to record the changes to the physical inventory or Click on the New button to create a new group.
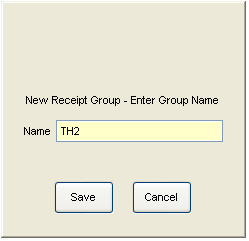
If a new Receipt Group is to be created, enter a name appropriate to the items being received. Click on the Save button to continue.
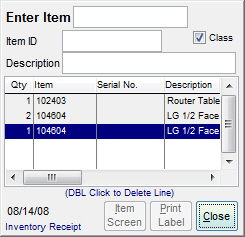
Enter or scan the item numbers of the appropriate items.
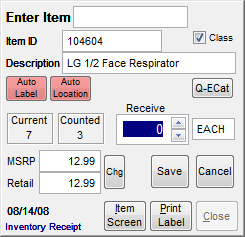
Enter the On-hand information for the item. Change the price of the item by clicking on the Chg button. Change and/or print the labels.
Receive
Select the number of items being received by clicking on the up and down arrows to select the appropriate number.
Auto Label
| | Note: Auto Label, Auto Location, and Auto Add options must be activated EVERY TIME you log in on the wireless menu.
|
By default, the Auto Label button is not active when the application is first started and will not interact with the scanning of items. When Auto Label is activated, the system will automatically print a label for the scanned item to the indicated label printer.
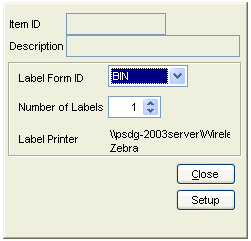
To activate the Auto Label option, select the "Auto Label" button and select the appropriate Label Form ID, the number of labels, and the destination label printer. Choosing the "Setup" button will allow the user to access the printer selection option. Upon selecting the required settings, select close to return to the previous menu.
On the main menu, the Auto Label button will change to green, indicating the label printing has been set and is ready for use. Now scan a barcode or type in an item number and the system will automatically print the specified item label.
Auto Location
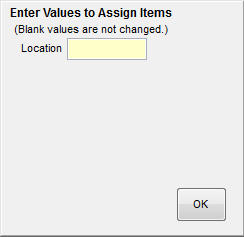
By default, the Auto Location button is not active when the application is first started and will not interact with the scanning of items. When activated, upon scanning an item, the system will automatically assign the indicated location code to an item.
To activate the Auto Location option, select the "Auto Location" button and enter the appropriate item location either manually with the device keyboard or by scanning the location label. Selecting OK will save the location and return to the main menu.
On the main menu, the Auto Location button will change to green and will contain the location ID as indicated within the previous screen. When the Auto Location button is green, the TransActPOS system will automatically assign the location ID to the scanned item.
Q-ECat
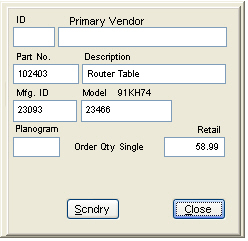
The Q-ECat will query the electronic catalog for detailed information in the selected item.
Scndry
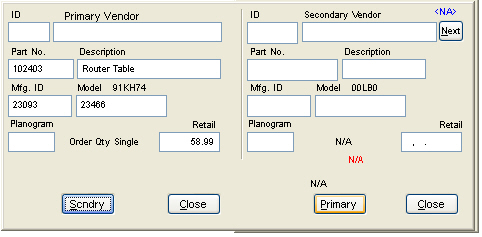
The Scndry button will display the primary and secondary vendors for the item if they are available for this item in its LookUp By tab.
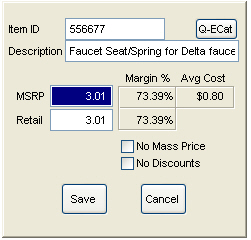
Chg
To change the MSRP and/or the Retail Price of an item while using the hand held device, select the Chg button to access the edit screen. Enter the desired MSRP and Retail price of the item and select Save to post the modification to the system. You can also check the No Mass Price option to disable mass pricing for the selected item and/or check the No Discounts option to disable any discounts, be it customer based or coupon based.
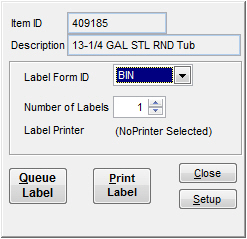
Print Label
To print a new label for the item, select Print Label and indicate the appropriate label, number of labels, and printer destination.
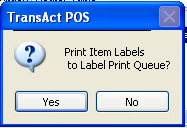
The Queue Label button will queue the printing of labels to the printer, saving you time in the long run. Selecting it may seem like it doesn't do anything, but when you close out of the Inventory Adjustment screen, the following prompt will pop up.
Class
The Class box, when checked, will add the class of a new item to the detail of the item when the Auto-Add function is on.