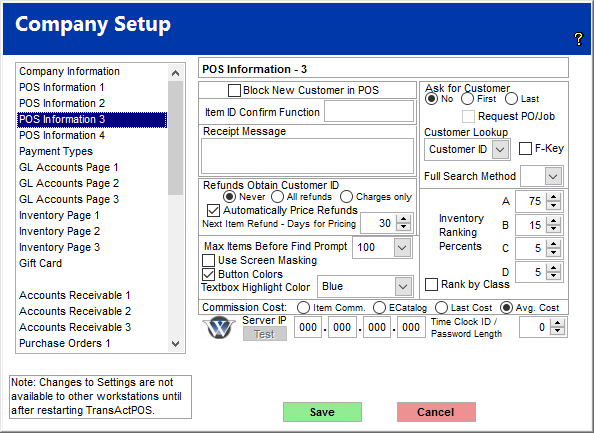
The following options relate to the selected company and the characteristics of TransActPOS as a whole.
Block New Customer in POS
Checking this feature will disable the ability to create an Accounts Receivable account in POS. To create an account this way, you have to go to AR | Customer File | Add.
Item ID Confirm Function
This option allows for custom code to be written to enable an item description to be generated from a properly formatted Item ID.
Receipt Message
The receipt message printed on each receipt is derived from this memo field. Receipts are typically printed on a 40-column printer defined within the workstation setup. The Invoice Message is located within System | Company Setup | Properties | Accounts Receivable.
Ask for Customer
By setting up customer as a zero credit limit account, TransActPOS can track customer purchases even during non-account charge sales. Having the system prompt the sales clerk and entering the proper customer ID during some portion of the sales process will allow management the opportunity to review a customer's purchase history for even cash sales. The following selection allows the user to determine when or if this information is collected.
-
No - the system will not prompt the user for the customer information. The user would need to manually change the customer by selecting "Change Customer" from the POS | Ring Sale | Change Customer Button.
-
First - this option will display the Find Customer Screen immediately after entering the sales clerk's login ID and prior to displaying the Ring Sale Screen.
-
Last - this option will display the Find Customer Screen immediately after selecting the End Sale button or selecting the F2 key.
| | If not participating in a Customer Loyalty program, typically the Ask for Customer - No option should be selected.
|
Request PO/Job
Selecting this option will, after asking for the customer, request a purchase order or job if the customer has these items set up within their customer file.
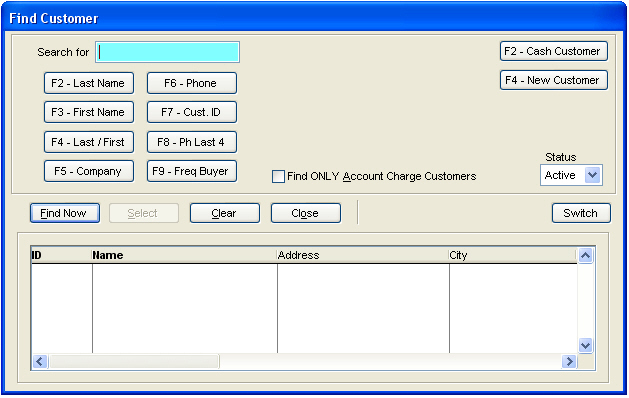
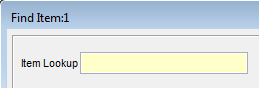
Customer Lookup by
TransActPOS allows the default customer lookup on the Find Customer Screen to be set to one of the following:
-
the last 4 digits of the customer phone
-
-
-
-
Selecting one of these fields from the Customer Lookup by pick list will set the picked field as the default setting. In the example below, the default setting is Customer ID, which is highlighted in yellow in the Find Customer Screen.
F-Key
Checking the F-Key box will default the customer search screen to the Function Key search format.
Full Search Method
The option selected here determines how deep your customer search will look. There are four options to choose from.
-
A: Customer ID, Company, First and Last Name, and Phone numbers
-
B: Everything in A plus Address 1 and 2
-
C: Everything in B plus Fax and Company Email
-
D: Everything in C plus Contact Names and Phone numbers
As mentioned above, selecting A-C will determine how strong you want your search to be. Selecting D will not only get your that strong of a search, but it will also look under any contacts listed under any given customer in your system and yield those in the search results.
Refunds Obtain Customer ID
These radio buttons determine the behavior of the refund screen.
-
Never - This option will not bring up the customer find screen during an item refund
-
Always - This option will bring up a customer find screen on all refunded items
-
Charges only - This option will bring up the customer find screen when crediting a customer charge
Automatically Price Refunds
When a customer does not have an invoice, refund prices will be automatically calculated according to their normal discounts.
Next Item Refund - Days for Pricing
This field is for customers who do not have an invoice. The refund price will be set to the lowest price paid within the set amount of days. If 3 is set, the system will look for the lowest price in the last 3 days for the refunded item.
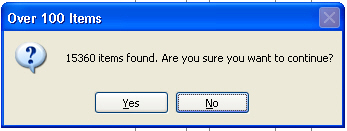
Max Items Before Find Prompt
This setting controls the maximum item count of a partial item number search before displaying an informational message.
Displaying over 15,000 items in the above example can take several minutes depending on the speed of your system.
Button Colors
Selected buttons will have color instead of just the white buttons.
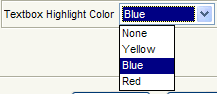
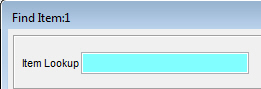
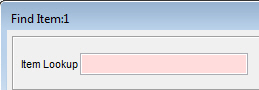
Text Highlight Color
All the user input text boxes will be highlighted in the selected color.
None Yellow
Blue Red
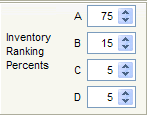
Inventory Ranking Percents
The Inventory Ranking Percents are used within System | File Maintenance | Recalculate. The results of this calculation are seen within the Sales History screen.
Rank by Class
Checking this box will allow ranking the items based on class.
Commission Cost
Commission cost will be calculated based on the selected cost basis.
Enter the IP address of the Watcher server. The IP address assigned to the Watcher server should remain the same. The technical staff at Watcher Products will assist you in the configuration of your surveillance system with TransActPOS.
| | After entering the correct IP address, go to System | Workstation Setup | General | Watcher Server Port to assign the Port Number to the workstation viewed by the surveillance. |