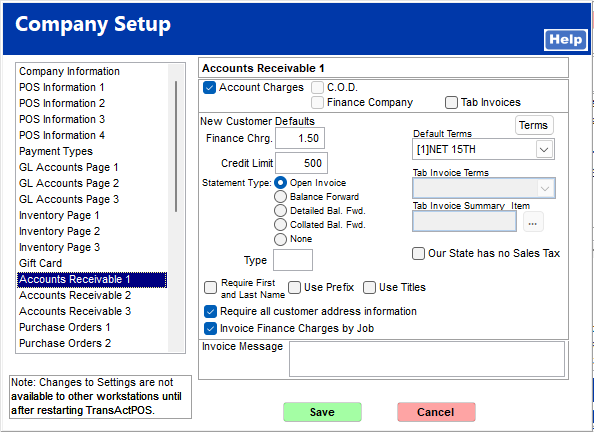
Accounts Receivable 1
The Accounts Receivable Module is an option when purchasing TransActPOS. This option allows for in house charge accounts, generation of finance charges, and printing of customer ledgers and statements.

Account Charges
Check this feature to allow account charges within the system.
C.O.D.
Selecting this option turns on the C.O.D. (Cash on Delivery) option within payment types. The C.O.D. payment type must first be set in System | Support Files | Customer Terms. If selected, an invoice can be created and the payment can be made as a C.O.D. payment type to the indicated customer. When the merchandise is delivered to the customer, the sales receipt indicates that the payment is due upon receipt and the delivery person should collect the full balance due. Upon receipt of the funds at the store, the payment can be posted to the customer account to balance the invoice.
This option will be grayed out until C.O.D. terms are set in System | Support Files | Customer Terms. See C.O.D.
Finance Company
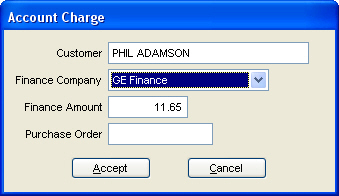
This option allows a Finance Company to be assigned to an invoice along with the customer. The listing of finance companies is maintained within System | Support Files | Customer Terms.
This option will be grayed out until Finance Company terms are set in System | Support Files | Customer Terms. See Finance Company.

Tab invoices
More information to come.
New Customer Defaults
The following fields represent default values for customer records. As customers are added to the database, these are the default values selected during that process. At any time, during the original addition or later during the edit process, these values may be changed.
Finance Charge
Enter the default monthly percentage for customer finance charges.
Credit Limit
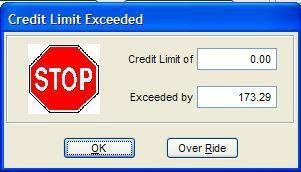
Enter the default credit limit allowed for a new customer. When the customer’s credit limit is exceeded, an override prompt will be presented.

The user must have the proper security privileges to over ride the Credit Limit Exceeded Prompt.
Statement Type
Declare the default customer statement type: Open Invoice, Balance Forward, Balance Forward with Detail, Collated Balance Forward, or None.
Open Invoice
The open invoice statement prints all of the customer’s open invoices within the customer statement. Open invoices are invoices with a balance other than zero. Credits will be included on this statement form. The invoice number, invoice date, purchase order number, original invoice amount, and current balance will appear on the report.
Balance Forward
The balance forward statement will only print the new invoices posted since the last statement. The balance forward statement displays the balance as of the last statement generation and appears at the top of the statement. The body of the statement will display invoice number, invoice date, purchase order number, original invoice amount, payments, and current invoice balance. The net due amount will be the sum of the balance forward plus the current open invoices and credits.
Detailed Bal. Fwd.
The detailed balance forward statement contains the same information as the balance forward and includes detailed item descriptions below each invoice, allowing the customer to recognize the nature of the purchase.
Collated Bal. Fwd.
The collated balance forward statement will print the new invoices posted since the last statement. This statement is like a detailed balance forward statement, only it collates the printed invoices and statement details. The collated balance forward statement will print the balance forward statement. If the Include Invoice Detail is checked within AR | Customer File | Find | Select (once proper account located) | Settings Tab, an Invoice Detail will be printed after each balance forward statement.
Note: The printer used to print the Collated Balance must be set to print direct in the printer properties.
Windows Start Menu | Printers and Faxes Icon | Select the proper printer | Right Click on the printer icon | Select Properties | Choose the advanced tab | Select the Print directly to the printer radio button.
None
With None selected, the default customer statement type will be None and no statement will be generated for this customer. A particular statement type may then be entered when a new customer is added or the statement type may be edited in AR | Customer File | Settings.
Type
Default Type for customer.
Require First and Last Name
Both the customer's first and last name will be required when a new customer is added using the Customer Add Wizard.
Use Prefix
Adds a drop down in front of First Name to add a prefix such as Ms, Mrs., Mr., Dr. within the Customer File.
Use Titles
Checking this box adds a box to give a customer a title such as secretary in the customer file.

Terms Button
This button is a shortcut key to Customer terms within the System | Support Files | Customer Terms.
Default Terms
Indicate the default customer terms. Customer terms are further defined within the System | Support Files | Customer Terms.
Tab Inv. Terms
More Information to Come.
Tab Invoice Summary Item
More Information to Come.
Our State has no Sales Tax
This checkbox will remove the requirement for a Tax ID on Non Tax customers when the state doesn't have ID's.
Cash Based Accounting
This checkbox will default the Sales Tax Report to Cash instead of Accrued.

Require all customer address information
This checkbox will require that all address information is entered on new/existing customers before you can save.
Invoice Finance Charges by Job
This setting will break the finance charges down by job invoices, if the customer is using jobs. Instead of one total finance charge invoice for the account, each job that has late invoices will receive a separate Finance Charge invoice tied to that job.
PO ONLY Required for Chrg.
This setting will only require a customer PO if the invoice is an account charge, when Account Charge PO Required is turned on in the Customer File.
Invoice Message
This message will appear at the bottom of all invoices. Invoices are typically the 80-column format printers defined within workstation setup. The receipt message is retained within System | Company Setup | Properties | POS Information 2.