01-010-1 Point-of-Sale Training #1 - Core Processes
Overview
The Point-of-Sale (POS) module is a comprehensive solution for controlling the sales process. This module is the predominant module in which clerks and customers interact.
Point of Sale
Access the Point of Sale module by selecting POS (F2) at the main menu or pressing the F2 key.
Shift Management
Shift Management controls the cash drawer balance and is required at any workstation that manages payments. Shift Management consists of three elements:
1. Begin Shift
2. End Shift
3. Reconciliation
To Begin a Shift
1. Select POS.
2. Select Begin Shift (F5) from the sub-menu or press the F5 function key on the keyboard.
3. Enter your User ID.
4. At the Open Cash Drawer? Prompt, select Yes to open the cash drawer.
5. At the Begin Shift screen, enter the Beginning Drawer Balance, the combined value of the coin, and cash placed into the cash drawer.
6. Select Begin Shift.
7. The Shift Indicator appears at the top of the main screen for this workstation, indicating the assigned Z-Number for the workstation. The Z-Number is a unique number assigned to each shift and is used to track all the transactions that will occur during that shift.
The current shift can be closed at any time during the day, and a new shift is started to address the change in staff. The shift is often closed at the end of the business day and then reconciled.
Ring Sale (F2)
As the customer approaches the point-of-sale workstation:
1. Press the F2 function key from the main screen or select POS | Ring Sale (F2)
2. Enter your User ID
Entering items
3. Enter an item in the Enter Item field
-
Scan
the item's UPC with the bar-code scanner -
Type
in the item's part number and then press Enter
-
Select the item from the Picture Grid
by clicking on the desired item
-
Type ?
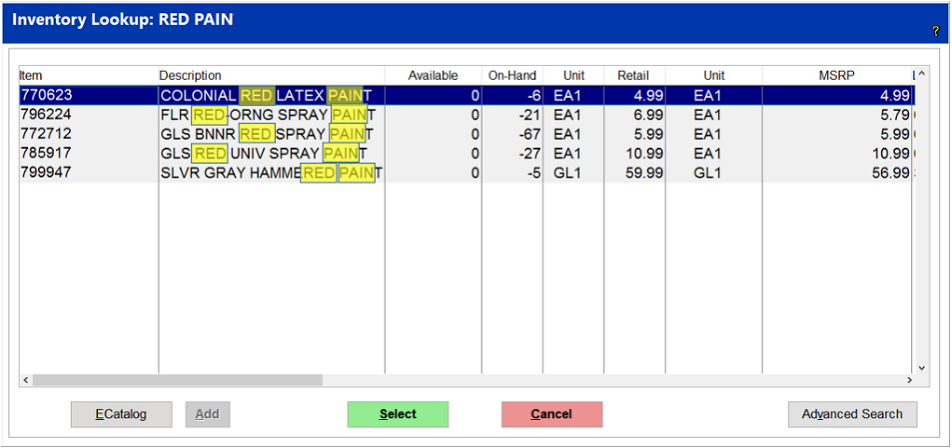
and then a portion of the item's description to locate the item which contains the text entered (e.g. ?red pain)
-
Type ??
and then a portion of the beginning of the item's description to locate items that begin with the stated text (e.g.
?water he)
-
Type the beginning portion of an item ID followed by an asterisk *
to search for all item IDs which begin the same way
-
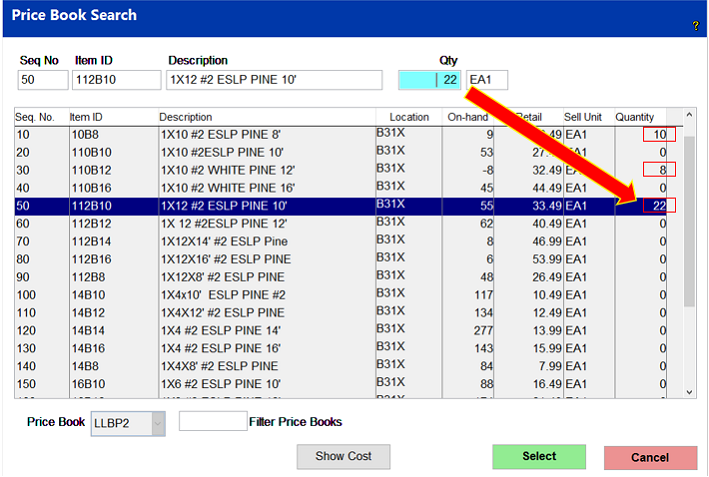
Select the
Price Book List to choose from a group of items indicating desired quantities
-
Select Import (F12) to import Suspended Sales, Sales Orders, Service Tickets, Assembles, or Spreadsheets
4. Repeat entering item information for all the customer's items presented at the counter.
Multi-Unit Priced Items
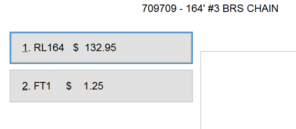
When a product with multiple selling units is scanned, you are prompted to select the correct unit. Determine which product unit is being purchased, like a spool of wire, a length of rope, or a 6-pack of oil. Selecting RL164 in the image below rings up a 164’ roll of chain. Selecting FT1 rings up one foot of chain, which can be adjusted to the quantity being sold. For the purchase of 20 feet of this chain, select option 2 and set the quantity to 20.
Changing Item Quantity
● Scan the UPC for each item present, thus increasing the summarized quantity
● Into the Enter Item field, enter * (asterisk) and the desired quantity (e.g. *10), and then press Enter
● Press Alt + Q or select the Change Qty button and enter the desired quantity, and then press Enter
Remove Item
● Enter *0 and then press Enter to remove the current item
● Right-click on the appropriate line and select Delete from the dropdown menu
● Press the F6 function key or select the Remove Item (F6) button, highlight the line to remove with the keyboard up and down arrows, or click on the desired item and then press Enter or select Delete.
End Sale (F2)
5. To end the sale, press F2 or click on the End Sale (F2) button.
Select a Payment Method
6. Multiple methods of payment selection are available. Choose the appropriate payment method.
Select a payment using a keyboard shortcut:
7. The Payment Amount may be edited within each payment method, which allows for multiple payment methods. Once the appropriate payment method is posted, the system will automatically print the invoice.
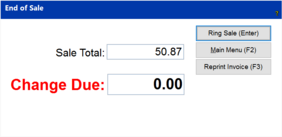
8. The system presents the End of Sale Screen with the following options:
-
Press Enter to return to the Ring Sale screen
-
Press F2 to return to the Main Menu
-
Press F3 to Reprint the current invoice
-
If there is no interaction, the system automatically returns to the Main Screen within a predetermined time.
Quick note: From the Main Screen, pressing Ctrl + X reprints the last invoice created at the workstation.
#2 Learning Moment:
1. Enter the Ring Sale screen
2. If a Shift is not currently open, begin a shift.
3. Enter item 709709 and respond to the prompts
4. Locate all items that have Red Pain within its description, then select one of the items, and then change the selling quantity to 3
5. Locate all items that begin with Water He, then select the desired item from the list.
Note: The description lookup examples above are not spelling errors, and it is simply making the point that close enough is good enough. ?Pain Red also locates Red Paint; order is not critical.
6. Select Price Book List, and choose Price Book > LLBP2 from the dropdown list. Enter in the desired quantities of the listed items. Click on Select to import the items into the current invoice.
7. Delete an item from the listing.
8. Change the quantity of the second item on your detail screen.
9. Complete the sale with a Cash payment and print the invoice.
10. When the sale is complete, press Enter to immediately return to the Ring Sale screen to be ready for the next customer in line.
Selecting an Item
The selected line has a ">>" marker in the far-left column indicating selected. Item functions like Inv Comments (F3), Change Price (F4), Item Desc (F11), Modify Tax (F5), Item Notes (F7), Column Price, Special Order, and Salesperson (F8) will be directed to this ">>" item.
Modify Prices
-
Select the line item you’d like to change the price.
-
-
Click either the Item button or All Item(s) button
-
Enter the desired percent off as a whole number (10% off would be 10.00) or directly enter a new price and press Enter to apply the change.
-
Note: On the Change Price screen you can click the Show Cost button to view the average cost of the selected item. The average cost can still be found without clicking the Show Cost button. In the lower left of the Change Price screen the TA ID holds the cost information. Read the TA ID right to left while ignoring the letters to reveal the cost. For example, TA ID: 24HD6 would be $6.42.
Modify Taxes
-
-
Select the appropriate customer tax type (maintained within System > Support Files > Tax)
-
Apply the selected taxation to only the current item with the This Item button or the entire Items listing with All Items.
-
Any additional items added to the invoice will adopt the original item and customer taxation.
-
The customer account typically controls taxation with a registered non-tax type and a supporting Tax ID with an expiration date.
-
The system can print an additional receipt for the customer information and signature. More details on this in Point-of-sale 3 Training.
-
When modifying tax type for a Cash Customer without an account, the Invoice Comments feature can be used to record their Tax ID.
Payment Screen – Other Functions
Suspending a Sale
While entering items into the Ring Sale screen, if the customer indicates that they will be right back for any reason, the current list of items can be saved to a Suspended Sale. This feature allows the clerk to save the current list of items and then serve the next customer. The returning customer's suspended sale may be imported at any point-of-sale workstation to complete their sale.
Creating a Suspended Sale
-
Assuming that the items exist within the Ring Sale, select End Sale (F2)
-
Click on Suspend Sale located in the center of the Payment Screen
-
Into the description field, enter a relevant piece of information about the transaction, such as the person's name or an accurate description. i.e., Yankee hat.
-
Select Save Only to complete the process and then continue on the next sale. Selecting Print and Save includes a printed Suspended Sale document to place on the stack of items.
Importing a Suspended Sale
-
Return to the Ring Sale screen
-
-
-
Choose the appropriate description of the suspended sale by clicking on the line, moving the blue bar with the up and down arrows, and pressing the Enter key.
-
The items of the suspended sale appear on the Ring Sale screen.
-
Edit and then complete the sale as required.
Returning to the Ring Sale screen.
Upon selecting the End Sale (F2), if the contents of the Ring Sale screen need to be changed, selecting the Edit Detail on the Payment Screen returns the system to the Ring Sale screen for edits.
Canceling an Invoice
Ring Sale Screen
-
Select Cancel (Ctrl + F10)
Occasionally, a customer may present items at the point-of-sale and then determine that they have decided not to complete the purchase. The Cancel (Ctrl + F10) button will delete the Ring Sale screen’s contents and return the system to the main screen.
Payment Screen
If the transaction has proceeded to the Payment Screen, an additional Cancel Invoice deletes the contents of the Ring Sale screen and returns the system to the main screen.
Voiding an Invoice
Once the system creates an invoice or credit, specific rules come into play if the document is to be deleted.
If an invoice is created by mistake, the Void Invoice feature located within POS > Manager Screen > Void Invoice voids the invoice and reverses the payment posted during the transaction. The security system can restrict the Void Invoice function.
Voids during an Open Shift
The following transactions are available while the original shift in which the invoice was created is open. Selecting POS > Manager Screen > Void Invoice, the following actions are available.
-
The cash value of the voided invoice will be reduced from the cash drawer
-
The credit will be applied to the credit card. The original credit card will be required if using the Verifone integration.
-
Debit Card credits will require the payment in cash since returns of payments directly to debit cards are not allowed.
-
The voiding of a customer’s account charge invoice deletes the invoice from the customer’s account.
Effect of a voided invoice within an Open Shift.
-
The invoice number is deleted from the transaction record
-
The system retains the contents of the deleted invoice for future reference
-
The POS > Reports > Exceptions report includes this type of activity within its reporting capabilities
Refunds after a Closed Shift
Once a shift has been closed, invoices and credits created within the shift cannot be voided. To reverse an invoice from within a closed shift, a refund by invoice number would be the appropriate process. To reverse a Credit, an invoice would need to be created to reverse the effect of the original credit.
-
The cash value of the refunded invoice will reduce the cash drawer value
-
The credit will be applied to the credit card. The original credit card will be required if using the Verifone integration.
-
Debit Card credits will require the payment in cash since returns of payments directly to a debit card are not allowed.
-
The refund will be posted as a credit to the customer’s account, thus balancing the original invoice according to the value of the refund.
#3 Learning Moment
-
Enter the Ring Sale screen
-
Enter some items into the invoice screen with varying quantities
-
-
Return to the Ring Sale screen
-
Revise the quantity of an item
-
Delete an item from the current listing
-
-
-
Return to the Ring Sale screen and reload the suspended sale
-
Complete the sale with a payment type of your choosing
Customer Accounts
TransActPOS provides you with many opportunities to select a customer’s account during the ring sale process.
When first entering the Ring Sale screen you will be presented with a Find Customer window. You can begin by choosing a customer here if they have an account with you, otherwise select Cash Customer to proceed with a guest checkout.
-
From the Ring Sale screen there is Change Customer button in the top row of buttons
-
At the Payment Screen there is also a Change Customer button in the third column
-
If a Cash Customer is still selected when you enter the Payment Screen, selecting Account Charge will also bring up the Find Customer window to select a customer account.
Account Stipulations
After selecting a customer’s account you may see one of more messages at the top of the Ring Sale screen. These are notices that the account has restrictions on its use, or the customer has requested that extra purchase information be recorded.
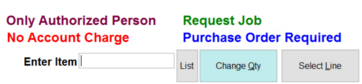
Only Authorized Person
Only certain people associated with this account are permitted to make purchases. You will be asked to select the name of the individual making the purchase from a list of Authorized Purchasers.
Request Job
The customer would like to know which Job of theirs this purchase is for. You will be asked to select from a list of their active jobs. If their job is not in the list you can uncheck the Active Jobs Only box to view inactive jobs. To add a new job you can fill in the new job information on the right side of the Select Job window. Click Select when finished.
Purchase Order Required
The customer would like to record their purchase order number associated with this purchase. You will be asked to record their PO number. This information will be provided by the purchaser, or it will be autofilled if the PO number has been saved in their account.
No Account Charge
This customer is not permitted to charge to their account, they must pay with normal payment methods such as Cash, Check, or Credit Card.
Deliveries
-
From the Ring Sale screen click the Del/Info Task button.
-
In the Load and Delivery Information Screen you can schedule the date and time of the delivery.
-
For each item that will be delivered put a check mark under the Load and Dlvr column to add that item to the Load and Delivery ticket.
-
Comments and Directions can be added for the delivery driver. A Comment example could be “Deliver to 123 Main St.” and a Direction may be “Leave items in front of the garage”.
-
Click OK after setting up the delivery.
-
At the payment screen click the Delivery Ticket button to queue a delivery ticket to print after the sale is completed.
Refunds

-
From within the Ring Sale screen, select Refund (Sh+F2).
-
-
Choose to refund by Invoice Number or Customer Invoices
-
If refund by Invoice Number, enter the invoice number by scanning the invoice barcode or manually typing the invoice number into the system.
-
If refund by Customer Invoices, locate the customer, enter a start date for the search
-
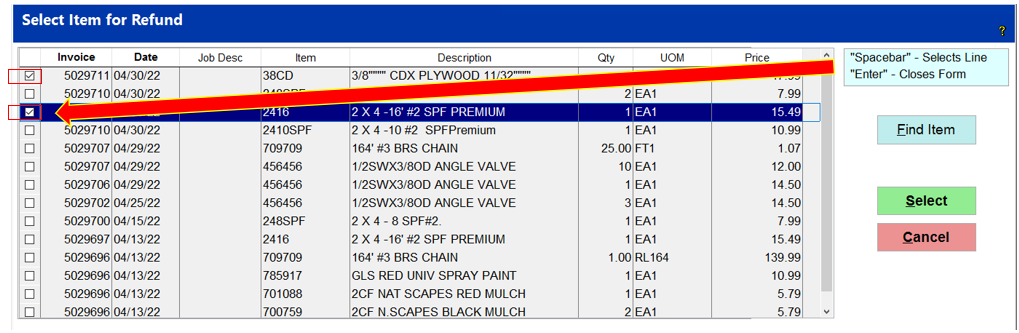
Either search method will present the item list to select the returned items.
-
The box in the far-left column can be checked with a mouse click or pressing the keyboard spacebar.
-
Press the Enter to close the form and proceed with the refund.
-
Those items checked will be imported into the invoice as a refund item with individual prompting for the quantity returned. The refund price is derived from the original invoice.
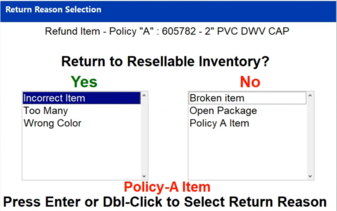
-
Choose a Refund Reason. This selection will determine whether the item is returned to inventory to be sold again. If it is a Policy-A item you will see a Policy-A Item note at the bottom of the window, select the Policy-A Item option if the item will not be returned to inventory in order to receive a credit from your vendor.
-
Items to be sold may be included with the refunded items, so go ahead and enter those additional items. An invoice may contain both sold items and refund items.
-
Select End Sale (F2) and proceed with the appropriate payment process.
Note: Typically, a refund may be included within the Ring Sale process. If a customer’s account provides job management, refunds will need to be done precisely to the job.
#4 Learning Moment
-
Enter the Ring Sale screen
-
Enter some items into the invoice screen with varying quantities
-
Select Shift + F2 or click on the Refund (Sh + F2) button to initiate the refund process.
-
From one of the prior invoices created during learning, enter the invoice number or locate the invoice by searching by customer.
-
Select a few of the items for a refund by checking the box.
-
-
Return to the Ring Sale screen
-
Revise the quantity of an item
-
Delete an item from the current listing
-
-
-
Return to the Ring Sale screen and reload the suspended sale
-
Complete the sale with a payment type of your choosing
Payment Methods
Edit Detail
If you arrive at the Payment Screen and you need to change something within the invoice details, select the Edit Details button to return and edit as required.
Cash
If the customer is paying with cash, simply press Enter to select Cash and then enter the amount tendered, the amount that the customer gave you. Press Enter a couple of times, and the system will complete the sale by presenting the change due to the customer on the screen and print an invoice.
Credit Card
Select Credit Card to post a credit card or debit card payment. If your system is configured with a Verifone, it will automatically prompt the customer for their credit card on the device. The customer may "chip" their card by inserting it, chip first, into the slot on the front of the device. The customer should follow the prompts on the device to enter additional information like a signature in the case of a credit card or a P.I.N. in the case of a debit card.
Check
Selecting Check, the system will prompt the user for additional check information like the check number and the name on the check. Note that the check amount can be edited, so the system will allow you to take a check for a portion of the payment, resulting in a multi-tendered payment.
Account Charge
Selecting Account Charge by pressing the A, clicking the button with the mouse, or pressing the up and down arrows to arrive at the button will invoke the customer selection screen. Enter the information provided to you and press enter. The system will return a list of customer matches from within several fields. You can explicitly state that the data is the last name or company name by selecting the F key associated with that specific type of lookup.
For instance, if you enter "Southside Middle" and press the F5 key, the system will present all company names which begin with Southside Middle. The highlighted record will be selected when the Enter key is pressed. Reposition the highlight with the mouse or the up and down arrows.
Once the customer is selected, follow the prompts to complete the sale. If a Verifone device is integrated with the workstation, the customer's signature will be requested to complete the transaction. The signature will appear on the receipt and any future print. If the store has the email feature included and the customer has the email receipt, the system will automatically email the indicated recipient(s) the invoice.
Point-of-Sale Notes:
-
Some stores prefer to be prompted to print a receipt or not. Go to Company Setup > POS Information 2 > Ask to print invoices and select the desired control from the options presented within this system-wide control.
-
The behavior of the Verifone device can be modified by the hardware support staff remotely within the available guidelines. Options can include not capturing signatures for transactions less than a certain amount and not requesting P.I.N.s for debit transactions. The Company Setup > Payment Types > # dollars and under – No credit card signature requested option controls the signature request.
-
If you arrive at the Payment Screen and need to return to the detail screen to edit the invoice details, select the Edit Details within the Payment Screen.
-
When completed with the current sale, press F2 or Enter at the End of Sale screen to return to the point-of-sale screen. The delay at the End of Sale screen is controlled within the System > Company Setup > POS Information 2 > Screen Delay ## Seconds. Entering a zero value will force the user to enter their User ID for each transaction.
Payment on Account
When a customer with a charge account wishes to make a payment on their account at the register you can take that payment under POS > Payments > Pay On Account. Each workstation can be configured to take payments in different ways. The simplest method is to enable two settings under System > Workstation Settings > System tab. Checking Payment on Account Create Credit and Skip Apply Credit in Payment on Account will configure the register to only take account payments as a credit on the customer’s account.
Taking an Account Payment
From the Main Menu go to POS > Payments.
-
-
Find and select the customer.
-
Enter the payment amount and press Enter, then click Next.
-
Choose the payment method.
-
Click Complete at the bottom of the window.
-
You will see two messages confirming that the payment was accepted and that a credit has been created for the amount of the payment.
Common Point-of-Sale Reports
Print Invoice
Reprinting a customer invoice by invoice number or customer lookup is achieved within this menu selection.
Note: Selecting Ctrl + X at any point-of-sale workstation will invoke reprinting the last invoice created at the workstation.
Cash Receipts
The system will organize and total the payments received for a given date range and the indicated payment type(s).
Exceptions
The Exceptions report presents the various activities of interest. It may lead to other inquiries about transactions occurring during the indicated date range and the selected salesperson. The User Security (System > User Security) controls the access to sensitive areas of the system in form and function at a group level. Assigning and using the User Security group policy underpin this feature.
Sales by Class (Department)
Actually, within the AR (Accounts Receivable) tab, this report shows the total sales by class for a given date range. Key points within the report are the ability to drill into the department to examine the details of the items sold during the indicated date range.
Sales Tax
By default, the Sales Tax report provides a month-to-date activity report in summary with a tax exemption detail report. The reported total can be based upon either accrued or cash-based accounting.
Shift Management
To Begin a Shift
Select Begin Shift (F5) from the submenu or press the F5 function key on the keyboard.
-
-
At the Open Cash Drawer? Prompt, select Yes to open the cash drawer.
-
At the Begin Shift Screen, enter the Beginning Drawer Balance, the combined value of the coin, and cash placed into the cash drawer.
-
-
The Shift Indicator appears within the main screen for this workstation, indicating the assigned Z-Number for the workstation.
-
The current Shift can be closed at any time during the day, and a new shift is started to address the change in staff. The shift is often closed at the end of the business day and then reconciled.
-
The Z-Number is a unique number assigned to each shift and is used to track all the transactions that will occur during that shift.
To Close a Shift

-
Select End Shift (F5) from the submenu or press the F5 function key on the keyboard.
-
At the Open Cash Drawer prompt, select Yes
-
At the Close Shift Menu, select Close / Report Shift
-
At the Report Format screen, select the desired Report Layout, choose between the 8x11 or roll format, and select the destination printer
-
At the Close this shift? prompt select Yes
-
At the Shift Notes prompt, enter the appropriate shift information as desired.
-
At the Continue to Reconciliation Screen? Select Yes to continue onto the reconciliation screen or No to choose to reconcile the shift later.
-
At the Reconciliation Screen, enter the values of the designated payment methods.
-
Note the green checkmarks which indicate matching values and red X’s which indicate a mismatch. Click OK when finished.
-
Provide a Deposit Ticket # if needed, then click Proceed.
-
At the Report Format screen, select the desired Report Layout for the Reconciliation Report.
-
Observer that the shift indicator now reads Shift Closed.
Reconciliation
Selecting either Reconcile This or Reconcile Selected allows the user to choose the closed shift (Z-Number) to count the cash drawer balances of the coin, currency, check, credit/debit card, and other payment types. The reconciliation can be performed at the current workstation (Reconcile This), or the user may select any closed shift within this system (Reconcile Selected).
Access to Credit Card Transaction Information
Installations that have the Verifone device solution installed can check on the current activity recorded within the Verifone Portal using the secure access provided by the Verifone Device.
-
-
-
Select Search Transactions
-
The default date and time range are set to the current day; selecting Generate will present to the user the current activity for the day.
Remember that the search option (Ctrl + F) will quickly locate the desired value in question.
Editing Invoice Header
-
-
-
Select Edit Invoice Header
-
-
Enter either the Invoice Number of the Customer Number
-
If a list is presented, click on the appropriate invoice or position the blue bar with the up and down arrows. Pressing Enter or clicking on the Select button will open the invoice header record for editing.
-
Select Edit the following fields:
-
Select the Customer button to change the customer for the selected invoice. This process can only proceed if the invoice has no applied payments.
-
Select Salesprsn to change the indicated salesperson.
-
Select the Job Name field to change the associated Job if active for the current customer.
-
Select Purchase Order to change the indicated purchase order.
-
Other fields that can be edited include Invoice Terms, Due Date, Payment Discount Date, and the Payment Discount Amount.