01-080-2 Point-of-Sale Training #2 - Manager Functions
Overview
The TransActPOS > POS > Manager presents a number of features to help stores manage a variety of aspects of the system. The following documentation provides a guide to understanding and use of these features.
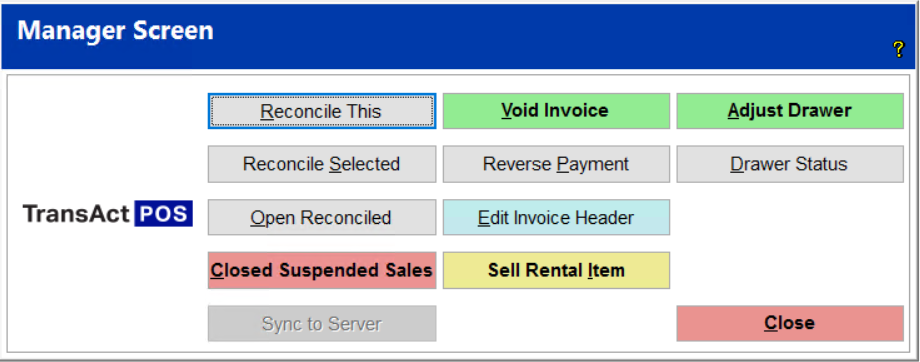
POS > Manager Screen
Reconcile This & Reconcile Selected
Selecting either Reconcile This or Reconcile Selected allows the user to choose the closed shift (Z-Number) to count the cash drawer balances of the coin, currency, check, credit/debit card, and other payment types. The reconciliation can be performed at the current workstation (Reconcile This), or the user may select any closed shift within this system (Reconcile Selected).
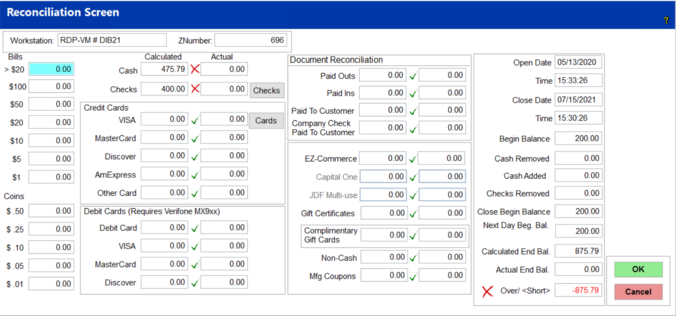
The Reconciliation Process
After selecting a shift with Reconcile This, Reconcile Selected, or after closing the current shift you will be brought to the Reconciliation Screen.
Step 1: Count Cash and Coins
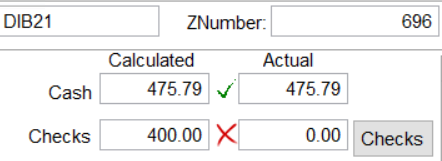
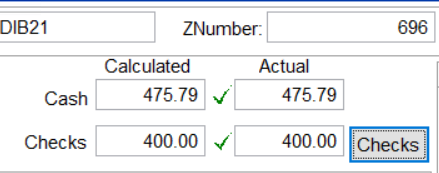
The first column on the left side of the screen is where you will enter the Dollar Value of each denomination in your till. As you fill in each field you will see the Actual value in the third column count up. Once you have entered the values of all the cash and coins the Actual value should closely match what is in the Calculated field, which is the expected cash value in the till. If they match exactly, the red ‘X’ will be replaced with a green checkmark to signify that the cash value is balanced.
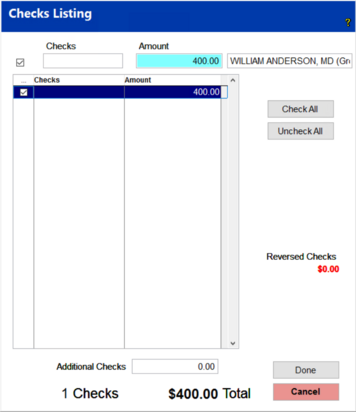
Step 2. Count Checks
Click on the Checks button to open a list of the checks that should be in the till. For each check that is found in the till you will mark the checkbox to count it.
Click Done when you are finished. If the value of the checks matches the calculated value you will see a green checkmark for this section also.
Step 3. Count Credit Card Sales
If the workstation does not have a linked credit card machine there will be a Cards button similar to the Checks button. Clicking the Cards button will open a list of all the credit card transactions that occurred within this shift. Clicking the Check All button will mark all the card transactions, you can also check each one individually while referencing receipts if you keep a duplicate copy. Click the Done button when finished.
If there is a linked credit card machine at the register, you can copy the value from the left Calculated column into the right Actual column to balance the credit card transactions.
Step 4. Document Reconciliation
The same process as before can be followed for the Document section. Any Paid Outs, Paid Ins, Gift Certificates, Non-Cash Payments, Manufacturer Coupons, etc. that were utilized during the shift will appear here. The left column will display the Calculated value and the right column is where you can supply the Actual value present in the till.
Step 5. Review and Finalize Reconciliation
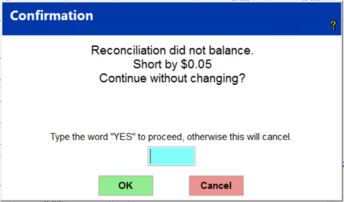
After providing all the information needed in the previous sections you can review the final column on the right side of the screen. It will tell you the opening and closing time for this shift, the balance the till started at, any cash that was added or removed, the calculated and actual end balance, and the total over and short amount. The Over/ <Short> field will alert you to any discrepancy between the Calculated and Actual End Balance with a red ‘X’.
The Next Day Beg. Bal. field will default to the last beginning balance, but this can be altered now if you want to start the next shift with a different beginning balance.
Once you are satisfied with your reconciliation you can click OK to continue.
If your shift did not balance perfectly you will be presented with this message to confirm the Short or Over status. Type “YES” and click OK to continue.
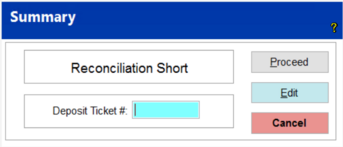
Provide a Deposit Ticket number if needed and click Proceed to continue.
Choose a report format and printer then click OK to print the Reconciliation Report. TransActPOS will return you to the Main Menu after the reconciliation process has completed.
Open Reconciled
If a shift was incorrectly reconciled you can use this option to reopen a shift to be reconciled again. Once opened, return to Reconcile Selected to repeat the reconciliation.
Closed Suspended Sales
This option can be used to reopen suspended sales that have been closed.
Void Invoice
Once the system creates an invoice or credit, specific rules come into play if the document is to be voided.
● Rule #1 - The void of an invoice must be done at the workstation where the invoice was originally created.
● Rule #2 - The void must be done before the shift is closed. If it is not voided prior to the shift being closed, then it becomes a refund.
If an invoice is created by mistake, the Void Invoice feature will void the invoice and reverse the payment posted during the transaction. The security system can restrict the Void Invoice function.
Voids during an Open Shift
The following transactions are available while the original shift in which the invoice was created is open. Selecting POS > Manager Screen > Void Invoice, the following actions are available.
● Cash Payment
○ The cash value of the voided invoice will be reduced from the cash drawer
● Credit Card
○ The credit will be applied to the credit card. The original credit card will be required if using the Verifone integration.
● Debit Card
○ Debit Card credits will require the payment in cash since returns of payments directly to debit cards are not allowed.
● Account Charge
○ The voiding of a customer’s account charge invoice deletes the invoice from the customer’s account.
Effect of a voided invoice within an open shift.
● The invoice number is deleted from the transactional record
● The system retains the contents of the deleted invoice for future reference
● The POS > Reports > Exceptions report includes this type of activity within its reporting capabilities
Reverse Payment
The Reserving of a Payment applies to payments posted within the Payment on Account process.
1. Select Reverse Payment
2. Select Customer
3. Enter the Beginning Payment Date
4. Select Find Payment
5. Select the Payment to Reverse from the listing of payments for the filtered date
6. Select Reverse Payment
Notes:
● If you are not sure of the Payment Date, go to AR > Customer File > Reports > Payments > Generate > Preview to view a listing of payments in inverse order; the most recent amount will be at the top of the list.
● The Payment Reversal backs out the payment posting and any payment discount activity made during the original payment.
● The Payment Reversal requires an open shift.
● The Payment Reversal makes reversal a Cash reversal. It is assumed that a reposting of the payment will occur to repost the Cash payment for the same amount but this time within a different payment distribution or a different customer. The net cash activity of the reversal and reposting will be zero.
Editing Invoice Header
1. Select POS
2. Select Manager Screen
3. Select Edit Invoice Header
4. Select Find
5. Enter either the Invoice Number of the Customer Number
6. If a list is presented, click on the appropriate invoice or position the blue bar with the up and down arrows. Pressing Enter or clicking on the Select button will open the invoice header record for editing.
7. Select Edit the following fields:
a. Select the Customer button to change the customer for the selected invoice. This process can only proceed if the invoice has no applied payments.
b. Select Salesperson to change the indicated salesperson.
c. Select the Job Name field to change the associated Job if active for the current customer.
d. Select Purchase Order to change the indicated purchase order.
e. Other fields that can be edited include Invoice Terms, Due Date, Payment Discount Date, and the Payment Discount Amount.
Sell Rental Item
This button will open a Ring Sale screen that will allow you to sell items that are usually only available for renting. (See the 07-030 Rental Training documentation for further details )
Adjust Drawer
The cash drawer can be adjusted during an open shift using this option. Checks can be removed, and cash can be added or removed. All adjustments are recorded within the end-of-shift report and the Exceptions report.
Drawer Status
This option will generate a report of the currently open shifts and provide an overview of sales that have occurred that day.
Point Functions
The Point Functions button becomes available when a Verifone credit card machine is installed. This option provides access to Point reports and a web link to the Point Internet Portal.
POS > File Maintenance
Promotions
Custom promotions, or product sales, can be created under this option. A list of products that will be on sale can be added manually, from a spreadsheet, or from an item listing report. Discounts for each item can be managed, and the start and end date of the sale can be set.
Bad Checks
If the Utilize Bad Check Mntc feature is enabled in Company Setup, this button allows you to manage a list of customers who will not be permitted to pay with a check.
Grid Layout
The Grid Layout buttons for POS and Rental allow you to edit the product grid for the respective module. Here you can choose the function of each button, whether it will be linked to an item, become a category, or be left blank.
Creating a Grid
For each page of the grid begin by setting the bottom right button to be a “More” category.
1. Right click the button to open its properties.
2. Select the “Grid” radio button. The Grid radio button allows you to create a category. Ex. Mulch, Dog Food, etc.
3. Enter a caption as the title of the button. In this case, name it “More Items…”.
4. Click Save
You now have a button on the grid that will open a new page of buttons when clicked. This process can be repeated for other categories you’d like to add to the grid, some examples might be Lumber, Plumbing, Outdoor, Etc. Relevant items can be added under these categories to provide organization.
To add an item to the grid follow these steps:
1. Navigate to the grid page where you would like the item button to appear.
2. Right click an empty button to open its properties.
3. Select the “Item” radio button.
4. Click “Find” 2 times and enter the desired item and when it appears in the box
5. Press Enter 3 times and then press the Save button
6. If the item has an associated catalog image it will be selected automatically. If no image is found you can browse for an image file.
7. The Item Description will be automatically added to the “Description” field, this can be edited if desired.
8. Optionally a caption can be added to the button, this text will appear above the description.
Note: Coupons can be added to the Grid in the same way as items that will be sold.