×
Menu
Index

Report Controls

Below is a guide to this print preview, including what certain buttons do and describing certain functions.
 
This button opens the bookmark panel on the left side of the screen
This button will take you to the first page in the preview (will be grayed out if you are on the first page or if there is only one page to the report)
This button will back you up one page to the previous page (will be grayed out if you are on the first page or if there is only one page to the report)
This field shows the current page you are on out of the total number of pages in the report preview
This button will allow you to view a specific page (will be grayed out if there is only one page)
This button will go to the next page in the report preview (will be grayed out if you are on the last page or there is only one page)
This button will go to the last page in the report preview (will be grayed out if you are on the last page or there is only one page)
This drop down menu will allow you to zoom the actual report to make it larger or smaller by the shown percentage (100% is the default)
 
This drop down menu allows you to select how to view the page(s). 1x1 is default and that will show 1 page at a time. You can select 2x1, 2x2, 3x1, 3x2, or 4x2. The first number is how many pages, while the second number is how many rows of pages (3x2 is 2 rows of 3 pages so 6 total)
This button will allow you to search all the report pages for a specific word or phrase. Look below for more information
This button will print the report you are viewing
This button allows you to export the report you are viewing to a variety of formats. Look below for more information
This button will close the report and go back to the report generation screen
If you have clicked on any links that open an additional report, tabs will be created. The original report will be labeled as "Main Report" and the additional tabs will be titled to specify what the report on that tab is (shown example is a Sales Report as the main report and an Invoice Summary of invoice 100748 on the other tab)
 

Search

 
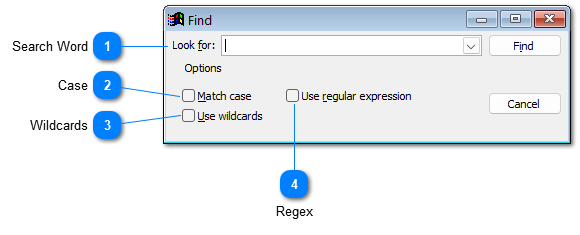
Search is a great tool for finding something on a report preview without having to manually search the entire document. Clicking the search button will bring up the Find window.
 
Enter what you wish to search for in the Look for field. The drop down will display previously searched words/phrases. When you have entered what you wish to search for, click Find or press Enter on the keyboard. Once you have done this, the matching results will be highlighted in yellow. You will also see the results as clickable links in the bookmark panel. Clicking these links will jump to the page with that matched result.
 
 
Back in the find window, you can enable "Match case" to have your search results be case sensitive. This means that if you enter "Cash" with a capital C, cash, without the capital, will not end up on the results. The other option is "Use Wildcards." This allows your search to be more flexible. Below are some examples of wildcards that are frequently used and how to use them.
 
* can be used to return results for any combination of characters; for example, c*t will return cat, cost, coat, court, credit, etc.
? can be used to return a single character; b?g would return big, bug, bag, big, and beg
[ ] will return words containing any of the enclosed characters; for example, p[ae]t will return pat and pet
[( ) will return words beginning with a certain string of characters; for example, [(per) will return person but not camper
( )] will return words ending with a certain string of characters; (per)] will return camper but not person
 

Export Report

 
You can now export the report to a variety of formats via the print preview screen.
 
Output Type
There are numerous export types you can choose from. Look below for a description of each format to see which format fits for you.
-Excel (.xls): Selecting this format will allow you to open the exported file in Excel
-HTML (.html): This format will open up in your web browser
-Image TIFF (.tif): This will create an image file; Tagged Image File
-Image Bitmap (.bmp): This will create an image file; Bitmap Image File
-Image PNG (.png): This will create an image file; Portable Network Graphic
-Image GIF (.gif): This will create an image file; Graphical Interchange Format File
-Image JPEG (.jpg): This will create an image file; Joint Photographics Expert Group (since there are five different image types, click here to learn the difference)
-PDF (.pdf): This format will open in Adobe Acrobat; Portable Document Format
-Open Office Writer (.odt): This format will open in Open Office, a free to use Microsoft Office-like program
-RTF (.rtf): This format will open in your default word processor; Rich Text Format
-RTF (flow layout): The difference between the original and flow layout is that flow is like a normal document; the original creates text boxes/fields that contain the information
-Word (.doc): This format opens in Microsoft Word
- Word (flow layout): The difference between the original and flow layout is that flow is like a normal document; the original creates text boxes/fields that contain the information
-XFF File (.xff): Selecting this will create a .xff file along with a .fpt file with the same name
-XPS File (.xps): Selecting this will create a .xps file that is similar to a XML file format
 

File Name

This is the title of the exported file. The default is "output" and it will be saved in the TransActPOS main directory. If you click the button next to this field, it will bring up a Save As window, allowing you to rename the file and save the file wherever you want on your workstation. Knowing where the file is saved is VERY important. Naming the file something you will easily recognize is also very important.
 

Page Range

Much like in a print screen, the page range that you enter is the range of pages to be exported. By default, all is selected (every page will be exported to the selected format type). If you select Pages, you can select specific page ranges/pages to export. Commas will allow you to export multiple page ranges (1-3, 5-7 will leave out page 4 and any page after page 8).
 

Image Settings

These options are only available when exporting to one of the image formats.
-Include: Select the pages in the report preview to include in the image; By default, All pages in range is selected. You can also select only even pages or only odd pages.
-Number of copies: Select the number of copies
-Zoom pages per sheet: Here, you can select how many pages of the report will export on one page (the more, the smaller each page will be)
-Image DPI: DPI is dots per inch; the higher this number, the better the image will look; 96 is the default
 

Clickable Links (Drill Down)

 
Any text on the report preview pages that is green and underlined are links that "drill down" to another report, somewhere in TransActPOS, or is an interactive value. Clicking an item number will bring up the inventory file screen for the given item. Clicking on a customer number will bring up the customer file for the given customer. Clicking an invoice will bring up an Invoice Summary with invoice information on that specific invoice. This is helpful instead of locating the invoice you wish to lookup, backing out of the report, and finding the report through other reports/means. These clickable links save time and patience when trying to find specific information. Each specific report page will have more information on what specific links are clickable in that given report. For more information, click here.