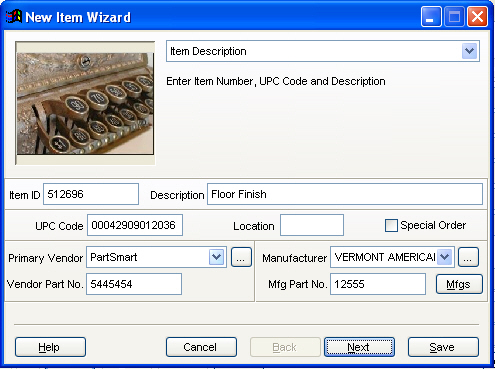
The Inventory Add Wizard is a controlled process of adding inventory to the TransActPOS IC module. Through a series of screens, the user will answer a variety of questions regarding the details of the inventory item. At any time, the user may cancel the add process or go to a previous screen to correct information. At any time, the user may select Save to immediately save the item to the system. Further modification of the item information may be performed within the Inventory Maintenance screens. Start with the Item ID. Carefully selected Item ID patterns will allow for item searches to be very productive in displaying groups of related items. Careful selection of the classification codes will result in more selective searches and inventory reports.
Enter the Item ID to be assigned to the new inventory item. This ID is typically the most common reference number for the item. The UPC can be entered by hand or scanned. Enter the store location for the item and if it is a special order item. The Primary Vendor pick list will display the entered vendors list, while the vendor button will provide a search for the vendor. On the Manufacturer section, the pick list will display the entered manufacturers list, while the Mfgs button will allow a search for the manufacture part number from certain manufacturers. Select Next to continue.

Next, indicate the display, stock, and purchasing units of measure and ordering quantities. Selecting the box on each Item UOM will display the types of units that have been defined in IC | Support Files | Unit Measure. Normally, the Displaying, Stocking, and Purchasing units will be the same. The Order Qty is the number of items to be re-ordered. The Ordering Information Min allows for automatic Stock Alerts to be created. The Ordering Information Max number is to limit the number of total re-ordered items to not exceed the set maximum for this item, i.e. the number of items ordered plus the number on-hand cannot exceed the set Max. The Decimals field allows for partial units to be sold. (i.e. 2.5 lbs of grass seed) Select Next to continue.
For the indicated Pricing Unit of Measure, enter the available information for the MSRP, Retail Price, Unit Cost, and the number of units On-hand. The number of units On-hand must be entered if this item will be changed to Rental type.
Enter inventory type of Stock, Non-Stock, Coupons, or Kit. Rental is also an option if you have Rental installed.
Enter Matrix type if the item is to be Serialized.
The Taxable Item will be checked by default, select a Tax Class if more than one is defined in System | Support Files | Sales Tax Menu | Taxable Item Types and Tax Tables. Uncheck the box for non-taxable items.
Select the 4 Unit button to change from Standard pricing to Unit Pricing.
Enter an appropriate UPC code or leave blank. Enter the appropriate UOM with the Retail and Unit Cost. Units of Measure are defined in IC | Support Files | Unit Measure.
Enter the A/B/C prices if Column Pricing is appropriate for this item.
Press Next to continue.
Enter the Class, Code, Fine, and Sub-Fine for the item. Selecting the box on each will display the types of classification that have been defined in IC | Support Files. Careful selection of the classification codes will result in more selective searches and inventory reports. Technically, all items do have a predefined class, code, fine, and sub-fine, but you can define your own that fits your store operations. Select Next to continue.
Enter the appropriate General Ledger information for the selected item. These are usually predefined in the company setup. Select Next to continue.
Each inventory item may contain item notes and an item image. Check the Print on Invoice box for the note to be printed on invoices. Both of these item facts can be edited from the Inventory Maintenance menu. Click on the Image Control button to find the item image. Select Next to continue.
Select Save to commit this new information to the Inventory Control Module. The Back button allows the user to go to a previous menu selection while the Cancel button aborts the entire add process. Selecting the Pick List button located to the right of the "Finish Add New Item" presents the previous menu selections, allowing the user to select a specific item menu from the sequence.
Select Save to complete the item add process. Once the item has been saved, it may be edited within Inventory Control | Inventory File.