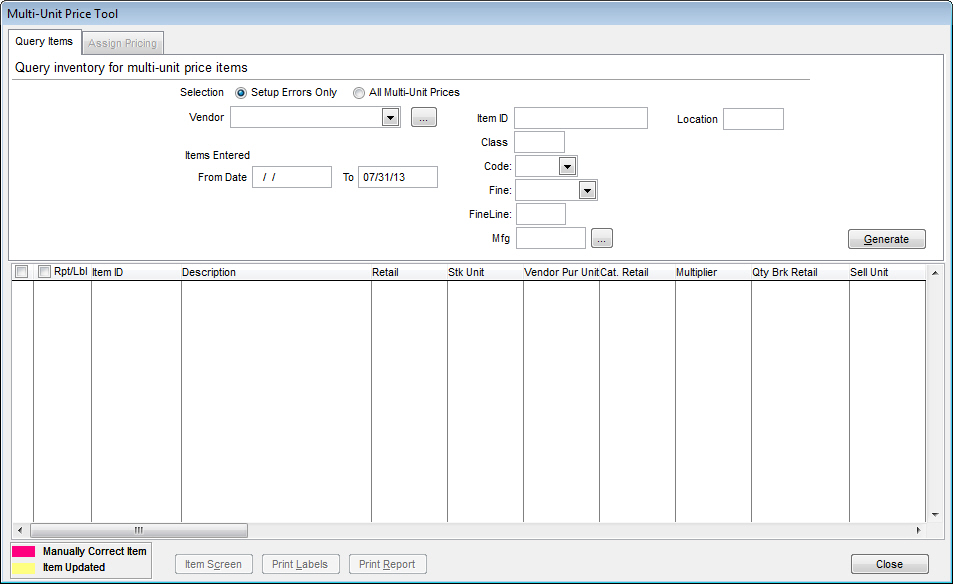
The Multi-Unit Price Tool feature allows you to search your inventory for items that have discrepancies with unit of measure.
Selection
The options chosen here determines what items will appear in the listing below. You can choose to only show Setup Errors (errors made when the items were originally entered) or All Multi-Unit Prices (all inventory items will be shown, regardless of when entered).
Vendor
In order to run this utility, you must select a vendor. Click the button to the right of the drop down menu to open a find window. Using this find window, locate the vendor you wish to run the tool for and click Select.
Items Entered
This date range determines the dates the tool will run. Any items that fall in this date range will be shown. By default, the from date is blank and the to date is the current day. This will report on any item entered at any time.
Filters
On the right side, there are a number of filter options. These options include Item ID, Class, Code, Fine, Fineline, Manufacturer, and Location. Entering values in these fields will narrow down your results greatly, especially if the vendor selected has a lot of items. If these are all left blank, the system will report on every item for the selected vendor.
Generate
Once all values are entered, clicking Generate will run this tool and look for items with discrepancies. Once the system has run the tool, the results will be shown in the listing below.
In the list at the bottom of the "Query Items" tab, all items matching the above criteria will be shown here, along with their description, retail price, stocking unit, vendor purchase unit, catalog retail price, multiplier (in catalog), quantity break retail (if setup), and selling unit (quantity break). If any of the items listed are highlighted this color, you must manually change the information by clicking the Item Screen button below. If the item has been changed on this screen (via the tools on the Assign Pricing tab), they will be highlighted with this color. If you wish to print new labels or a report of selected items, check the boxes next to the items desired in the "Rpt/Lbl" column and once all items you want labels/reports for are checked, click the respective buttons below to perform that action.
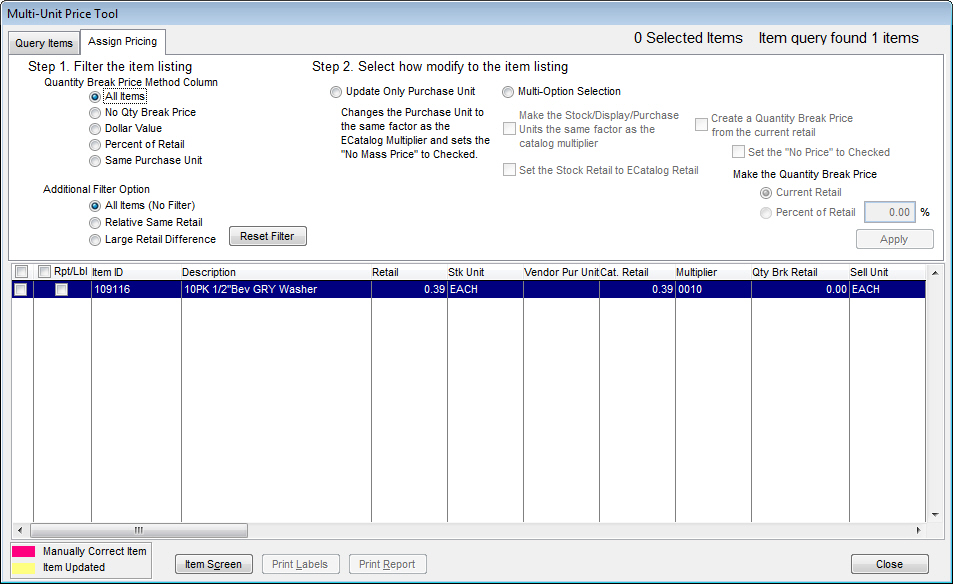
Assign Pricing
Once the items are queried and listed, the "Assign Pricing" tab becomes available. Clicking it will offer some options to perform on the selected items below (the check box on the far left).
Step 1: Filter the item listing
The options below this are filters you can apply to the list of items below. Selecting an option will filter the list. If you wish to reset the filters, click the Reset Filters button to restore the listing of items to the initial filter (no filter). The filters are as follows:
Quantity Break Price Method Column
Additional Filter Option
Step 2: Select how modify to the item listing
The option selected here is how you will modify the items selected in the list below. You can choose from two options. The first is "Update Only Purchase Unit" which will change the purchase unit to the same factor as the ECatalog multiplier and sets the "No Mass Price" option to checked. The other option is "Multi-Option Selection." This option allows you to customize your modification more thoroughly. The following options can be selected when choosing Multi-Option Selection:
-
Make the Stock/Display/Purchase Units the same factor as the catalog multiplier
-
Set the Stock Retail to ECatalog Retail
-
Create a Quantity Break Price from the current retail
-
Set the "No Price" to Checked
-
Make Quantity Break Price
-
-
Once the options are set, clicking Apply will modify the items selected in the way you have established.