The Accounts Receivable Module is an option when purchasing TransActPOS. This option allows for in house charge accounts, generation of finance charges, and printing of customer ledgers and statements.
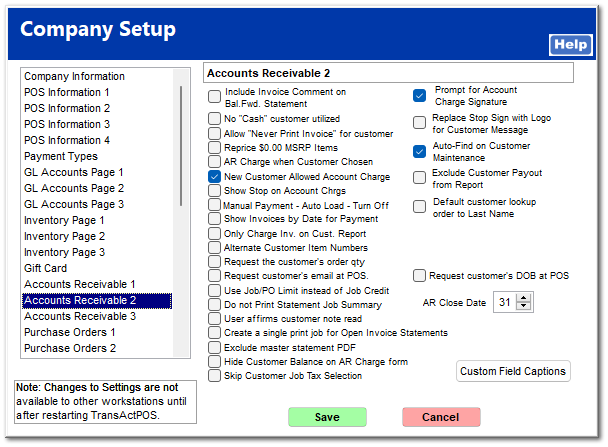
Include Invoice Comment on Bal. Fwd. Statement
The Invoice Comment that was entered at the Point of Sale | Inv Comment (F3) will be printed on Balance Forward Statements.
No "Cash" customer utilized
If checked, the Cash customer will not be utilized. A customer's name will have to be entered when creating any invoice.
Allow "Never Print Invoice"
The AR | Customer File | Settings | Never Print Invoices option will be made available for customers. Invoices can alternatively then be sent electronically or sent with the Balance Forward Statement with Detail monthly.
Reprice $0.00 MSRP Items
When an item has a $0.00 MSRP price, the price entered at the time of sale will be discounted based upon the customer's discounting percentage. If not checked, no discounts will be allowed on the item.
AR Charge when Customer Chosen
If an account charge is allowed for a customer, when the End Sale (F2) is selected at the end of a sale, the Payment Screen will default to the Account Charge type of payment.
New Customer Allowed Account Charge
When checked, new customers added at the Point of Sale workstation will be allowed to make an account charge. If left unchecked, new customers can be created at POS for mailing list and Loyalty Program purposes, but will enable the "
No Account Charge" option. Review AR | Customer File |
Main Tab for further information.
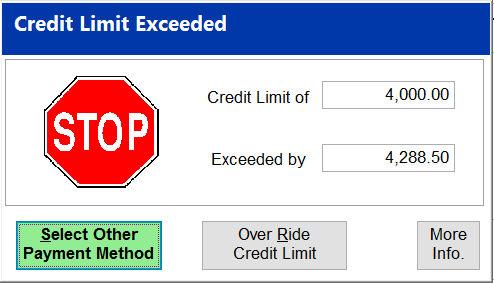
Show Stop on Account Chrgs
If this option is selected and the No Payments Accepted check box is selected in AR | Customer File | Main Tab, the system will prompt the user during the Account Payment process that the selected customer cannot make a payment to the said charge account. This is used when the said account is in a legal preceding for non-payment of account. Check with your attorney, if accepting account payments can null and void your legal remedies against this customer once legal proceedings have begun.
If you are taking actions to this extreme, be sure that in AR | Customer File | Main Tab the No Account Charge check box is selected. Definitely do not want this liability increasing!
Manual Payment - Auto Load - Turn Off
When the Manual Option to enter payments on invoices is selected, the automatic displaying of the amount of the selected invoice will be disabled and will require the entering of the amount payment for each invoice.
Show Invoices by Date for Payment
This option affects account Payments. The Show Invoice by Date For Payment check box, if left unchecked, will push any
finance charges to the top of the Account Payments (Application) screen. This will enable the payment of finance charges before payments to invoices. POS or AR Payments | Pay On Account | Find (and select proper customer) | Accept | Enter Payment Amount | Payment On Account Method | Select Automatic.
In the above example, a $50.00 payment was applied. The payment was first applied to the finance charge of $33.93 and the remaining $16.07 was applied to invoice #84060, reducing the balance from $559.41 to $543.34.
Only Charge Inv. on Cust Report
The Only AR Charges and Payment options on the ledger report for a customer in AR | Customer File | Reports | Ledger will automatically be checked
Alternate Customer Item Numbers
Alternate Item ID's allows the creation of an alias to a store item ID. The alias is customer specific and is appended as a prefix to the item description and enclosed in parenthesis on the customer invoice. See
Alternate Item ID's
Request the customer's order qty
The actual quantity will be prompted for entry and entered into the POS description when the invoice is completed, such as the actual number of copies delivered on a printing order.
Request the customer’s email at POS.
Cashier will be prompted to request the customer’s email or to verify the existing email.
Default to Job/PO Limit instead of Job Credit
Within a customer job, the default is a Job Credit
Option Checked
Accounts Receivable 2 -

Accounts Receivable 2 -

Do not Print Statement Job Summary
More information to come
Use affirms customer note read
More information to come
Create a single print job for Open Invoice
More information to come
Exclude master statement PDF
More information to come
Hide Customer Balance on AR Charge form
More information to come
Skip Customer Job Tax Selection
More information to come
Prompt for Account Charge Signature
Anytime an account charge is utilized in the POS module, the customer will be prompted for a signature.
Replace Stop Sign with Logo for Customer Message
Checking this option will replace the stop sign in the customer message to the logo set for TransActPOS in Company Setup | Company Information.
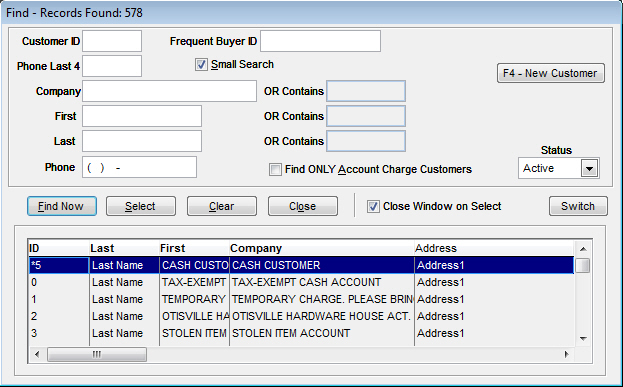
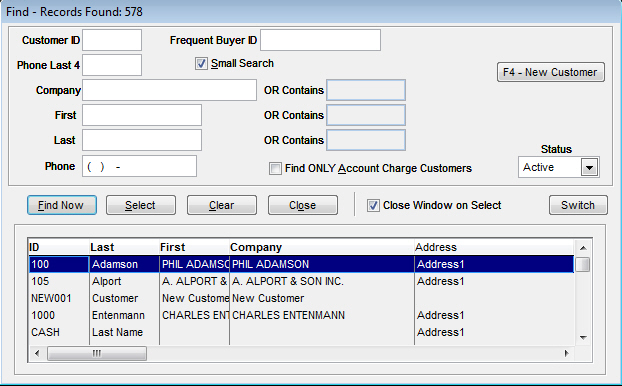
Auto-Find on Customer Maintenance
Enabling this option will automatically bring the Find screen when entering the Customer File in AR | Customer File.
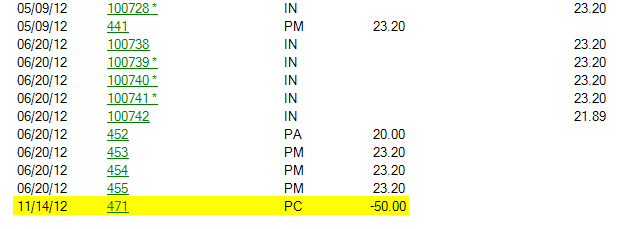
Exclude Customer Payout from Report
Checking this box will exclude any negative values from a payout from the customer's report. If the check box is unchecked, the report will show a negative value with PC (Paidout Credit to Customer) as the type.
Default customer lookup order to Last Name
By default, this option is unchecked and anytime you go to locate a customer, the listing will be shown by Customer ID.
If you enable this option, the find listing will be shown by Last Name.
Request customer's DOB at POS
More information to come
Show customer's aging at Charge
With this option checked, the system will present a condensed summary of the selected customer's aging based upon each invoice's Due Date at the bottom of the Get Customer screen.
|
Get Customer Screen
|
Cur:
|
30:
|
60:
|
90:
|
120:
|
Bal:
|
|
Customer Open Invoice Aging
|
Current
|
1-30 Days
|
31-60 Days
|
61-90 Days
|
Over 90 Days
|
Total Due
|
AR Close Date
Select the number of days prior to the normal monthly closing date for invoices to be including on the next monthly statement.
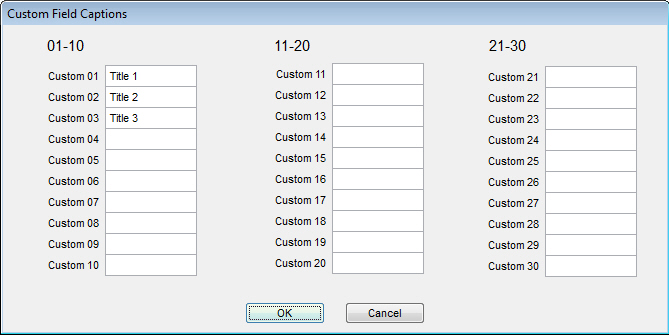
Custom Field Captions
New to version 3.036, you can have up to 30 customized fields for your customers. These are for any additional information your store may keep on a given customer that isn't listed anywhere in the customer file. To create these, click the button and enter the titles you want to appear in the customer file. Once the fields have been entered, click OK.
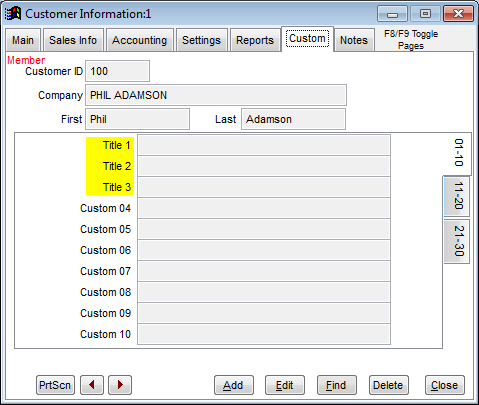
Now that you have created some custom fields for customers, go into AR | Customer File and locate a customer. Clicking on the Custom tab will display the fields you created split amongst three tabs (10 on each). As you can see below, the field names we entered above now replace where it used to say "Custom 01," "Custom 02," and "Custom 03." Clicking the edit button will allow you to enter information into each field.