What is cStateDate when talking about customer statements?
When printing Balance Format Statement, the system automatically applies the statement date to the invoice. Invoices with a blank "Statement Date", appear on the listing on current activity invoices. The Beginning Balance plus the list of current invoices create the Ending Balance value present on the Statement.
Customer statements are individual customer reports containing all account charges (invoices) that are not paid in full. Typically, one customer statement format is established for all customers. By doing this, a single statement printing generates statements for all customers, and customer balances are easier to interpret. Statements can be generated on a periodic basis according to your store's policy. Finance charges are typically processed just prior to printing statements. For information on running finance charges, see Finance Charge.
Customer Statement Types
By default, this is entered from the selection in System | Company Setup | Accounts Receivable 1. You can select a different statement type at the time of running statements. For more information on the different statement types, see Customer Statement Types.
The last date statements were run is entered in this field, which serves as the statement printing start date. It can be changed to any date. You can select of start of day or end of day as the statement printing start.
Enter a customer ID or partial ID to print a statement for a particular customer. Leave the field blank to print statements for all customers. Click the ... button to find a customer. Click the Exact checkbox to ensure only the customer exactly matching the specified customer ID is included in printing.
This allows you to update a customer's account and print a statement between statement cycles. Checking the box updates the customer's statement date. It should not be checked to run a copy of the statement or to run a mid-cycle statement.
Three distinct behaviors occur within the Print Only Customer with/Balance option.
1.
Option Unchecked
The system will print statements all customers with activity from the Last Statement Date to the Statement Cut-Off Date whether the customer account is a charge account or cash account.
Whether these customers are account charge customers or not. This will print "Cash" customer terms!
2.
Option Checked and Greater Than checked
This will print only "Account Charge" customers with a balance owed that is greater than the indicated value to the right.
This will not print credit balances.
If the Value is placed at 5.00, the system will only print statements for customers with balances greater then $5.00.
3.
Option Checked and Greater/Less than checked
This will print only customers with a balance owed that is greater or / less than the than the indicated value to the right.
This will print credit balances.
If the Value is placed at 5.00, the system will only print statements for customers with balances greater then $5.00 and credits balances greater then -$5.00.
Customers with a balance between -$4.99 and $4.99, will not receive a statement of any type for this statement run.
The Save Setting icon allows the user save the current selections presented within the Print Customer AR Statement screen. Date fields are determined based upon the settings prescribed during the Save Settings process.
Select Type of Date Represented for
Reference to the above diagram
Begin Date for Open Invoice Detail
#9
End Date for Open Invoice Detail
#9
Update Customer Statement Date and Balance through
This automatically applies credits when running statements. Note that this does not apply to customers who use jobs, have revolving accounts, or have No Auto Applying Credits checked.
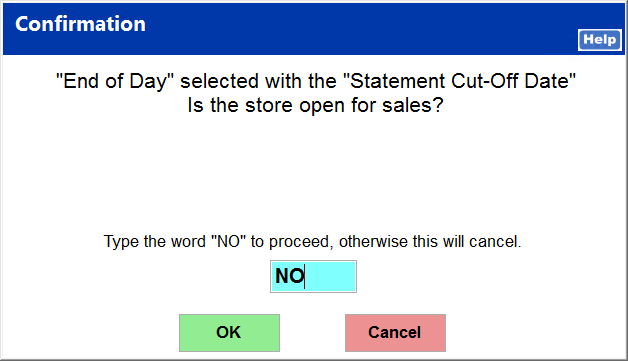
After making the appropriate selections, click Print to proceed to print statements. You are prompted to confirm whether the store is open for sales. This determines the statement cut-off date used.
If the store is open, enter YES, and click OK. This sets the previous day as the statement cut-off date and does not include sales for the current date.
If the store is closed, enter NO, and click OK. This sets the current date as the statement cut-off date.
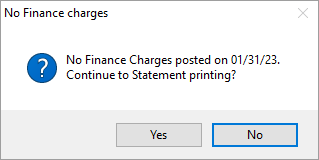
No Finance Charges
If finance charges have not been run for the statement date, a message is shown asking you to confirm that you wish to continue to print statements.
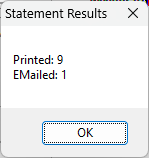
Statement Results
Once statements have run, a message shows how many statements were printed and emailed.
You can view a customer's previously printed statements through AR | Customer File | Reports | View Statement.