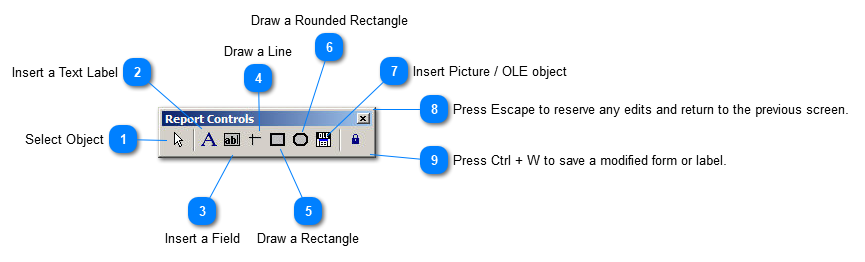
Within the form editor, the Report Controls toolbar provides standardized editing tools for elements of the report form.
The report controls allow the user to modify the layout and physical characteristics of the report form.
The commands are the following from left to right
 Select ObjectSelect an object the move or resize. A selected object may be moved with the arrow keys or resized with the Control plus arrow keys.
|
|
 Insert a Text LabelOnce selected, the text field will appear on the form into which the text may be entered and fonts/sizes be applied.
|
|
 Insert a FieldSelecting the field option allows a set of available variables to be applied.
|
|
 Draw a Line |
|
 Draw a Rectangle |
|
 Draw a Rounded Rectangle |
|
 Insert Picture / OLE object |
|
 Press Escape to reserve any edits and return to the previous screen. |
|
 Press Ctrl + W to save a modified form or label. |
|
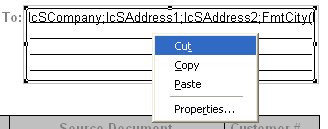
Once an object or a field is selected, handles will appear on the object which will allow it to be move or re-sized. Right clicking on the object will display the options of Cut, Copy, Paste, or Properties.
Clicking on the Properties option will present the data entry and formatting menu.
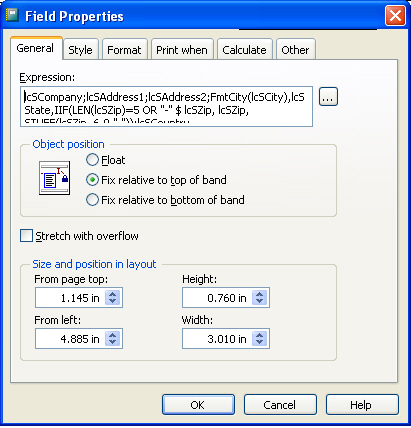
For field controls, you can set a variety of format options for each data type.
To Format a Field Control
Choose the Field control to select a field box, right click, and select the Properties option.
In the Report Expression dialog box, choose the dialog button after the Format box.
In the Format dialog box, select the data type for the field: Character, Numeric, or Date.
The Editing options area displays the formatting options available for that data type.
Note: This data type applies only to the report control. It reflects the data type of the expression and doesn't change the data type of the field in the table.
Select the justification and format options you want.
The Format dialog box displays different options depending on the data type you choose. You can also create a format template by entering characters in the Format box.
Justifying Text in a Field
You can justify field contents within the control in two ways: justify text in a field control and justify text in a field. This setting does not change the position of the control on the report, only the contents within the space of the control.
To justify text in a field control
Defining Field Format Templates
A format template allows you to customize the format of the field. By entering a combination of characters and codes in the Format box of the Report Expression dialog box or the Format dialog box, you can create a wide variety of print formats. The characters you enter appear as literal text along with the field value. The codes you enter determine the appearance of the field output. For example, if you use the following format template for a 10 -digit numeric field, the characters (parentheses, spaces, and dashes) are printed along with the numeric data.
|
Format Template
|
Printed Output
|
|
(999) 999-9999
|
(123) 456-7890
|
Changing Fonts
You can change the font and size of text for each field or label control or you can change the default font for the report.
To change fonts and size in a report
-
-
From the Format menu, select Font.
-
The Font dialog box appears.
-
Select the appropriate font and point size and then choose OK.
-
To change the default font
-
From the Report menu, choose Default Font. In the Font dialog box, select the appropriate font and point size you want as the default and then choose OK.
Only the controls inserted after you changed the default font will reflect the new font settings. To change existing objects, select them all, and then change the font using the Font option on the Format menu.
Cropping a Picture or OLE Object
The picture or OLE object you inserted might not fit the frame you drew when you created the control. By default, the picture or object retains its original size. You can clip or scale it to fit into your frame.
If the picture or OLE object is bigger than the frame you created in the Report Designer, only a portion of the picture or object appears in the frame. The picture or object is anchored at the top and at the left of the frame. You cannot see the lower right portion that extends beyond the frame.
To fit a picture in the frame
-
In the Report Designer, create a Picture/OLE Bound Control.
-
In the Report Picture dialog box, select Scale picture &endash; Retain shape.
-
The whole picture appears, filling as much of the frame as possible while retaining its relative proportions. This protects your picture from vertical or horizontal distortion.
To fill the frame with the picture
-
In the Report Designer, create a Picture/OLE Bound Control.
-
In the Report Picture dialog box, select Scale picture &endash; Fill the frame.
-
The whole picture changes to fill the frame that you sized. If necessary, the picture is stretched vertically or horizontally to fit the frame.
Centering an OLE Object
The OLE objects included in a General field can vary in shape and size. If the object in a General field is smaller than the frame, it appears in the upper left corner of the frame. You can center it to ensure that all objects smaller than the frame are centered in the frame in the report or label. File pictures don't need to be centered because they don't vary.
To center General field OLE objects
-
In the Report Designer, create a Picture/OLE Bound Control.
-
In the Report Picture dialog box, select Center picture.
-
The printed OLE objects are centered within the area when the report is previewed or printed.