Short Barcodes are utilized within very small jewelry labels because of the limited space for printing the item number or UPC. The following steps will assure you of the successful creating and alignment of Butterfly labels (2.20" Wide by .50" Tall). Due to the many variations in printers and size of labels, multiple print tests and label edits will need to be done.
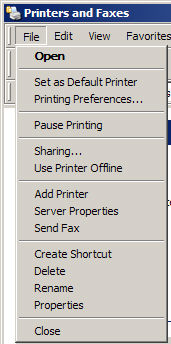
Make sure that your workstation's printer server recognizes the size of label that you are wanting to print to. Open the Windows Printer folder and select File | Server Properties
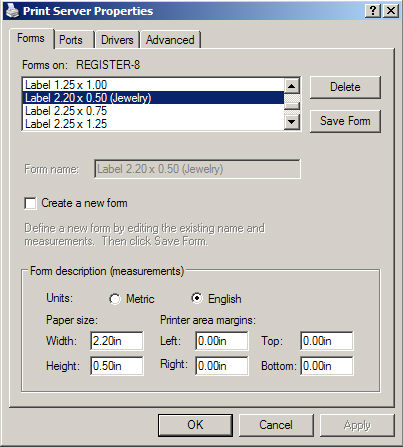
From within the Forms tab, locate the desired label size. If the desired label is present, go the next step. If the label size is not present, select "Create a new form" and then indicate the appropriate width and height. Then select Save Form to complete the process. The new form should be displayed within the forms listing.
Next, create a specific printer to utilize the specified label. If you are printing "Bin Labels" and "Jewelry Labels", create two printers. The Bin Label printer will have the names "Bin Label Printer" and the printing preferences will indicate Paper Output of the correct size label. The Jewelry Printer will be the same printer but the Paper Output will be the "2.20" x .50" label.
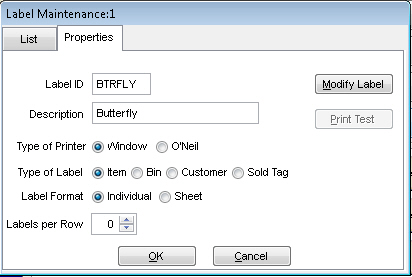
From within TransActPOS, select System | Form/Label Editor | Labels and create a New label or modify an existing one. The Properties tab will indicate the Label ID and Description that will easily distinguish the label the end user. Next select Modify Label.
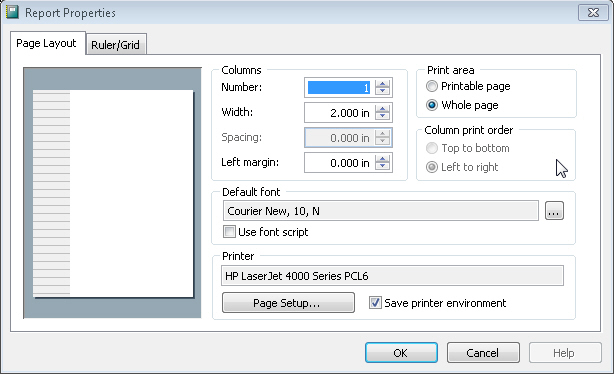
First identify the printer to which the label will be formatted to print. Select File | Page Setup and enter the appropriate printer. Checking "Save Printer Environment" will save the printer settings. The Page Layout screen should display a representation of the desired label format. Select OK to continue.
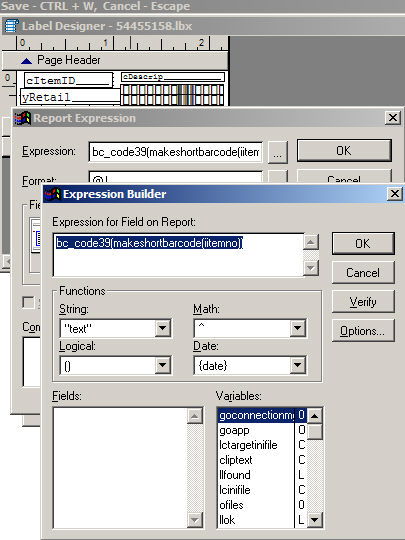
Next, right click on the field that will represent the short barcode and select Properties. Then Select
the box to the right of the field containing the 'bc_..." information. The Expression for Field on Report should contain this "bc_code39(makeshortbarcode(iitemno))". Select OK (twice) to finish and close the screens.
.
With the field containing the barcode information, select the Format | Font and select the "BC C39 2 to 1 Medium " font. Make sure to select a font size of 11 or larger. It has been our experience that the font size can have a dramatic effect on the readability of the final product. Select OK to complete the font portion. (c39m2.TTF)
Near final note: Look again at the size of the label displayed with the Label Designer screen. If this label is taller than what the label is specified within the paper size being used, you will get a "...band out of range error...". Correct the height of the label by placing the cursor on the Detail and wait for the display of a double vertical arrow. Holding the left mouse button and clicking down will allow the adjustment of the label height to increase or decrease.
Select Ctrl + W to save the current label modification.
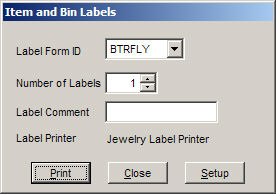
Print a test label to confirm proper alignment of the label. Also, from within IC | Inventory File, locate a current item then select the print label. Make sure to select the matching Label Form ID and Label Printer as shown in the example below. Print a label and then make sure that the barcode label can be scanned accurately.