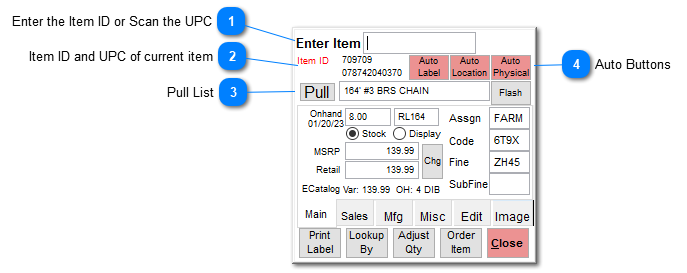
The Main tab on the inventory screen displays the basic information of the selected item. To locate an inventory item, simply enter any known item lookup number. Additionally, you can scan the UPC number, manually enter the IBM number, or enter a vendor part number. Any number that can be entered within the desktop TransActPOS application can be entered into this field.
Note: If entering the item number manually, select Enter when done. If utilizing a barcode scanner, make sure that the scan includes a Carriage Return at the end so the system will automatically begin the search process.
In this example, 709709 has been entered as an item number and then the Enter key has been selected.
 Enter the Item ID or Scan the UPCEnter the Item ID, UPC or any of the values located within the Lookup By of the desired item.
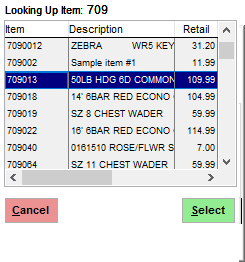
If an exact match is not found within the inventory, the system will present the list of products that contain the value entered. Locate the item you want within the list, highlight it by clicking on it, and choose the Select button to pick the item.
|
|
 Item ID and UPC of current itemThe Item ID and the Primary UPC are presented.
|
|
 Pull ListThe Pull List feature allows the user to make a list of items that then can be printed upon exiting the current function.
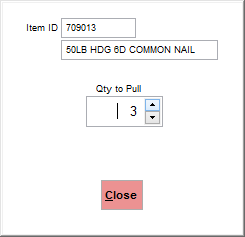
Selecting the Pull button, prompts the user to enter the Qty to Pull of the currently selected item.
|
|
 Auto ButtonsThe Auto Buttons provide the following:
|
|
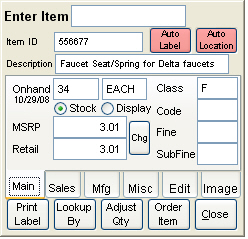
Description
The description field allows up to 60 characters to describe the product. Further information can be placed within item notes.
Auto Label
| | Note: Auto Label, Auto Location, and Auto Add options must be activated EVERY TIME you log in on the wireless menu.
|
By default, the Auto Label button is not active when the application is first started and will not interact with the scanning of items. When Auto Label is activated, the system will automatically print a label for the scanned item to the indicated label printer. Once you have clicked on the Auto Label button, you will see the following screen.
After this screen, the following notice will be shown. This will only show if, in the main version of TransActPOS, you don't have the option mentioned in the message enabled. To enable this option, you must go into Company Setup and go to the
ECatalog section.
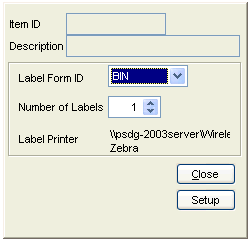
You will then be brought to the Label Print menu. Here you can select the appropriate Label Form ID, the number of labels, and the destination label printer. Choosing the "Setup" button will allow the user to access the printer selection option. Upon selecting the required settings, select close.
Once you have closed the Label Print menu, you will be asked about Auto Add. Below is more information about this.
Once on the Main menu, the Auto Label button will change to green which indicates that label printing has been set up and is ready for use. Now scan a barcode or type in an item number and the system will automatically print the specified item label.
Auto Add
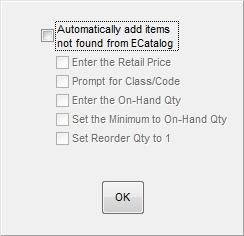
Immediately after closing out of the Auto Label option above, the system will prompt with a series of check boxes.
Checking the "Automatically add items not found from ECatalog" option will enable the other options on this screen. The options are self explanatory and listed below:
-Enter the Retail Price
-Prompt for Class/Code
-Enter the On-Hand Qty
-Set the Minimum to On-Hand Qty
-Set Reorder Qty to 1
Auto Location
By default, the Auto Location button is not active when the application is first started and will not interact with the scanning of items. When activated, upon scanning an item, the system will automatically assign the indicated location code to an item.
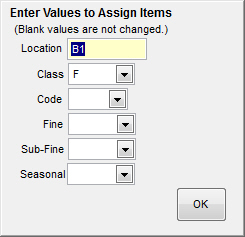
To activate the Auto Location option, select the "Auto Location" button and then enter the appropriate item location information either manually with the device keyboard or by scanning the location label.
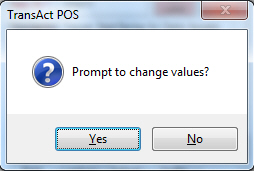
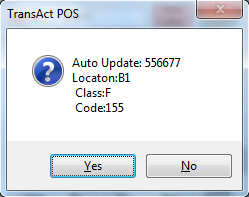
After entering in the information above, the system will ask you if you want to double check the values you entered before confirming them. Answer accordingly.
If you answer Yes, you will see the following screen (values will be different depending on the information entered). If you answer No, the system to take you back to the Inventory screen with the Auto Location button active.
Answering Yes will confirm your values for Auto Location.
Upon returning to the Main menu, the Auto Location button will change to reflect the location ID as indicated within the previous screen.
When the Auto Location button is active, the TransActPOS system will automatically assign the location information to the scanned item.
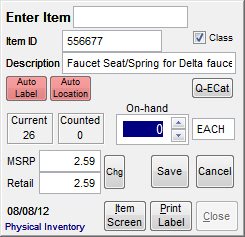
On Hand
On Hand is the total quantity from the shelf and warehouse locations.
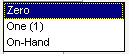
When using the Wireless application to perform a physical inventory, the system can be defaulted to one of three quantities based upon the situation. Typically, the default is left at zero which requires the user to change the value to the appropriate value of the count. Options of "1" and the on-hand quantity (as stated by your system) can be used depending upon your preference.
Stock / Display
The Stock or Display radio buttons pertain to the viewed on hand quantity. The current unit of measure is EA (Each). If the Stock unit is selected, then the on-hand value is interpreted in the stocking unit of measure.
MSRP
Manufacturer’s Suggested Retail Price
Retail Price
If no other discounts apply during the sale of the current item, this will be the price that appears on the invoice screen and will be charged to the customer.
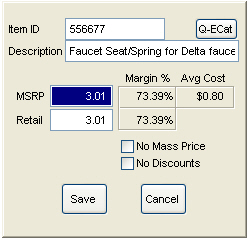
Chg
To change the MSRP and/or the Retail Price of an item while using the hand held device, select the Chg button to access the edit screen. Enter the desired MSRP and Retail price of the item and then select Save to post the modification to the system. You can also check the No Mass Price to disable mass pricing for the selected item and/or check the No Discounts option to disable any discounts, be it customer based or coupon based.
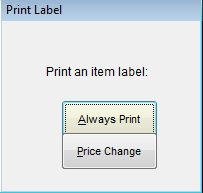
To print a new label for the item, select Print Label at the bottom of the Inventory screen (not the screen above) and then indicate the appropriate label, number of labels, and printer destination.
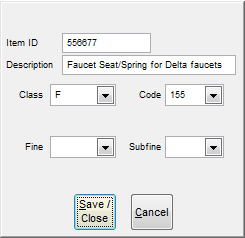
Class/Code/Fine/Sub-Fine
These fields identify what the item is. To change any of these values, double-click any of the four fields for the following screen. Using the drop down menus beside each value, select the new value to be changed. Once all changes have been made, click Save/Close to back up to the Inventory screen that will reflect the new values.
At the bottom of this screen, there are a number of tabs that will allow you to access other information regarding the item selected. There are also some buttons along the bottom that serve different functions.