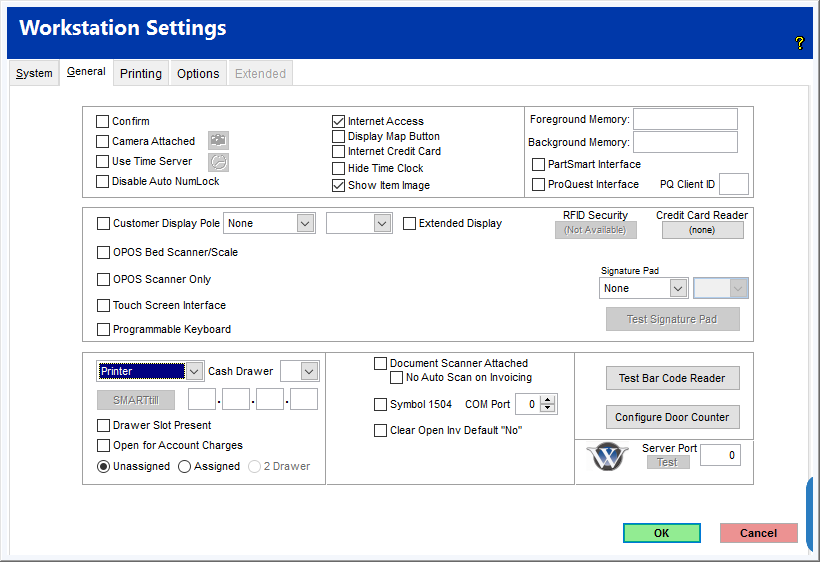
General Tab
Specific settings available for this workstation. Checking a box will confirm the presence of a workstation feature to TransActPOS.
Confirm
Confirmation of Yes or No is required for deletions, changes, etc. in TransActPOS program modules.
Camera Attached
A WebCam is attached to the workstation and is available for use. With a webcam attached to the workstation, the additional image capturing features are available within AR | Customer file, IC | Inventory File, and Service Tickets. Selecting the camera icon will allow you to test the configuration of the camera.
Use Time Server
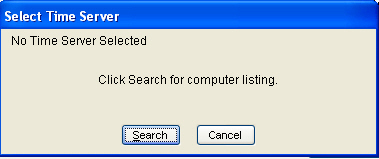
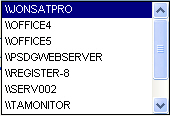
Normally, changing the Windows system clock will change the times accordingly in TransActPOS. If you designate a workstation to serve as the system clock, it doesn't matter what you set the Windows clock at, it will automatically update according to the time specified on the defined workstation. Search for and select anyone of the defined workstations. This will automatically sync this workstation's clock to the selected workstation's clock. This will make sure that the workstation's time matches the "server's time." Again, the "server" can be any other workstation. See this video for more information.
Disable Auto NumLock
The Num-Lock key on the keyboard is disabled, leaving the numeric keypad permanently in its NumLock condition. This should be set especially when using a laptop computer.
Internet Access
Internet access is available from this workstation.
Display Map Button
Flag to add Map button to Customer file.
Internet Credit Card
This allows the use of credit cards on the internet. If the Internet Access checkbox is unchecked, this option will be grayed out.
Hide Time Clock
The Time Clock button on the TransActPOS Main Menu is disable which will then not allow logging in and out from this workstation.
Show Item Image
Item images, when they are available, will be displayed on the screen at the appropriate times.
Foreground Memory / Background Memory
Not currently assigned.
PartSmart Interface
The PartSmart Interface is available from this workstation.
ProQuest Interface
The ProQuest Interface is available from this workstation.
PQ Client ID
The ProQuest Interface ID.
Customer Display Pole
Customer Display Pole is attached to this workstation. If selected, this will allow the configuration of a Display Pole which provides the customer with sales information during the transaction and messages during the idle time between transactions. Check out Logic Controls Display Pole Installation for more details.
OPOS Bed Scanner/Scale
OPOS Bed Scanner/Scale is available at this workstation.
Touch Screen Interface
A touch screen interface is available at this workstation.
Programmable Keyboard
A programmable keyboard is available at this workstation.
Extended Display
Notes for Video within the Extended Display Option is located here: Extended Display Setup Requirements
|
An extended display screen is attached to this workstation. The Extended Display option requires a second monitor to be attached to the workstation. The intent of the Extended Display is to present to the customer similar information that can be displayed on a "Display Pole" but in a larger format. The Extended Screen capabilities are dependent upon Microsoft Windows XP multiple monitor option. Consult your hardware vendor to enable this functionality. Workstations will require an additional monitor and video adapter.
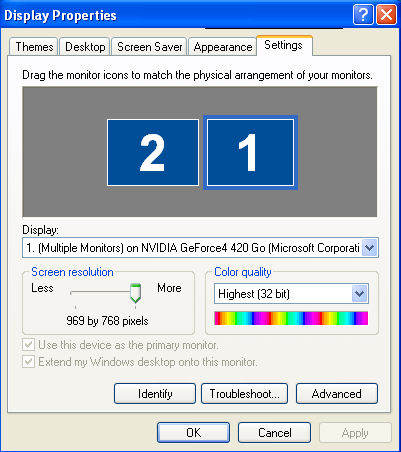
Below is a snap shot of the entire expanded desktop which is available from within Microsoft Windows.
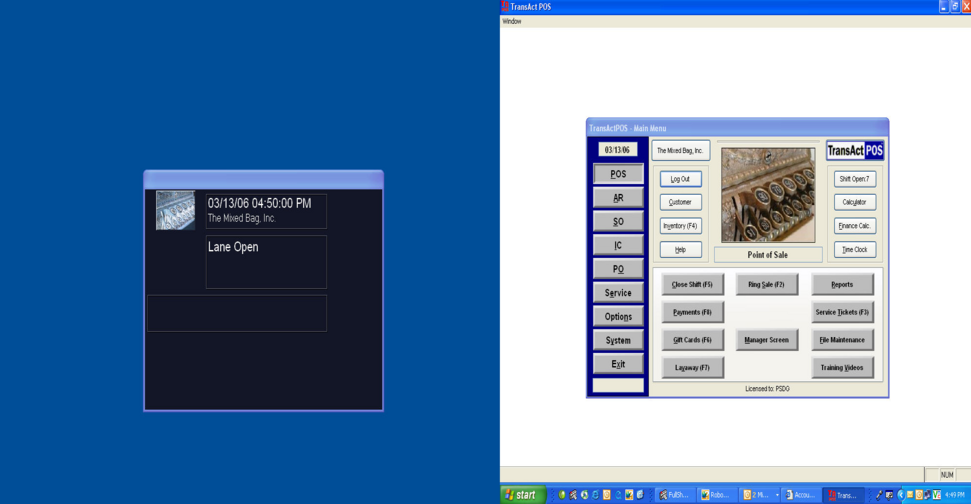
Once the Extended Display option is selected, the system will present the TransActPOS Extended Display screen on the desktop.
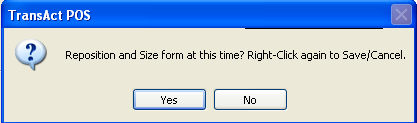
To reposition the screen, right-click on the extended screen, and select "Yes" to the Reposition and Size form question. Next, reposition the screen to the desired position, typically on the extended desktop viewed by the customer. Once the extended screen has been repositioned, save the position by right clicking on the screen and selecting "Save".
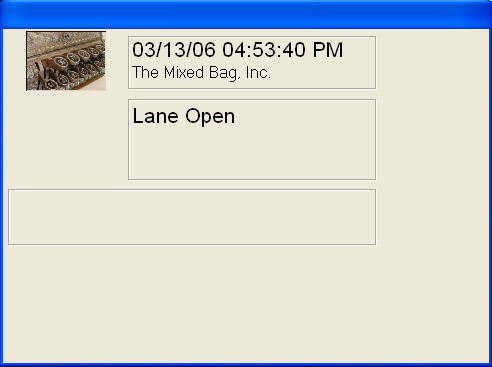
Information presented to the customer at the time of sale is below.
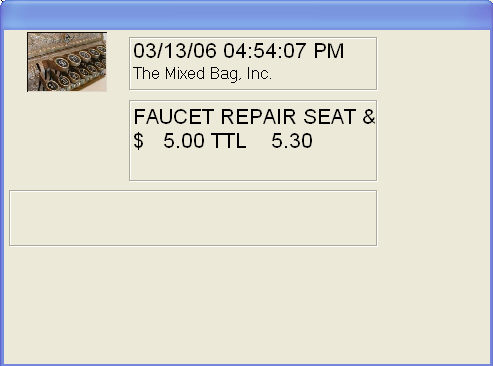
At the end of the sale, a summary of the transaction is presented.
RFID Security
Uses RFID Security Card. More information to come.
Card Reader
Credit card reader is available at this workstation.
Signature Pad
A signature pad is available at this workstation. Select the appropriate signature pad from the pick list. After the Topaz Electronic Signature pad is installed, the workstation needs to be configured before it can recognize the unit. Simply select the Topaz HSB port and select the quality of the signature: Good, Better, Best.
Get Rental Signature
This setting allows you to get a digital signature for Rental Pickup that will appear on the printed Rental Contract.
Test Signature Pad
The test signature pad allows the user to confirm proper functionality of the signature pad. Note: Follow the instructions for installation of the signature with the signature pad UNPLUGGED. Then make sure to plug in the signature pad after the installation is complete.
Cash Drawer
Note about APG cash drawers:
Correctly selected cash drawer kick cables are required for proper operation of the cash drawer. The following APG cash drawer and printer manufacturer combinations assure that your printer/drawer combination will work appropriately.
 |
If a Cash Drawer is attached to the workstation, select the type of communications to properly configure the drawer.
-
None : This is typically done for workstations that are used for non point-of-sale functions such as the inventory receiving workstation.
-
Printer : The printer style of attachment indicates that the cash drawer is physically attached to the cash drawer via a communications cable. In this configuration, the actual printed form contains a control character to open the cash drawer. Typically this is a "Control A" contained within a field of the invoice form. (Note: The font of the control character field should be a control font from the attached receipt printer.)
-
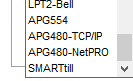
If you are using an APG IP Drawer, select either APG480-TCP/IP or APG480-NetPro and then enter the IP address to the right of the smarttill button.
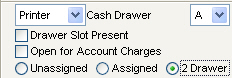
Drawer Slot Present
If the cash drawer has slots in the front for inserting checks, select this option to reduce the amount of times the drawer is opened.2 Drawer Setup
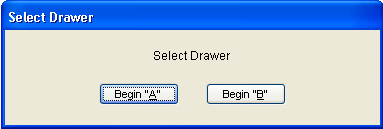 The 2 Drawer Option will assign a use to a cash drawer when a shift is created. During the shift, only the assigned user can open the drawer and make transactions at the register. Since the system can support two cash drawers, only two users can be assigned to a workstation. During "Close Shift", the system will ask which drawer needs to be closed and will allow the user to continue onto the reconciliation screen as usual. Each cash drawer will be closed independently. Each drawer will have its own Z Number.Go to 2 Drawer Setup within Equipment Installation Notes for information regarding physical setup of the drawers.Go to Shift Management for more information regarding processing shifts.The following provides an outline for setting up and understanding 2 Drawer workstations.1) Confirm that the current shift is closed. If open, close and reconcile the shift.2) Confirm that Fast Access is turned off in System > Company Setup > POS Information 23) Within System > Workstation > Cash Drawer, select the "2 Drawer" option.4) Place the cash drawers and connect the Drawer A / Drawer B cables.5) Begin a Shift and select the appropriate drawer when prompted.
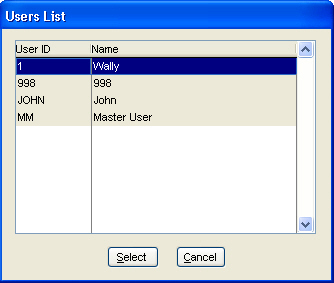 6) When prompted, assign the appropriate user to the cash drawer.
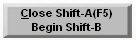 7) Upon return to the main screen, the Begin Shift / Close Shift button will change according to the current shift status. In this example, an additional shift could be opened on the B Drawer.
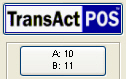 8) The shift status button in the top right of the main menu will indicate the current Z number of the corresponding shifts.
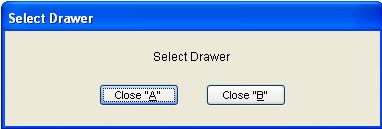 9) During the Close Shift process, the system will prompt the user to select the appropriate drawer to close.
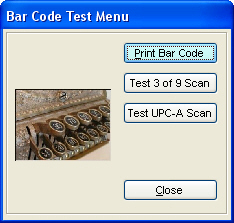
Open for Account Charges
Open cash drawer on account charges.Unassigned/Assigned
The Cash Drawer is assigned or not assigned to a specific personDocument Scanner Attached
A scanning device is attached to this workstation. TransActPOS is capable of scanning delivery tickets and attaching the image to an existing invoice. The scanner must be compliant with TWAIN drivers and be tested by the TransActPOS testing staff before support can be provided. Currently the Epson V100 Flatbed scanner and the BizCardRader 600C are compliant units. The V100 will provide the user with up to 8.5" x 11" scanning area while the C600 is utilized within a 4" x 6" scanning area.No Auto Scan on Invoicing
The scanning device does not have an auto scan feature.Symbol 1504 Port
The Symbol 1504 device is defined for one of the USB ports for this workstation.Clear Open Inv Default "No"
This will clear the open invoice default of no.Test Bar Code Reader
This option allows the user to test the bar code capabilities of the current workstation. Print Bar CodePrints a sample 3 of 9 and UPC-A barcode and the expected results.Test 3 of 9 Scan
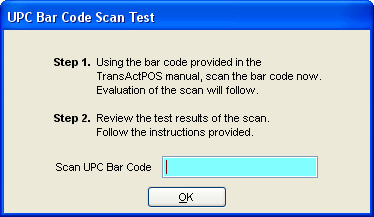 Test UPC-A Scan
 Scanner Speed
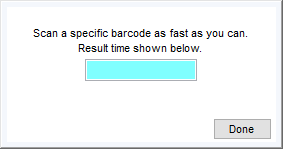
Configure Door Counter
Configure Door Counter settings (Additional module required)
After configuring your Watcher server to recognize the TransActPOS system, enter the assigned port number for the camera viewing the current workstation.